
An Interest In:
Web News this Week
- April 20, 2024
- April 19, 2024
- April 18, 2024
- April 17, 2024
- April 16, 2024
- April 15, 2024
- April 14, 2024
Some of Our Sources
- BoingBoing
- Simplebits
- Team Treehouse
- The Logo Smith
- Smashing Magazine
- Fudge Graphics
- Reencoded
- Android Headlines
- Dev To
- TechPowerUp
Help Webnuz
Referal links:
Spring it on! A complete guide to React Spring.
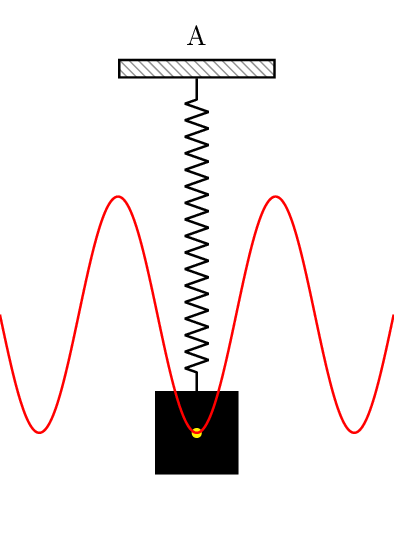
Hey, are you the one who's keen on discovering new possibilities with Hooke's Law? Remember the following image which tells us how elasticity works?

Well, I'm no a Physics professor to introduce you to the world of how springs and hooks work but I can certainly show you how you can achieve the same level of flexiblity on a React-based application through a very popular library called React Spring.

What is React Spring?
React Spring is a spring-physics based animation library which gives all the necessary tools to make simple yet powerful animations and interactions via the different interpolations and transitions provided to us.
So yes, you get all the easings and smoothness you would like for your components or elements.
Understanding the spring
Before we start coding let's take a moment to appreciate Physics (I loved that subject ). The term 'spring' is heavily involved with this library.
Just like we have the following different forces applied to a spring attached to a certain point 'A':
- Force of gravity.
- Acceleration of gravity.
- The spring force.
And more, in the same fashion we describe a spring in React Spring library as something which:
does NOT have a defined curve or a set duration.
Hence all the animations are done in terms of time and curves. This is where React Spring comes into play. Typically, we would have normal @keyframes animations in CSS which basically deals with time-based animation. Here, due to the nature-inspired easings, the animations feel more natural.
What we'll be making?
First, we'll make this basic transition to understand how things work:

Let's spring it on!
Step 1: Installation
After you've created a new React project, open up your terminal window and run the following command:
npm install react-springThis should install all the necessary files related to the library.
Step 2: The Toggle Component
Create a new file under the src/ folder of your project called Toggle.jsx.
Start with the usual stuff like exporting the component and returning a container div which has two children; first, the <h1> heading called "Hello" and next a <button> "Toggle".
Nothing fancy here. So, just add the 'fancy'. We'll be using the useState Hook in order to handle the state of our toggle. Start by importing it and giving it the isToggled state variable. The initial value of the state should be set to false as we don't want the toggle state to show at first.
const [isToggled, setIsToggled] = useState(false);Next, to start using React Spring, we need to import the useSpring hook. This turns a normal value of an element into an animated-value.
Let's name our animation as fade and inside the useSpring hook object we'll define all the animations we need. As you can see in the demo above, when the toggle button is clicked, the text changes:
- Its color from black to green.
- Its font size from small to big.
- Its position.
As you can see in the documentation, the useSpring hook takes in various properties just like a normal CSS code would take. But here we have a React Hook also, hence we pass the color, transform, and fontSize properties (notice the change in syntax when compared to CSS!) with the isToggled variable.
So, if the toggle has not changed its state, then the color would be #000 else when it does change (when the button is pressed), we set it to green.
The same goes for the other two properties we want to animate:
const fade = useSpring({ color: isToggled ? '#000' : 'green', transform: isToggled ? 'translate3d(0, 15px, 0)' : 'translate3d(0, 15px, 0)', fontSize: isToggled ? '2rem' : '3rem', });Okay, but now we haven't written the <button> functionality! Let's write it. We add an onClick event which passes in the setIsToggled Hook function whose job is to simply change the boolean value of isToggled variable.
<button onClick={() => setIsToggled(!isToggled)}>Toggle</button>For the final part, we use the animated prop provided by the library (make sure to import it). We add this prop in whichever element we want to animate. Here, on clicking the "Toggle" button we want to animate the heading so, we change the tag from <h1> to <animated.h1>.
Step 3: Add the Toggle Component
At last, simply go back to the App.js file and return the newly created component. You can also add some styling if you like.
function App() { return <Toggle />}As soon as you do this, you can play with the newly created spring animation! Notice that you didnt have to care about the easing :)
Take a step further
How about we move ahead and make this?

Looks exciting right? It's somewhat complex though, Here's what we need to do:
We'll write the code inside App.js itself. Begin by importing the library.
import { useSpring, animated } from 'react-spring';Inside the return() method, we have a single <animated.div /> which takes in two React's mouse synthetic events: onMouseMove and onMouseLeave for the actions we need to perform. These take in the x and y coordinates inside the current viewport/container.
return ( <animated.div onMouseMove={({ clientX: x, clientY: y }) => set({ xys: calcXY(x, y) })} onMouseLeave={() => set({ xys: [0, 0, 1] })} style={{ transform: props.xys.interpolate(perspective) }} /> );Here, we pass in the clientX and clientY to be calculated by the calcXY() function.
The calcXY is a simple function which takes x and y as its arguments and uses DOM's Window interface to get respective width and height.
const calcXY = (x, y) => [ -(y - window.innerHeight / 2) / 15, (x - window.innerWidth / 2) / 15, 1.0,];To set the value of xys as desired, we make a new global constant and use the perspective(), rotateX(), rotateY() and scale() properties.
const perspective = (x, y, s) => `perspective(500px) rotateX(${x}deg) rotateY(${y}deg) scale(${s})`;Notice the use of JavaScript's template literals to dynamically change the corresponding values. But by just declaring the new perspective constant, it won't work. We need to use it inside the style attribute of the <animated.div /> tag as follows:
style={{ transform: props.xys.interpolate(perspective) }}We pass the perspective inside the interpolate() function. As per the docs:
The interpolate function either takes a function or a an object which forms a range.
Interpolations can also form chains which allows you to route one calculation into another or reuse them.
Now it's time for some physics stuff (again!). Inside the useSpring() we first pass in the default xys value (which simply translates to the X, Y, and the Z coordinates in three dimensions) and then using the config property, we can manually define how much mass, tension and friction an element can have!
Exciting right? All of this is possible thanks to React Spring's Common API. You can view all the examples and an interactive demo on their website.
As for the styling, it can be achieved quite easily with CSS:
.card { width: 30rem; height: 30rem; border-radius: 15px; background-image: url(https://images.pexels.com/photos/4870974/pexels-photo-4870974.jpeg?auto=compress&cs=tinysrgb&dpr=2&h=750&w=1260); background-size: cover; background-position: center center; box-shadow: 0px 10px 30px -5px rgba(0, 0, 0, 0.3); transition: box-shadow 0.5s;}.card:hover { box-shadow: 0px 30px 100px -10px rgba(0, 0, 0, 0.4);}Here's our entire spring code:
const calcXY = (x, y) => [ -(y - window.innerHeight / 2) / 15, (x - window.innerWidth / 2) / 15, 1.0,];const perspective = (x, y, s) => `perspective(500px) rotateX(${x}deg) rotateY(${y}deg) scale(${s})`;function App() { const [props, set] = useSpring(() => ({ xys: [0, 0, 0.5], config: { mass: 5, tension: 200, friction: 100 }, })); return ( <animated.div className='card' onMouseMove={({ clientX: x, clientY: y }) => set({ xys: calcXY(x, y) })} onMouseLeave={() => set({ xys: [0, 0, 1] })} style={{ transform: props.xys.interpolate(perspective) }} /> );}I hope this cleared your basic understanding of how you can animate your components in React Spring, there are tonnes of other possibilities with this library. Check out all the examples here.
Thanks for reading, I appreciate it! Have a good day. ()
Your IDE may be in dark mode but are your Windows OS and related apps late-night friendly too? Learn more here: https://t.co/ww6fY8HUju
Microsoft Developer UK (@msdevUK) September 28, 2020
Image source: https://t.co/cB3ntpgxIq#DevHumour #DarkMode #Developer pic.twitter.com/Xz4Y4FAlI6
Subscribe to my weekly developer newsletter
PS: From this year, I've decided to write here on DEV Community. Previously, I wrote on Medium. If anyone wants to take a look at my articles, here's my Medium profile.
Original Link: https://dev.to/vaibhavkhulbe/spring-it-on-a-complete-guide-to-react-spring-1om9
Dev To
More About this Source Visit Dev To