
An Interest In:
Web News this Week
- March 20, 2024
- March 19, 2024
- March 18, 2024
- March 17, 2024
- March 16, 2024
- March 15, 2024
- March 14, 2024
Some of Our Sources
- Web Designer Wall
- Pearsonified
- The Logo Smith
- Spoon Graphics
- Noupe
- Fudge Graphics
- Stylized Web
- CSS Tricks
- Spyre Studios
- Dev To
Help Webnuz
Referal links:
How To Contribute To Open-Source Projects As A Beginner
When I was learning to code, I wanted to make open-source contributions, but I had no idea where and how. Fast forward, I made my first open-source contributions to DEV, and I want to share the Git workflow required to make open-source contributions.
I want to mention that it is the workflow I am using. It is not the only one or the best one. Also, the article assumes basic Git knowledge. Moreover, I want to clarify a common misconception as well. Contributing to open source is not all about writing code. You can contribute by improving the documentation, by organizing stuff, by opening issues, or labeling pull requests.
As a general rule, before starting to contribute, you must read the code of conduct and the contribution guidelines. A code of conduct is a document that establishes expectations for behavior for your project's participants. Adopting, and enforcing, a code of conduct can help create a positive social atmosphere for your community. (Source: Your Open Source Guide) A contribution guideline is a document that explains the workflow you have to respect to make contributions. That includes branch naming conventions, what you should include in a pull request, and more.
Thus, let us see what the process of contributing to open-source projects is.
Find a project
The most time-consuming task is to find a project where you feel confident enough to make changes. If you are yet to find a project, I recommend checking the first contributions webpage. On the web page, you can find various repositories, which you can filter by technologies. For instance, you can only search for applications written in JavaScript.
However, if you still struggle to find a repository, you can check my OSS Contribution repository. I created it a while ago to help people learn the workflow they use when they make changes to a bigger codebase.
Pick whatever repositories you wish, and let us move to the next step - forking!
Fork the project
After choosing a project, you need to fork the project. But what does "forking" mean? When you fork a project, you make a copy of the original project. That means you can make any changes you want to the forked repository, without affecting the original one.
How to fork a project? To fork a project, you need to go to the repository's main page and click on the fork button, on the right-hand side. Figure 1 illustrates what you should see.
Figure 1

Once you click the button, GitHub redirects you to your copy of the original repo.
But why not clone the repository directly to your machine? The reason is that you do not have access to push changes. Only people who have access to the project can make changes directly to it. Those might be people that created the project, or maintainers.
Figure 2

Figure 2 illustrates what happens if you clone the original repository and try to make changes directly to it. You run into an error because you do not have permission.
Therefore, you need to fork the project, which makes a copy of the original repository on your GitHub account. The forked version is the repository you are going to use.
Clone the project
After you fork the project, you have to clone the project on your machine to work on it. Go to the repository on your GitHub profile and click on the green button saying "Code".
Figure 3
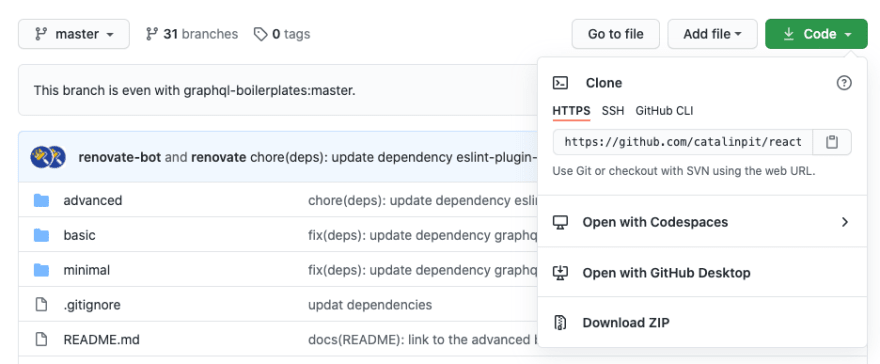
Figure 3 illustrates that. Then you need to copy the link, and run the following command on your machine:
git clone https://github.com/<profile_name>/<repo_name>.gitThe command copies the repository on your machine so you can make changes. Open the project in your favourite editor, and let us move on to the next step!
Create a branch
Before making and pushing any changes, you have to create a branch. The branch you create holds all your changes. Thus, everyone working on the project can work independently, and without getting into conflict with each other.
When it comes to naming your branch, all open source projects have a naming convention. An example could be your_name/issue_fix. For instance, let us say I want to fix a broken article image. My branch would be something like catalinpit/fix_broken_article_image. Alternatively, you can use a branch name like issue-[issue number]. However, make sure you read the rules and guidelines from each project. Every project does it differently.
You create a branch by running the following Git command:
git checkout -b "branch_name"The above command creates a new branch with the name you specify and switches to the newly created branch. At this point, you can make any changes you want. Fast-forward, let us pretend you made all the necessary changes. What is the next step?
Make your changes
After creating the branch, you are ready to make changes to the project.
At this point, you can make code changes, update the documentation, organize the files, or anything else. Always remember that all contributions are important. Whether you add a new feature or fix errors in the documentation, both are important and valuable.
Now that you made the changes, we can move to the next steps - committing and pushing the changes!
Commit and push your changes
Congratulations! You made the changes, and now it is time to create a pull request. However, you still have to do a few things before opening a pull request.
First of all, run git status to see which files you modified. Once you see the files changed, and after you decide what you want to commit, run the following command:
git add . // it adds all filesORgit add file1 file2 file3 fileN // specifies what files are commitedI want to mention that you might have a bunch of files modified, or only one. Depending on what you want to push, you might use git add . or git add <your_files>. If you're going to add everything to the commit, use git add ..
The next step is to commit your changes. That is, to explain in a few words what you did. For instance, let us say you fix a broken URL. Thus, the commit command might look something like this:
git commit -m "Fixed the broken Home URL"Try always to use a meaningful commit message, but at the same time, do not go overboard. Now, the last step is to push your changes. To push your changes, run the following command:
git push -u origin <your-branch-name>After pushing your changes, you need to create a pull request so other people (or team members) can see what you did, and why.
Creating a pull request
Usually, after pushing your changes, you get a link you can click to open a pull request automatically.
If that does not happen, you can go to the repo and click on Compare & pull request. You can see an example in figure 4.
Figure 4

By clicking on Compare & pull request, a new window opens where you can enter a title and a description for your pull request. Figure 5 illustrates an example of a simple pull request.
Figure 5

Before submitting the pull request, make sure you adhere to the guidelines and rules of each project. Also, if you get comments, look at them objectively and do not take them personally.
After adding all the necessary information, click the button saying "Create Pull Request". Congratulations! You made your changes and opened a pull request.
Conclusion
The article explains the most straightforward workflow to make contributions to open source projects. I have used this workflow to make changes successfully to DEV To, which is open-source.
To recap:
- Fork the repository to your GitHub account.
- Clone the project on your machine.
- Create a branch before making changes.
- Make your changes.
- Commit and push your changes.
- Open a pull request.
If you enjoyed the article, consider sharing it so more people can benefit from it! Also, feel free to @ me on Twitter with your opinions.
If you like what I write, the chances are you would love what I email. Consider subscribing to my mailing list.
daily.dev delivers the best programming news every new tab. We will rank hundreds of qualified sources for you so that you can hack the future.
Original Link: https://dev.to/dailydotdev/how-to-contribute-to-open-source-projects-as-a-beginner-2h43
Dev To
More About this Source Visit Dev To