
An Interest In:
Web News this Week
- April 3, 2024
- April 2, 2024
- April 1, 2024
- March 31, 2024
- March 30, 2024
- March 29, 2024
- March 28, 2024
Some of Our Sources
- Technology Review
- Pearsonified
- Smashing Apps
- Abduzeedo
- TutsPlus - Design
- Vandelay Design
- Creative Curio
- Crazy Leaf Design
- Reencoded
- Daily Now
Help Webnuz
Referal links:
Hands-On with VSCode & "Dev Containers"
Today I wanted to give Visual Studio Code a try for the first time. Even though I still haven't found my way around it, I discovered an extension that could really be a game-changer for my workflow! Thought to share it with you.
The "Remote - Containers" Extension
In simple terms, this extension allows you to use a Docker container as your development environment.
Everything will be in it: your code, SDKs, dependencies, OS packages.. everything!
I've been looking forward to something like this for a long time, and I have to say, this VSCode extension is very well thought out.
There are several advantages of using "dev containers"...
- Compatibility: your code runs in the exact same environment from your development machine all the way to production
- Automation & Speed: the creation of a new dev environment is fully automated. You can restore a broken environment (or onboard a new developer) in seconds
- PR Review: you can check out the code from a PR in a new, isolated container without messing with your work
- It's CLEAN! I have tons of small projects on my laptop that I can't even find anymore. With dev containers I could: checkout a project -> build a dev container -> develop and commit my changes -> destroy it immediately
How I Created My First Dev Container
I'm now going to show you step by step how I created my first "dev container" today.
I grabbed one of the projects I'll be collaborating with this Hacktoberfest. It's a Django application, so this will require our development environment to run with Python3.
First, install the "Remote - Containers" extension from the VSCode marketplace

Second, press F1 to open VSCode menu and search for "Add Development Container Configuration File".

Next, you need to tell VSCode how you would like to create the configuration file. VSCode provides predefined configuration files for the most popular languages so I found one for Python3 very easily


You'll then be asked to choose the Python minor version to use, and if you want to install NodeJS in the container (not sure why , but I don't care at this point).
VSCode should have created a new folder for you called .devcontainer and generated two files:
- a
Dockerfile: which is the container definition for your new dev environment - a
devcontainer.jsonfile: a configuration file you can use to further customize your development container build process
Customize the .devcontainer/Dockerfile
We first look at the Dockerfile and it should look something like this:
# See here for image contents: https://github.com/microsoft/vscode-dev-containers/tree/v0.140.1/containers/python-3/.devcontainer/base.Dockerfile# [Choice] Python version: 3, 3.8, 3.7, 3.6ARG VARIANT="3"FROM mcr.microsoft.com/vscode/devcontainers/python:0-${VARIANT}# [Option] Install Node.jsARG INSTALL_NODE="true"ARG NODE_VERSION="lts/*"RUN if [ "${INSTALL_NODE}" = "true" ]; then su vscode -c "source /usr/local/share/nvm/nvm.sh && nvm install ${NODE_VERSION} 2>&1"; fi# [Optional] If your pip requirements rarely change, uncomment this section to add them to the image.# COPY requirements.txt /tmp/pip-tmp/# RUN pip3 --disable-pip-version-check --no-cache-dir install -r /tmp/pip-tmp/requirements.txt \# && rm -rf /tmp/pip-tmp# [Optional] Uncomment this section to install additional OS packages.# RUN apt-get update && export DEBIAN_FRONTEND=noninteractive \# && apt-get -y install --no-install-recommends <your-package-list-here># [Optional] Uncomment this line to install global node packages.# RUN su vscode -c "source /usr/local/share/nvm/nvm.sh && npm install -g <your-package-here>" 2>&1What we want to do here, is making sure this container image has everything we need to run our project. In this case, I need to install the required Pip packages listed in the requirements.txt file.
The generated Dockerfile is already suggesting how to do it, I simply have to uncomment a few lines. This is going to be my final Dockerfile:
# [Choice] Python version: 3, 3.8, 3.7, 3.6ARG VARIANT="3"FROM mcr.microsoft.com/vscode/devcontainers/python:0-${VARIANT}# [Option] Install Node.jsARG INSTALL_NODE="true"ARG NODE_VERSION="lts/*"RUN if [ "${INSTALL_NODE}" = "true" ]; then su vscode -c "source /usr/local/share/nvm/nvm.sh && nvm install ${NODE_VERSION} 2>&1"; fiCOPY requirements.txt /tmp/pip-tmp/RUN pip3 --disable-pip-version-check --no-cache-dir install -r /tmp/pip-tmp/requirements.txt \ && rm -rf /tmp/pip-tmp Configure .devcontainer/devcontainer.json
The second file generated by VSCode is devcontainer.json. This contains additional information for VSCode to create our development container. Here is how I set it up.
The first section is defining how I want to build my container. I left everything with its default values
"name": "Python 3", "build": { "dockerfile": "Dockerfile", "context": "..", "args": { // Update 'VARIANT' to pick a Python version: 3, 3.6, 3.7, 3.8 "VARIANT": "3.8", // Options "INSTALL_NODE": "false", "NODE_VERSION": "lts/*" } },Since my Django application is going to run at http://127.0.0.1:8000, I need to forward port 8000 from the host machine into the container, so I uncommented and edited the line below.
// Use 'forwardPorts' to make a list of ports inside the container available locally. "forwardPorts": [8000],I suggest you take the time to read through the file to find out about all the available options, but here is what mine looks like after the changes:
// For format details, see https://aka.ms/devcontainer.json. For config options, see the README at:// https://github.com/microsoft/vscode-dev-containers/tree/v0.140.1/containers/python-3{ "name": "Python 3", "build": { "dockerfile": "Dockerfile", "context": "..", "args": { // Update 'VARIANT' to pick a Python version: 3, 3.6, 3.7, 3.8 "VARIANT": "3.8", // Options "INSTALL_NODE": "false", "NODE_VERSION": "lts/*" } }, // Set *default* container specific settings.json values on container create. "settings": { "terminal.integrated.shell.linux": "/bin/bash", "python.pythonPath": "/usr/local/bin/python", "python.linting.enabled": true, "python.linting.pylintEnabled": true, "python.formatting.autopep8Path": "/usr/local/py-utils/bin/autopep8", "python.formatting.blackPath": "/usr/local/py-utils/bin/black", "python.formatting.yapfPath": "/usr/local/py-utils/bin/yapf", "python.linting.banditPath": "/usr/local/py-utils/bin/bandit", "python.linting.flake8Path": "/usr/local/py-utils/bin/flake8", "python.linting.mypyPath": "/usr/local/py-utils/bin/mypy", "python.linting.pycodestylePath": "/usr/local/py-utils/bin/pycodestyle", "python.linting.pydocstylePath": "/usr/local/py-utils/bin/pydocstyle", "python.linting.pylintPath": "/usr/local/py-utils/bin/pylint" }, // Add the IDs of extensions you want installed when the container is created. "extensions": [ "ms-python.python" ], // Use 'forwardPorts' to make a list of ports inside the container available locally. "forwardPorts": [8000], // Use 'postCreateCommand' to run commands after the container is created. // "postCreateCommand": "pip3 install --user -r requirements.txt", // Uncomment to connect as a non-root user. See https://aka.ms/vscode-remote/containers/non-root. // "remoteUser": "vscode"}Opening The Project as a Dev Container
Now that everything is ready, we press F1 again and search for the "Reopen in Container" option.
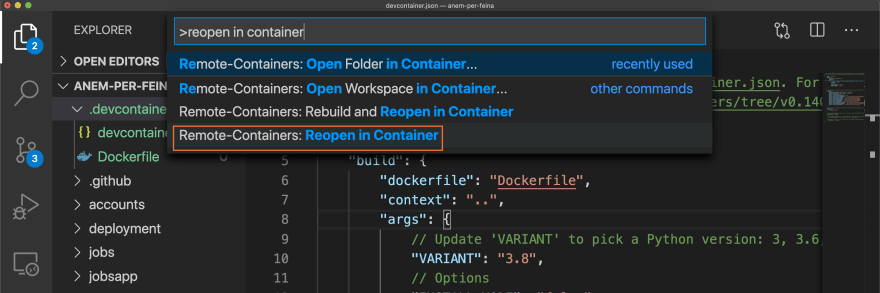
VSCode will now create a new development container from the Dockerfile and devcontainer.json you created.
Project files in your workspace are now synchronized with the container and VSCode will edit them directly in it.
You'll notice the green strip at the bottom left of the screen indicating VSCode is not attached to our Python 3 dev container.

And to test our brand new environment, let's run the application with python manage.py runserver

Yay! The application is now running on port 8000 and forwarded correctly through localhost!

This was my experience with Dev Containers today...
I'm impressed with this VSCode extension so far and I'm looking forward to learning more about it by using it every day.
Hope this intro will inspire someone else to get started with Dev Containers in VSCode.
Thank you for reading through the end!
Original Link: https://dev.to/mcastellin/hands-on-with-vscode-dev-containers-33bf
Dev To
More About this Source Visit Dev To