
Some of Our Sources
- Techcrunch
- Technology Review
- Smashing Magazine
- Abduzeedo
- Naldz Graphics
- FanExtra - PSD
- Crazy Leaf Design
- Fudge Graphics
- CSS Globe
- Freelance Switch
Help Webnuz
Referal links:
How to make your MongoDB container more secure?
Start it with docker
The most simple way to get MongoDB instance in your machine is using docker to run mongodb image on docker hub as below:
docker run --name mongodb -p 27017:27017 mongoBy specifying -p 27017:27017, you can access to it with the connection string such as mongodb://localhost:27017 or mongodb://0.0.0.0:27017, as same as installed MongoDB server.
This database instance is only available locally. In the case you want to access to it from another computer, you have to overwrite the default config file with a custom MongoDB configuration file.
Allow to connect from outside
The command looks like below:
docker run --name mongodb -p 27017:27017 -v /path/to/custom/mongod.conf:/etc/mongod.conf mongoIn which, the mongod.conf file has been customized to allow to connect from outside:
# mongod.conf# other settings# network interfacesnet: port: 27017 # bindIp: 127.0.0.1 # this is default setting bindIp: 0.0.0.0 # this is what changed# other settingsBut since now your database is public and no longer secure.
In my experience, the first thing we should do in this situation is change the default port.
Change default port
Let's map it to another free port:
docker run --name mongodb -p 27117:27017 -v /path/to/custom/mongod.conf:/etc/mongod.conf mongoSo that the connection string will become mongodb://IP_ADDRESS:27117, not default port.
As you know, there are many bots those automatically scan for public databases on the internet. They try to check the popular default ports, such as 3306 (mysql), 5432 (posgres), 6379 (redis), 27017 (mongo), etc. Changing to a strange port may help you in almost cases.
However, that's not enough.
Enable authentication
By default MongoDB will start with authentication disabled. We should enable it with a little bit change to entrypoint. In order to make things easier management, we create a docker-compose.yaml file as below:
version: "3"services: mongodb: image: mongo container_name: mongodb ports: - 27117:27017 volumes: - ./mongod.conf:/etc/mongod.conf entrypoint: ["mongod", "--auth", "--config", "/etc/mongod.conf"]In the above .yaml file, we added our custom entrypoint to run mongodb with --auth flag. Now when we run it with docker-compose, we should get MongoDB within a container named mongodb similar to the docker run command earlier.

And the following is the most important parts of this article...
Create users with specific permissions
Until now, our MongoDB instance does not have any user yet. We will get into its container and create a few ones.
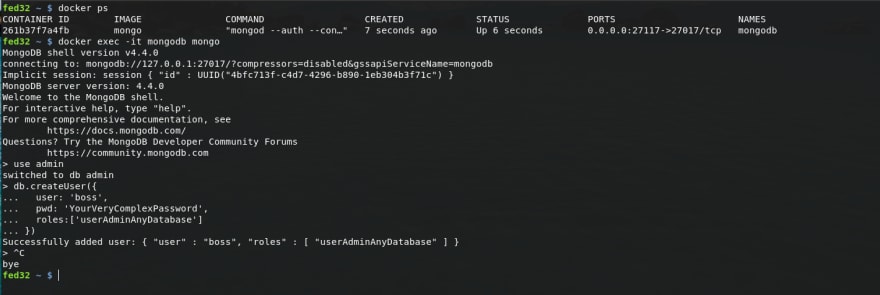
Firstly, let's get the interactive mongo shell by running:
docker exec -it mongodb mongoWith opening mongo shell, we can now run the commands to switch to admin database and create a user named boss with admin permission on any database:
use admindb.createUser({ user: 'boss', pwd: 'YourVeryComplexPassword', roles:['userAdminAnyDatabase']})Done, press Ctrl + C to exit the shell and leave that session.
Note that, at this time, we had already a MongoDB instance run with authentication mode enabled, and an admin user. The connection string for boss user now looks like:
mongodb://boss:YourVeryComplexPassword@IP_ADDR:27117
But that's power user, don't use it for regular applications. Instead, we should create more users for different purposes.
To create more user or database, we have to come back to mongo shell as boss user:
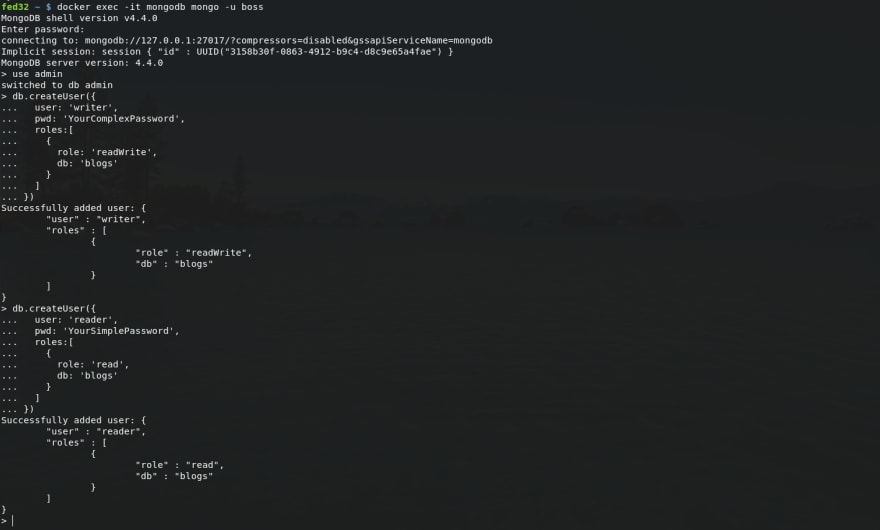
docker exec -it mongodb mongo -u bossEnter password when asked and you should see something like:

Assume that we have a plan to use a database blogs to store our great blog posts. We should add a user named writer which can write to this database, and a user named reader which can read only.
Do that as below:
# go to database `admin`use admin# add writerdb.createUser({ user: 'writer', pwd: 'YourComplexPassword', roles:[ { role: 'readWrite', db: 'blogs' } ]})# add readerdb.createUser({ user: 'reader', pwd: 'YourSimplePassword', roles:[ { role: 'read', db: 'blogs' } ]})Done, press Ctrl + C to exit the shell and leave that session again.
Now we have 2 new users, one for read/write and other for read only action. Their connection strings are:
mongodb://writer:YourComplexPassword@IP_ADDR:27117mongodb://reader:YourSimplePassword@IP_ADDR:27117
With the apps or API endpoints those only load and show blog posts, we just need to use the connection string for reader. Otherwise, when we need to add more blog posts, we will connect to database as writer.
That's it. Enjoy playing with docker and MongoDB :)
Original Link: https://dev.to/ndaidong/how-to-make-your-mongodb-container-more-secure-1646
Dev To
More About this Source Visit Dev To