
An Interest In:
Web News this Week
- April 3, 2024
- April 2, 2024
- April 1, 2024
- March 31, 2024
- March 30, 2024
- March 29, 2024
- March 28, 2024
Some of Our Sources
- Engadget
- Web Designer Wall
- Smashing Magazine
- Abduzeedo
- TutsPlus - Design
- Vandelay Design
- Fudge Graphics
- CSS Globe
- CSS Tricks
- Hashedout
Help Webnuz
Referal links:
Beginner's guide to using MySQL database in a Node.js app
In my previous blogs, we have learned how to create Ruby on Rails and Node.js/Express servers from scratch. In these examples, we have created(C), read(R), updated(U) or deleted(D) data stored in files in our servers.
While this method may have been enough to handle data for simple tutorial apps we have created, it is not an optimal way to manage data for apps in real life.
Imagine that you have created the next Amazon e-commerce platform. Millions of users will be accessing your app to sell and buy items at the same time.

Can you imagine having to read through the entire data file every time someone wants to buy an item? It would take forever and we would end up with lots of frustrated customers!
This is where the database comes in! It is specifically designed to efficiently store and retrieve data.
SQL(relational) and NoSQL(non-relational) are the two primary types of databases out there. This tutorial will focus on SQL database.
If you want to delve into the differences between SQL and NoSQL and their use cases, check out these resources. I have found them to be helpful!
What is SQL database?
As the name suggests, SQL database is written in SQL(Structured Query Language),a programming language used to design relational databases.
SQL database is known for requiring a predefined data schema, which is a collection of database objects such as data tables. Before we can work with data tables, we must define what columns(fields) it has and what type of data(integer, text & etc) this table will hold.
In order to store the data, the data must meet all the predefined requirements. As you can see, the strict rules of SQL database keeps data consistent across applications or database copies you will be working with.
SQL database is a relational database, a type of database that stores and provides access to data points that are related to one another(excerpt from Oracle).
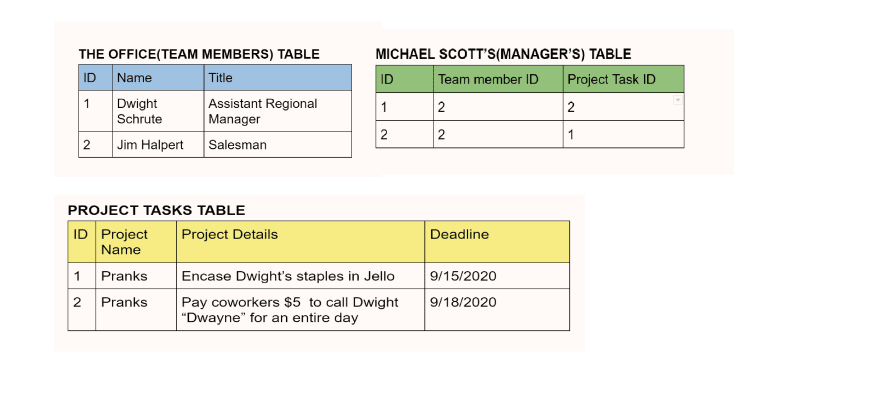
For example, let's say we are managing a database for a project management app for a team. Project management involves three factors: team members, project tasks, and a manager.

As you can see all of these factors are related to each other. Team members could have have multiple projects. A project could have multiple team members. The team members report to the manager who keeps track of who is working on what project tasks.
In SQL databases, a table is created for each factor(model). Team members table contains information specific to team members(id,name, and title). The project tasks table contains info specific to the tasks(id, project name, project details, and deadlines). Only the manager table keeps track of which team member(team member id) is working on which project(project id) and serves as the single source of truth. All of these tables are related to one another.
I created a table to help you visualize this concept!
There are many scenarios in which keeping track of the relationships could come in very handy.
For example, relational databases could be used to track inventories, process ecommerce transactions, manage huge amounts of mission-critical customer information, and much more. A relational database can be considered for any information need in which data points relate to each other and must be managed in a secure, rules-based, consistent way(excerpt from Oracle).
What are we building?
MySQL is one of the most popular SQL databases. This blog will explore how to use MySQL database with Node.js server.
By the end of this blog, you will be able to:
- create a MySQL database
- connect the database to Node.js server
- configure the server to create(C), retrieve(R), update(U), and delete(D) data in the database
- send the appropriate server response to the client
In the spirit of football season, we will be creating a CRUD app to manage quarterback rankings data for fantasy football! 
Before we get started...
Fantasy Football Data
We will be working with quarterback rankings data from FantasyData.
Click on the link and have it pulled up on a separate tab. We will referring to this later!
Background reading
After installing and setting up MySQL database, we will be building a Node.js server with Express framework.
We will breeze through a lot of the steps as detailed explanations of these steps have already been covered in my previous blogs:
-Beginner's guide to building a server with Express as Node.js framework
-Beginner's guide to building a Node.js server
Feel free to refer to these blogs if you need a deeper understanding of the steps covered in this tutorial.
GitHub Repo
Here is the GitHub repo of the server we will be building. Use this repo as a resource if you encounter any errors while following along.
Let's get started!
Installing MySQL
We will be installing the free version of MySQL Community Server and MySQL Workbench.
Installation steps for Windows and macOS are very similar and vary slightly. The major difference may be that in Windows, you can download the community server and workbench in one fell swoop. In macOS, you will have to download these separately.
I will only go over Windows installation directions to keep this blog as short as possible. But don't worry. There are tons of installation videos on line for mac users if you have trouble with installation.
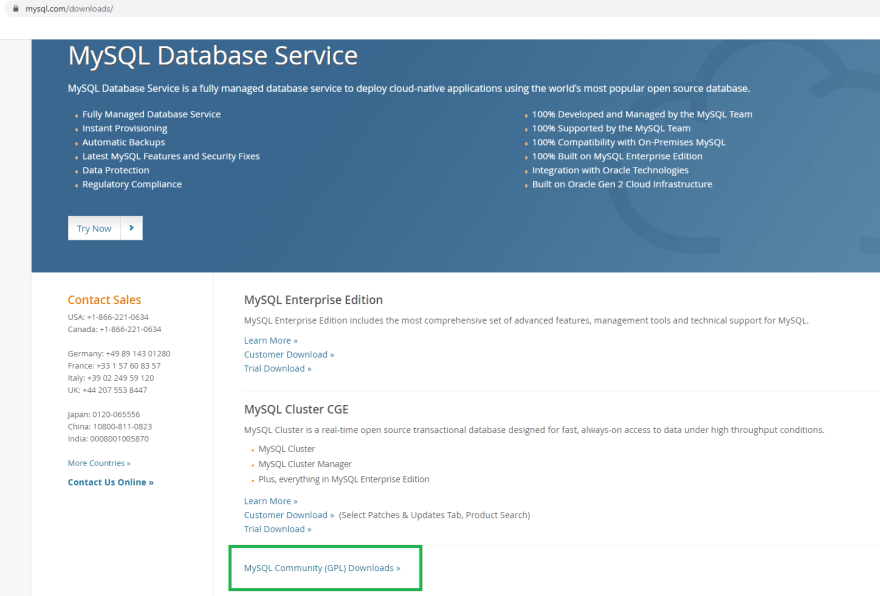
Step 1: Go to MySQL home page
Go to mysql.com. Click on Downloads option(green box).

Step 2: Select MySQL Community(GPL) Downloads
Scroll down and click on MySQL Community(GPL) Downloads option(green box).
Step 3: Click on MySQL Community Server(orange box)
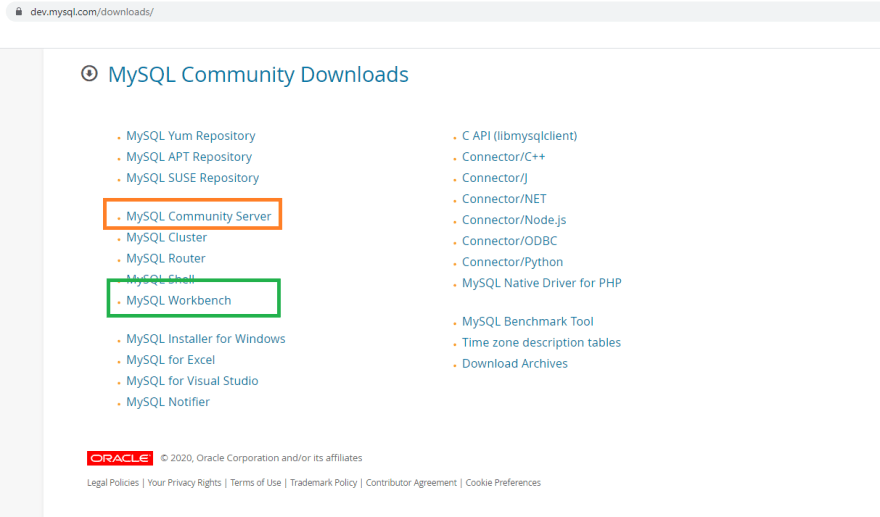
Reminder
If you are installing on Windows, clicking on MySQL Community Server will give you an option to download both the community server and the workbench.
macOS users will have to download MySQL Community Server(orange box) and MySQL Workbench(green box) separately.
Step 4: Select an operating system and go to Download Page(orange box)

Step 5: Select the very first download option(green box)

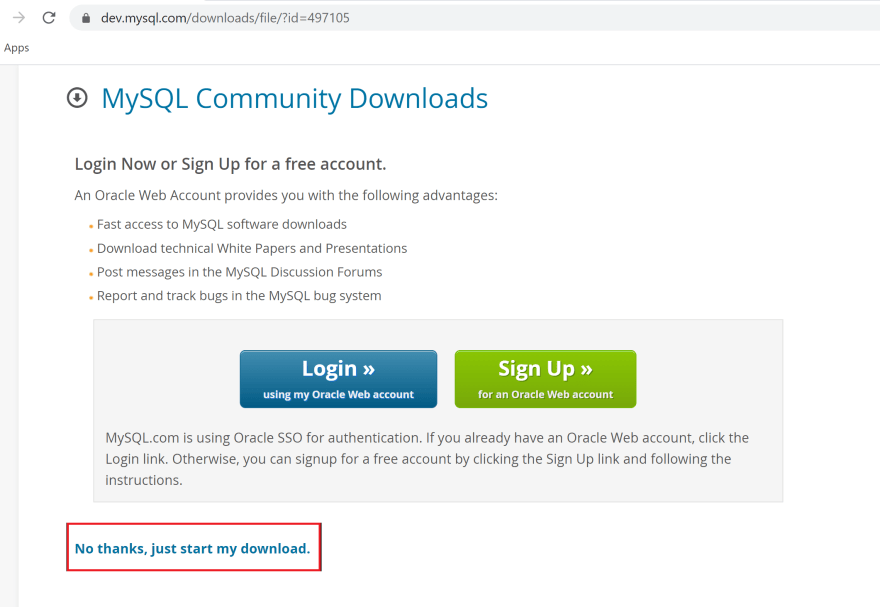
Step 6: Select No thanks, just start my download option(red box)
Step 7: Click on the download and start the installation process
Once MySQL has downloaded, click on the downloaded file and go through the installation process. Agree to the terms of software license agreement.
Step 8: Choose the Custom option at the bottom(green box) and click on Next

Step 9: Add MySQL Server and MySQL Workbench to Products/Features to be Installed list
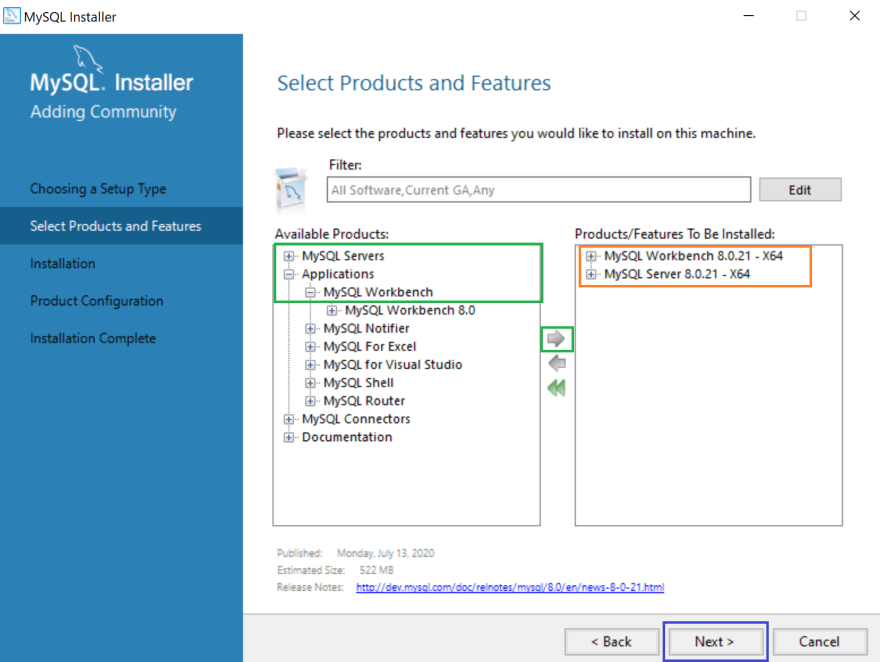
Look at the region highlighted with a green box.
Expand MySQL Servers option by clicking on the + sign to the left.
Then, expand MySQL Server and MySQL Server 8.0.
Select the server at the top of the list. Click on the right facing arrow(green box) to add MySQL Server to Products/Features To Be Installed list.
Once you finish this step, you should see that MySQL Community Server has been added to the list(orange box).
Go back to the region highlighted with a green box. Expand Applications, MySQL Workbench and MySQL Workbench 8.0.
Select the workbench at the top of the list and click on the right facing arrow. The workbench will be added to the Products/Features To Be Installed list(orange box).
Click on Next button.
Step 10: Click Execute button(green box) to install MySQL Community Server and MySQL Workbench

Step 11: Complete configuration
At this time, a MySQL installer window should pop up to guide you through configuration.
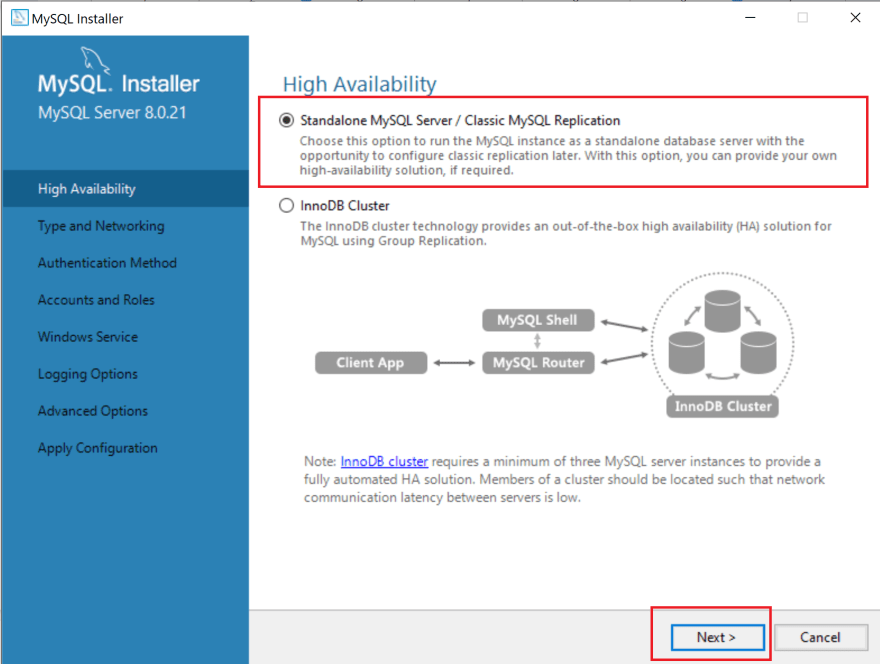
Select the Standalone MySQL Server/Classic MySQL Replication option and click on Next.
It should take you to the Type and Networking step. Leave the default values and click Next.
In the Authentication Method step, select the Use Legacy Authentication Method option and click Next.
In the Accounts and Roles step, enter the password you would like to use to gain access to MySQL database, save it somewhere safe, and click Next.
In the Windows Service step, select the Configure MySQL Server as a Windows Service option and click Next.
For Logging Options and Advance Options, leave the default settings and click Next.
In the Apply Configurations step, click on Execute.
Once configurations are completed, it should automatically start MySQL server for you.
NOTE:
For Windows users, installation of MySQL Community Server and MySQL Workbench are now complete. For mac users, you will need to go back to the downloads page and install the workbench separately.
Setting up MySQL Workbench
Workbench is a visual client for our database. It allows us to inspect and explore the database outside of our Node.js server. It is going to be your best friend while working with MySQL database because it is going to make debugging and developing a lot easier!
Step 1: Open MySQL workbench and connect to the database
You should see an icon with a dolphin on your desktop. Double click to open.

You should see a local instance already running(red box).
To connect to the database, double click on local instance. It will prompt you to enter the password you have provided during the installation steps.
You will see the following display.

Step 2: Create a new schema
Click on Schema option highlighted with a red box in the image above. You will see the following displayed on your screen.

Go to the upper left side of the workbench. Under the search bar, right click to see the drop down menu. Select Create Schema option(red box).

Name the schema fantasy_football(green box). Click Apply(red box).
It will prompt you to review the SQL script to be applied on the database. Click Apply(red box).

Check Execute SQL statements(red box) and click Finish(green box).

We have just created a fantasy football database we will use to create, retrieve, update, and delete quarterback ranking data!
Step 3: Create a data table
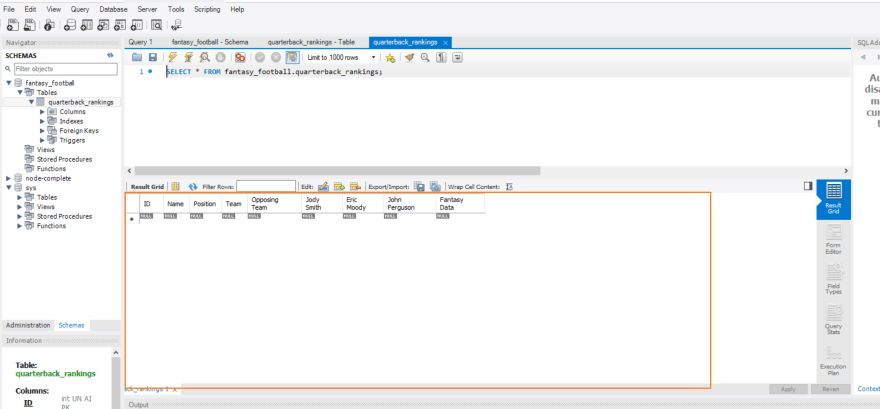
Let's create a data table for quarterback rankings and enter information about one quarterback.

In the navigator of your workbench, expand fantasy_football. You will see bunch of options presented to you. Right click on Tables(green box) and select Create Table option(red box).

Section highlighted with a orange box is where we will be specifying the name of our data table. Section highlighted with a green box is where we will be specifying column names and its data types.
Step 4: Configure data table
We will be working with quarterback ranking data from FantasyData. The snapshot of data is shared below but do pull it up on your browser so you can see the table clearly.
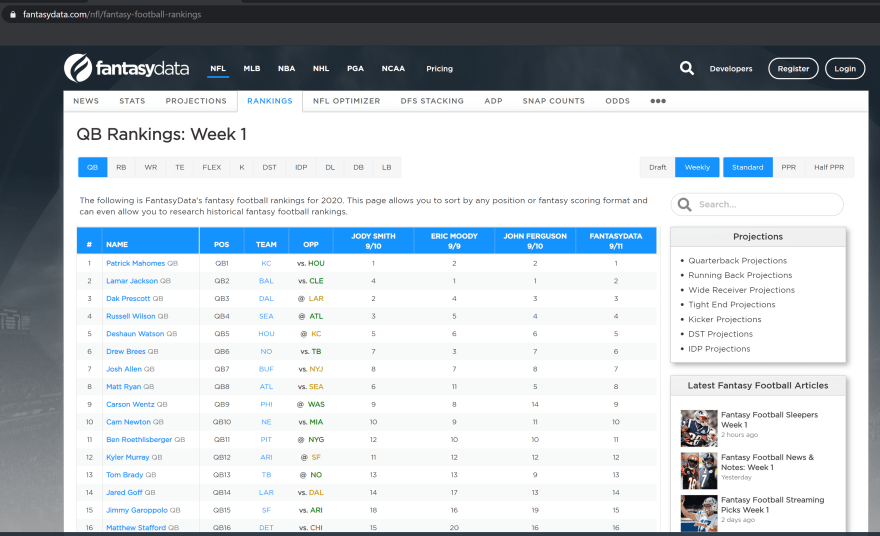
Let's pay attention to the columns highlighted in blue.
We have the quarterback's id(#), name, position(pos), team, and opposing team(opp). The next four columns show the three experts and FantasyData's rankings of the quarterbacks.
You can see that each row displays corresponding data and each column has different data types. For example, the column name will contain data that consists of characters. Column id(#) will contain data that consists of integers.
We will model our data table after the FantasyData's quarterback rankings table.
Let's get back to the MySQL Workbench.
The following image shows the final version of our data table.
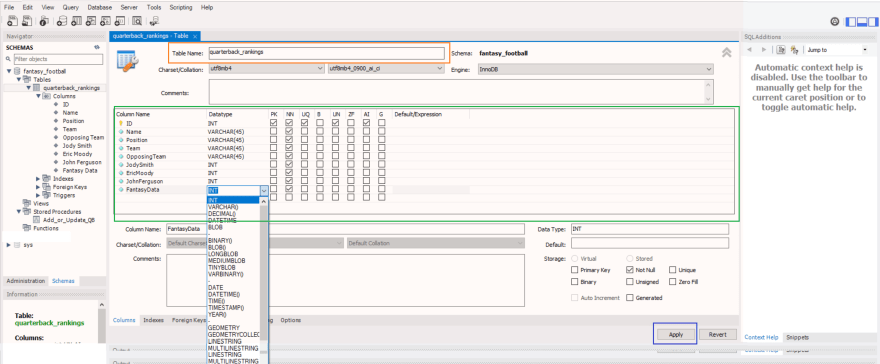
Change the Table Name to quarterback_rankings(orange box).
Look at the region highlighted with a green box. This is where we will be filling out the column names and its data types.
Double click under column name. It should now allow you to type in ID in the box. Enter the column names for Name, Position, Team, OpposingTeam, JodySmith, EricMoody, JohnFerguson, and FantasyData as shown in the image(Note that column names are PascalCased. Do not put any space between the words and capitalize the first letter).
To the right of Column Name column, you will see the Datatype column. Under Datatype column, click on the space below. It will give you a drop down menu of data types you can choose from. Fill out the data type as specified below.
Columns ID, JodySmith, EricMoody, JohnFerguson, and FantasyData contain numbered rankings for the quarterbacks. Specify the data type as INT(integer).
Columns Name, Position, Team, and OpposingTeam contain characters and none of the values are greater than 20 characters. Choose VARCHAR(45) as their data type.
On a side note, the parenthesis next to VARCHAR allows you to specify the number of characters you are willing to allow. Change the number of characters if your use case requires longer characters. For long lines of texts, choose Text as the data type.
If you look to the right of DataType column, you will see column properties depicted in acronyms. Let's go over these.
PK: primary key
Primary key uniquely identifies each record in a table. It must contain unique values and cannot contain null values. A table can only have one primary key(excerpt from w3schools.com).
NN: not null
Values cannot be null.
UQ: unique
Values must be unique.
B: binary
Values store any kind of binary data like images, word files, ext files and etc(excerpt from tutlane).
UN: unsigned
Values are not negative.
ZF: zero fill
ZF pads the displayed value of the field with zeros up to the display width set in the column definition(excerpt from tutorialspoint).
AI: auto_increment
AI allows a unique number to be generated automatically when a new record is inserted into a table and increment by 1 for each record(excerpt from w3schools.com)
G: Generated Column
G stores data without actually sending it through the INSERT or UPDATE clauses in SQL(excerpt from gabi.dev).
ID is used as a unique identifier of each quarterback(PK). ID must be a unique(UQ) value and cannot be null(NN). ID cannot be a negative value(US). It must be generated automatically when a new record is inserted into a table and increment by 1 for each record(AI).
So the column properties selected for ID column are PK, NN, UQ, UN, and AI.
For the rest of the columns, only select NN as none of these could be null values.

Click on Apply(blue box).
A pop up window show up and it will prompt you to review the SQL script to be applied on the database. Click on Apply(orange box).

Another window should pop up. Leave the default setting and click Finish.
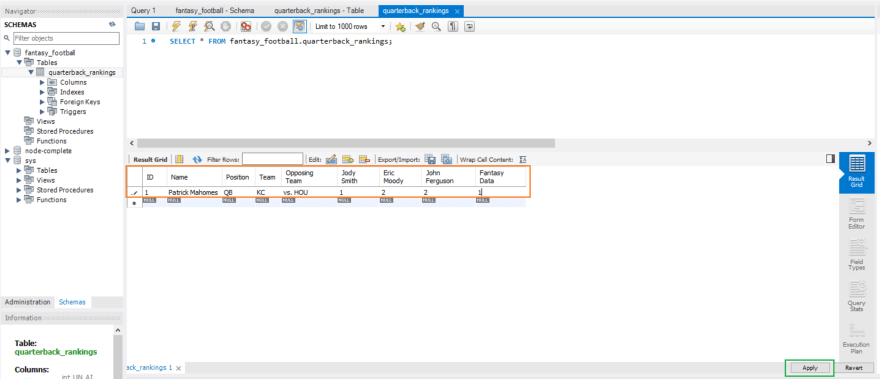
Step 5: Enter data about a top ranking quarterback
You should now see the quarterback_rankings table in the navigator on the left(highlighted in light blue). When you hover over the quarterback_rankings table, you should see three icons show up.

Click on the rightmost icon highlighted with a red arrow. The workbench should display the following.
Look at the section highlighted with a orange box. It has the same columns as the data table in FantasyData. Woot woot!
Let's fill out information about Patrick Mahomes! To fill out the data, just double click under each column and type in Patrick Mahomes' data from FantasyData table as shown below.

Then, click on Apply(green box).
You will see a pop up window nudging you to review the SQL script to be applied on the database. Click on Apply.
Another window should pop up. Leave the default setting and click Finish.
All right, our MySQL database is good to go.
Let's create a Node.js server that will interact with our new database.
Creating a Node.js server with Express framework
Step 1: Create a directory for our server
In the appropriate directory, type in the following in your terminal.
#in terminalmkdir Fantasy_FootballGet into Fantasy_Football directory and open it up in your text editor.
#in terminalcd Fantasy_Footballcode .Step 2: Create a package.json file
package.json file keeps track of all of the packages and applications it depends on, information about its unique source control, and specific metadata such as the project's name, description and author(excerpt from nodesource.com).
In your terminal, type in:
#in terminalnpm initA series of questions regarding the details of your app will be presented to you as you press enter after each question.
You can fill out this info if you choose to but for the purpose of this tutorial, we can skip this part. Press enter multiple times until the terminal exits out of the questionnaire.
At this time, you should see that package.json file has been created for you.
Step 3: Install necessary packages and tools
Install mysql, express, and body-parser as production dependencies. Run the following command in your terminal.
#in terminalnpm i --save express mysql body-parserInstall nodemon as a development dependency by running the following command in your terminal.
#in terminalnpm i --save-dev nodemonOpen up your package.json file.

You will see that body-parser, express, and mysql have been installed as production dependencies(green box) and that nodemon has been installed as development dependency(yellow box).
Next, let's instruct our app to use nodemon to restart our app every time there is a change in our code.
In the section highlighted with a red box, add a comma at the end of line 7. On line 8, add a start script, "start":"nodemon server.js" as shown in the image above.
In the explorer, you should also see that a package-lock.json file has been created for you(blue box).
Step 4: Create a utils folder. Within it, create a file called dabase.js
Your directory should look like the following.

Step 5: Create a routes folder. Within it, create a file called qb.js
Your directory should look like the following.

qb is short for quarterback. We will write SQL queries here to store quarterback rankings data in our database.
Copy and paste the following code into qb.js.
#in routes>qb.jsconst express = require("express");const mysqlConnection = require("../utils/database");const Router = express.Router();Router.get("/", (req, res) => {});module.exports = Router;Don't worry about the code just yet. We will go over these line by line in later!
Step 6: Create a server.js file and configure server
In your terminal, execute the following command.
#in terminaltouch server.js You will see that server.js has been created within your directory.
In server.js, copy and paste the following code.
#in server.jsconst mysql = require("mysql");const express = require("express");const bodyParser = require("body-parser");const qbRoutes = require("./routes/qb");const app = express();app.use(bodyParser.json());app.use(qbRoutes);app.listen(4000);Let's go over this line by line. To explain the code in a logical manner, I may skip around a little bit so be sure to pay attention to the line numbers.
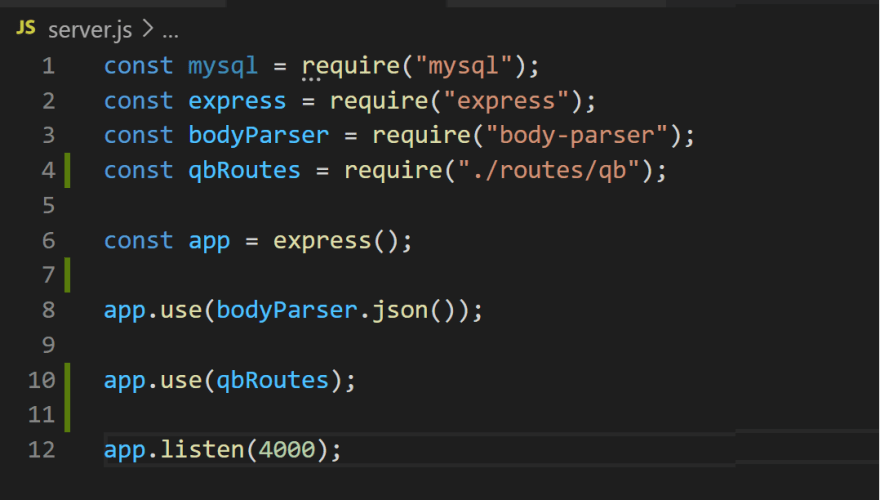
Lines 1-3
During set up, we have installed three packages(mysql, express, and bodyParser). We need to import these packages into server.js to gain access to all the awesome functionalities that come with these packages.
Line 6
Among these functionalities, express() is used to create an Express app. Set express() equal to a constant app.
Line 12
app.listen(4000) creates a server that listens on port 4000.
Line 8
When an HTTP request is sent to the server, the data is contained within the body of the request. Before we can work with the data, we need to first parse the data using bodyParser.
Line 8 allows you to use bodyParser in your server.
Line 10
Whenever you see app.use() in an Express app, know that you are looking at a middleware function.
In my previous blog on Express, we did a deep dive on middleware. If you are having trouble understanding this concept throughout the tutorial, refer to the blog to get a deeper understanding of the code we will be writing.
In short, middleware function is designed to recognize a specific type of HTTP request(GET, POST, PUT, DELETE) and the url of the request. When a middleware function recognizes its matching request, its function is triggered and it sends an appropriate response to the browser.
Writing out the details of middleware functions in the server could make our server.js really lengthy and hard to read.
During setup, we have created a folder called routes and created a qb.js file within it.
To compartmentalize our code, we will be writing out the details of middleware functions in qb.js and passing it as an argument in app.use() on line 10.
Line 4
In order to pass middleware functions written out in qb.js in line 10, we need to import the qb.js file(line 4).
Step 7: Connect MySQL database to Node.js server
Locate the utils folder and open the database.js file in utils folder. This is where we will connect our database to our server.
Copy and paste the following code into database.js
#in utils>dabase.jsconst mysql = require("mysql");const mysqlConnection = mysql.createConnection({ host: "localhost", user: "root", database: "fantasy_football", password: "ENTER YOUR MYSQL DB PASSWORD HERE", multipleStatements: true,});mysqlConnection.connect((err) => { if (!err) { console.log("Connected"); } else { console.log("Connection Failed"); }});module.exports = mysqlConnection;Let's go over these line by line!
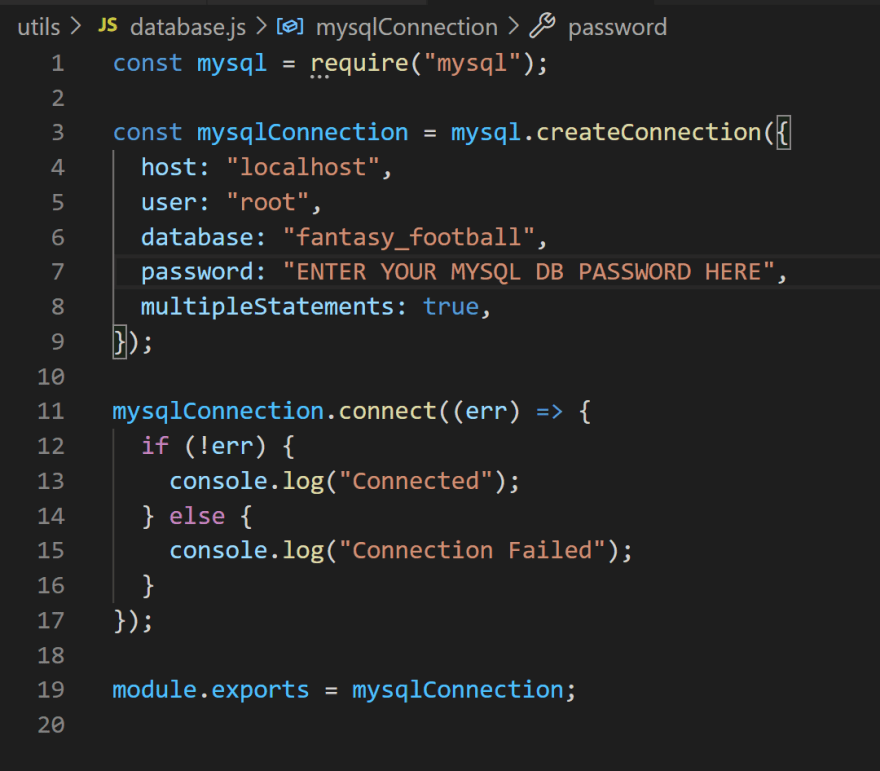
Line 1
During set up, we have installed mysql in our server. Import it into database.js. This will allow us to gain access to all of the methods that will help us connect our Node.js server to our fantasy_football database.
Lines 3-9
First, we need to create a connection between MySQL database and the server. We can do that calling on createConnection() method. Within this method, we need to provide information about the database we are trying connect with our Node.js server. We set this equal to a constant mysqlConnection.
Line 4
The database hostname will be localhost as we are running on our local machine.
Line 5
We will define the username as 'root' as it was given to us during the configuration process.
Line 6
For the database name, we will type in fantasy_football as that's what we named our database.
Line 7
For the password, enter the password you used to create the database.
Line 8
For multipleStatements, add the value to be true as we will be executing multiple statement queries in qb.js.
Lines 11-19
Now that we have created a connection, we are going to connect the database to the server by using the connect() method. This method accepts a callback function that has error as an argument. This error will come up if the server fails to connect to the database.
To create a convenient way to check on the database connection, we write an error handler. The lines 12-18 are saying that if there is no error, then print "Connected" in our server console. If there is an error, then print "Connection Failed".
Line 21
We export mysqlConnection as we will be using this in our qb.js file!
Let's check if our database is connected to our Node.js server.
In your terminal, run the following command.
#in terminalnpm startThe server should be connected to the database and you should see the following message on your console.

Step 8: Configure qb.js to handle GET request
Locate the routes folder and open up qb.js file.
qb.js is where we will be writing out the details of middleware functions. As mentioned earlier, an HTTP request(GET, POST, PUT, DELETE) is funneled through middleware functions until it finds the function designed to handle the request.
When a middleware function recognizes its matching request, it sends a query to the MySQL database to either create, retrieve, update, or delete data. Once this action is completed, the server will send an appropriate response to the browser.
Replace the existing code in qb.js with the following.
#in routes>qb.jsconst express = require("express");const mysqlConnection = require("../utils/database");const Router = express.Router();Router.get("/", (req, res) => { mysqlConnection.query( "SELECT * FROM quarterback_rankings", (err, results, fields) => { if (!err) { res.send(results); } else { console.log(err); } } );});Router.post("/", (req, res) => { let qb = req.body; const sql = "SET @ID = ?;SET @Name = ?;SET @Position = ?;SET @Team = ?;SET @OpposingTeam = ?;SET @JodySmith = ?;SET @EricMoody = ?;SET @JohnFerguson = ?;SET @FantasyData = ?; CALL Add_or_Update_QB(@ID, @Name, @Position, @Team, @OpposingTeam, @JodySmith, @EricMoody, @JohnFerguson, @FantasyData);"; mysqlConnection.query( sql, [ qb.ID, qb.Name, qb.Position, qb.Team, qb.OpposingTeam, qb.JodySmith, qb.EricMoody, qb.JohnFerguson, qb.FantasyData, ], (err, results, fields) => { if (!err) { results.forEach((element) => { if (element.constructor == Array) res.send(element); }); } else { console.log(err); } } );});Router.put("/", (req, res) => { let qb = req.body; const sql = "SET @ID = ?;SET @Name = ?;SET @Position = ?;SET @Team = ?;SET @OpposingTeam = ?;SET @JodySmith = ?;SET @EricMoody = ?;SET @JohnFerguson = ?;SET @FantasyData = ?; CALL Add_or_Update_QB(@ID, @Name, @Position, @Team, @OpposingTeam, @JodySmith, @EricMoody, @JohnFerguson, @FantasyData);"; mysqlConnection.query( sql, [ qb.ID, qb.Name, qb.Position, qb.Team, qb.OpposingTeam, qb.JodySmith, qb.EricMoody, qb.JohnFerguson, qb.FantasyData, ], (err, results, fields) => { if (!err) { res.send( "The data for the selected quarterback has been successfully updated." ); } else { console.log(err); } } );});Router.delete("/:id", (req, res) => { mysqlConnection.query( "DELETE FROM quarterback_rankings WHERE ID= ? ", [req.params.id], (err, results, fields) => { if (!err) { res.send("The selected quarterback has been successfully deleted."); } else { console.log(err); } } );});module.exports = Router;Let's go over these line by line!

Line 1
We import Express to gain access to its Router() method.
Line 2
We import mysqlConnection as we will need this to send queries to the database.
Line 4
We invoke the Router() method here to create router-level middleware functions that handle different HTTP requests.
Line 6-14
This is how you would write a router-level middleware function that handles GET request from a browser.
The syntax of middleware functions and the concept of router-level middleware function have already been covered in my previous blog on Express. So we will just skip right over to the SQL query performed on the database.
Line 7
We send the query to the database by invoking the query method on mysqlConnection. Inside of the parenthesis, we write a SQL query("SELECT * FROM quarterback_rankings") and a call back function that contains an eventual error, results, and fields.
Let's break this down.
SQL query allows us to communicate with the database. From our Node.js server, we can instruct the database to create, retrieve, update, or delete data.
SELECT allows us to choose specific piece of information we want to pull from our database. Adding * after SELECT tells the database that we want all the information FROM quarterback_rankings table we created earlier.
Right now, we only have one row of information about Patrick Mahomes. So we should get a row of info for Patrick Mahomes.
After the SQL query, we write a call back function that contains an eventual error, results, and fields.
Lines 9-12 are saying that if no error is encountered while running queries in SQL database, then send results as a response. If there is an error, then print the error in the console.
All right! Let's test this out.
Earlier you have downloaded Postman. We will be using it to test whether the query sent from our server is being accurately handled by MySQL database.
I have covered the general layout of Postman and how to use it in my previous blogs so we will breeze through this part.
If you need further explanations, check out my previous blogs:
Open up Postman.
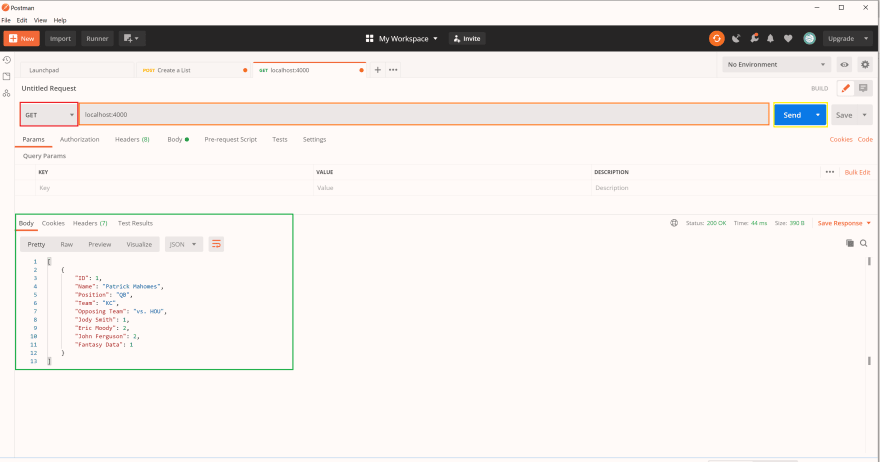
Select the HTTP method to GET(red box). Enter the url localhost:4000 in the url bar(orange box) and press send(blue button).
Take a look at the body region highlighted with a green box. You will see that info regarding Patrick Mahomes has been retrieved for you. Woot woot!
Step 9: Configure qb.js to handle POST request
Our server and database should be able to handle POST and PUT requests.
To create or update a record in our table, we need to send the values for all the columns in our data table(id, name, position, team & etc). As you can imagine, the SQL queries for these requests could get quite lengthy!
Instead of writing this out for both POST and PUT requests in our qb.js file, we will write it out once in MySQL Server and save it as a stored procedure. Then, we will call the stored procedure in qb.js to execute it.
Go to MySQL Workbench. In your navigator, locate fantasy_football database. Expand it to locate Stored Procedures option(green box).

Right click on Store Procedures to display a drop down menu. Select Create Stored procedure(orange box).
In the region highlighted with a blue box, we will write out the procedure.
The code enclosed within a blue box is the basic syntax of create procedure statement. In line 1, you can replace _new_procedure with the name of your stored procedure. When you specify the name, it should automatically display the name in the region highlighted with a yellow box.
( ) is a space for you to specify a list of comma-separated parameters for the stored procedure.
Between the Begin and End block, you can write the code that instructs the database to either create or update a record in quarterback_rankings data table.
Copy and paste the following into the region highlighted with a blue box.
CREATE DEFINER=`root`@`localhost` PROCEDURE `Add_or_Update_QB`(IN _ID INT, IN _Name varchar(45),IN _Position varchar(45),IN _Team varchar(45),IN _OpposingTeam varchar(45),IN _JodySmith INT,IN _EricMoody INT,IN _JohnFerguson INT,IN _FantasyData INT)BEGIN IF _ID = 0 THEN INSERT INTO quarterback_rankings(Name, Position, Team, OpposingTeam, JodySmith, EricMoody, JohnFerguson, FantasyData) VALUES (_Name,_Position,_Team,_OpposingTeam,_JodySmith,_EricMoody,_JohnFerguson,_FantasyData ); SET _ID = LAST_INSERT_ID(); ELSE UPDATE quarterback_rankings SET Name = _Name, Position = _Position, Team = _Team, OpposingTeam = _OpposingTeam, JodySmith = _JodySmith, EricMoody = _EricMoody, JohnFerguson = _JohnFerguson, FantasyData = _FantasyData WHERE ID = _ID; END IF; SELECT * FROM quarterback_rankings;ENDClick on Apply. You will see a pop up window nudging you to review the SQL script to be applied on the database. Click on Apply.
Another window should pop up. Leave the default setting and click onFinish.
Let's go over these line by line!

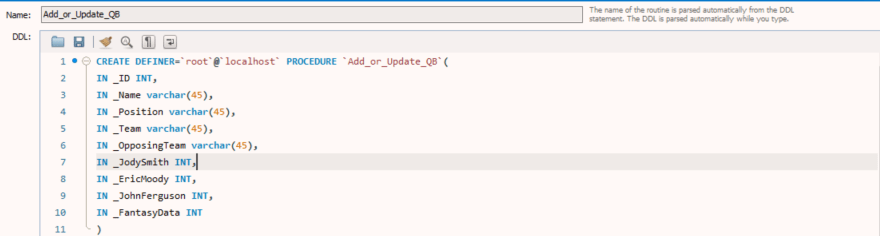
Line 1
This line allows you to create a procedure. We have specified the name of the procedure to be Add_or_Update_QB.
Lines 2-10
In MySQL, there are three modes of parameters: IN, OUT, or INOUT.
IN is the default mode and when you define an IN parameter in a stored procedure, the calling program(i.e. our server) has to pass an argument to the stored procedure(excerpt from mysqltutorial.org).
I am sure this sounds very abstract at the moment. Let's look at the big picture and see where these IN parameters come in to play.
When the server receives a POST request from the browser, it receives the values for all the columns in our data table(id, name, position, team & etc) in the body of the request. The server parses the data and sends these parameters to the database in a query. These parameters are the IN parameters you are looking at now!
Let's write this out.
First, you need to specify the parameter mode IN. Then, specify the name of the parameter. These must be identical to the column names in the data table you are making changes to(i.e. quarterback_rankings).

Then, you must specify its data type. If the data type is varchar, you must specify the maximum length of the parameter.
Lines 12-32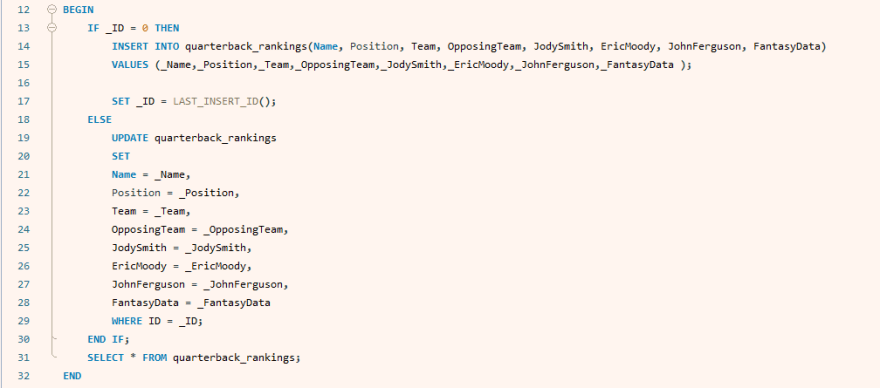
Between the Begin and End block, you can write conditional statements on how you would like the database to create or update a record in our data table.
We will be writing a IF-THEN-ELSE statement and its syntax looks like the following.
IF condition THEN statements;ELSE else-statements;END IF;If condition is true, then we execute the statement in between IF -THEN and ELSE. If condition is not true, then the else-statement between ELSE and END IF will execute.
Lines 13-17
When our server receives the POST request, it will send the parameters(_ID, _Name, _Position, _Team, _OpposingTeam, _JodySmith, _EricMoody, _JohnFerguson, _FantasyData).
These lines are saying that if the _ID in the query is 0, then INSERT the parameters(_ID, _Name, _Position, _Team, _OpposingTeam, _JodySmith, _EricMoody, _JohnFerguson, _FantasyData) as values for columns(Name, Position, Team, OpposingTeam, JodySmith, EricMoody, JohnFerguson, FantasyData) in the quarterback_rankings table.
This essentially creates a new record in the table.
Then, set the _ID of the new record as auto_increment id of the last row that has been inserted or updated in a table(line 17).
Lines 18-30
If _ID parameter in the query is not 0(line 18), then find the row whose ID matches the _ID of the parameter(line 29). Then, update that row(line 19) by setting the values of the specified columns with the corresponding parameters in the query(lines 21-28).
Line 31
Retrieve everything from quarterback-rankings table and send it to the server.
Time to return to qb.js in our server!

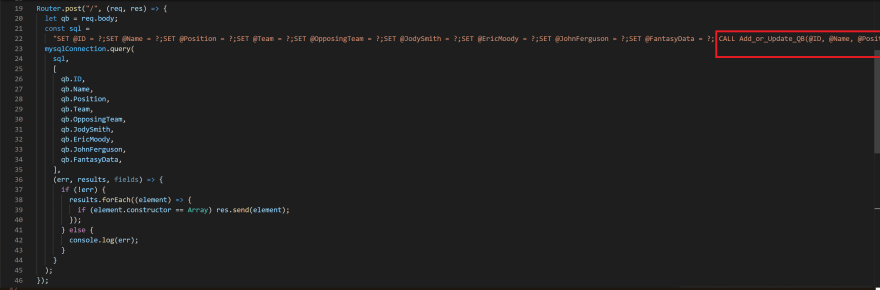
Line 19
We create a router-level middleware function for a POST request.
Line 21-22
We invoke our stored procedure Add_or_Update_QB by using the CALL statement(red box). Remember the IN parameters we have written in our stored procedure? Our server has to pass these parameters to the stored procedure by including them in the parenthesis.
In line 21, we create a constant called sql. In line 22, we create variables for all of the parameters we are passing through Add_or_Update_QB and setting it equal to ?. The ?s, AKA the values of these variables will be dynamically retrieved from the body of the POST request.
Then, we invoke Add_or_Update_QB stored procedure and pass these variables as parameters(red box).
Lines 23-35
We create a SQL query(line 23) that we will send to the database. In the query, we pass the variable sql. Remember how we set the variables in line 22 to question marks?
In line 20, we grab the body of the request that contains all of these values and set it equal to qb.
In lines 26-34, we grab these values and replace the ? of corresponding variables.
Lines 36-43
These lines of code are very similar to the call back function of our GET request. This functions contains eventual error, results, and fields.
We are saying that if no error is encountered while running queries in SQL database, then send the array element that contains all the info retrieved from the database and send it to the browser. If there is an error, then print the error in the console.
A little background information on lines 38-39. The results that come back from the database is an array that contains a mix of objects and an array that contains info about the record we have created. So we are simply iterating through the elements of the results array(results.forEach((element)). If we come across an element that is an array(if (element.constructor === Array) res.send(element)), then we are sending that element as a response.
All right! Let's test to see if this works.
Open up Postman.

Change the HTTP method to POST(red box).
Under the url bar, click on Body tab(grey box). It should present multiple options below.
Select raw(orange box). If you look to the right you will see the Text option. Click on it to access the drop down menu and select JSON(yellow box).
In the region below raw and JSON tabs(purple box), copy and paste the following.
{ "ID": 0, "Name": "Lamar Jackson", "Position": "QB", "Team": "BAL", "OpposingTeam": "vs. CLE", "JodySmith": 4, "EricMoody": 1, "JohnFerguson": 1, "FantasyData": 2 }This is the JavaScript object that contains all the parameters necessary to create a record in our quarterback_rankings table in MySQL database. Notice that the ID set to 0.
Let's see how everything comes together.
When the browser sends this POST request, our server receives the the sent info in the body of the request.
The server parses the data and sends these parameters to the database in a query. The query invokes the stored procedure which takes in these parameters(IN parameters).
Our stored procedure recognizes that ID parameter is 0 and inserts the values of these parameters to the appropriate columns in our quarterback_rankings table.

All coming together now, right?
Now, press Send in Postman!
If you look at the response, you will see that a new record of Lamar Jackson has been created(blue box).
Don't mind the "ID" of 10 you see on my image. I have been playing around with this database for a while and have created and deleted multiple records. If you are doing this for the first time around, Lamar Jackson should have an ID of 2.
Let's go back to MySQL database.

Make sure the quarterback_rankings table is pulled up on your screen. Click on the lightning bolt to refresh the table(red box).
You will see that a new record for Lamar Jackson has been created(blue box)!
Step 10: Configure qb.js to handle PUT request
The code to update a record of the database is almost identical to the POST request.
Two differences are highlighted with red boxes.
On line 48, we specify the HTTP method to be PUT. One line 67, we send a message that the record has been successfully updated.

Let's test this out with Postman!
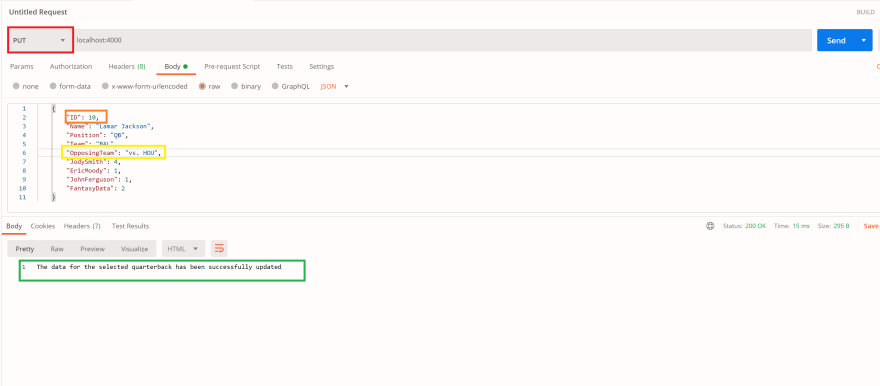
Change the HTTP method to PUT(red box).
In the body of the request, specify the id of the record you would like to change. In my case, I know I have a record with an id of 10(orange box).
Change the OpposingTeam to "vs. HOU"(yellow box).
Press Send.
When you look at the response from the server, you will see the message that "The data for the selected quarterback has been successfully updated."
Go back to MySQL database.

Click on the lightning boly to refresh the table(orange box).
You will see that the opposing team of the record you have specified has been updated to "vs. HOU"(red box)!
Step 11: Configure qb.js to handle DELETE request
The code for DELETE request is very similar to the GET request we wrote earlier.

The differences are highlighted in colorful boxes.
Line 75
The HTTP method is delete(red box).
The URL of the request includes the id of the record we would like to delete(blue box).
Line 77-78
SQL query instructs the database to delete the record whose ID matches the id parameter in the request.
Lines 80-81
If there is no error, server sends the message "The selected quarterback has been successfully deleted" as a response.
Line 89
Export Router so that these router-level middleware functions could be accessed by server.js in line 10.
Let's test this out!
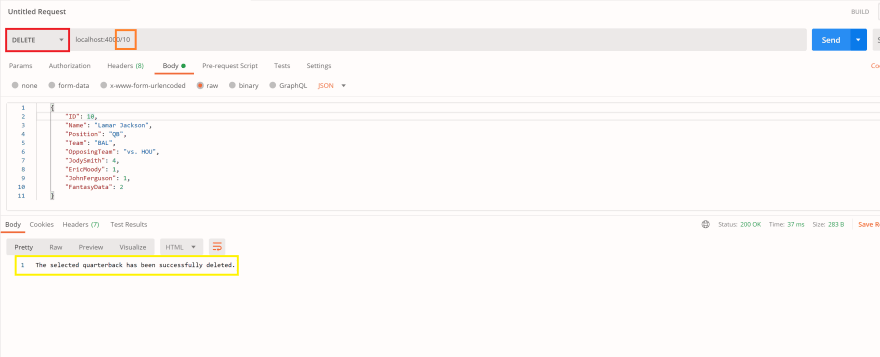
In Postman, change the HTTP method to DELETE(red box). In the url bar, at the end of localhost:4000, add the /id of the record you would like to delete(orange box - localhost:4000/10).
Click Send.
You will see that the server sent the message "The selected quarterback has been successfully deleted." as a response.
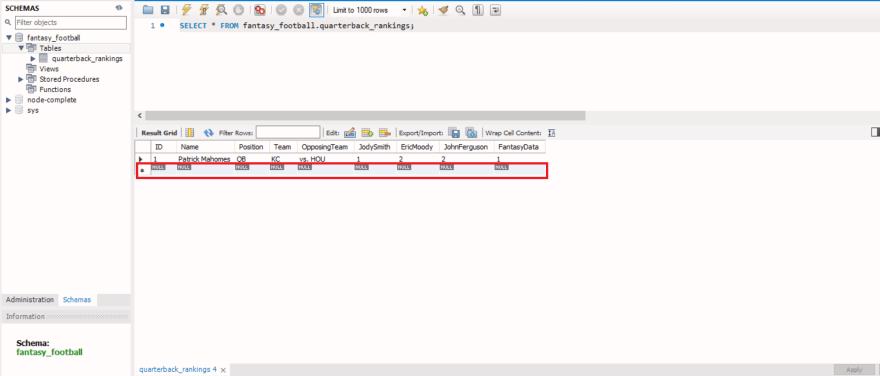
Check your MySQL database and click on the lightning bolt. You will see that the record with the id you have specified has been deleted from your data table.
There you have it! You now know how to:
- create a MySQL database
- connect the database to Node.js server
- configure the server to create, retrieve, update, and delete data in the database
- send the appropriate server response to the browser
You are a rock star. Now step away from your computer and enjoy your day!

Original Link: https://dev.to/lisahjung/beginner-s-guide-to-using-mysql-database-in-a-node-js-app-49li
Dev To
More About this Source Visit Dev To