
An Interest In:
Web News this Week
- April 18, 2024
- April 17, 2024
- April 16, 2024
- April 15, 2024
- April 14, 2024
- April 13, 2024
- April 12, 2024
Some of Our Sources
- BoingBoing
- Smashing Apps
- Vandelay Design
- You The Designer
- Fudge Graphics
- Line 25
- 24 Ways
- Design Modo
- Android Headlines
- Willems Lab
Help Webnuz
Referal links:
An Introduction to testing in Javascript
Today, we are going to discuss testing in Javascript and help you in starting your journey towards understanding and mastering it.
Testing is one of the most important topics in software development, but a lot of developers still shy away from it. This article is here to change that.
The primary motivation behind this article is to give a clear overview of the entire world of Javascript testing and making it simple to understand. Even if you have no prior experience in testing, this article will prove to be the perfect start for your journey.
So, without wasting any further time, let's get started.
Why testing is important
Before diving into the various types and concepts of software testing, you should first have a clear understanding of why you should actually care about automated testing in the first place.
Building Confidence In Your Code:
To know that your code is working as planned, it needs to be tested in some kind. Manual test work for most small applications but don't provide the security and confidence level you get using automated tests.
Automated tests make it easy to test almost every possible situation and allow you to run them whenever you are making a change to your code.
Identifying every success and failure case and writing tests for them will ensure that you are confident with the code you are deploying for production.
Writing Minimal Code:
Testing also helps you to reduce the amount of code you are writing for a particular feature. After testing, your main goal is to write the minimal required code to make the tests pass. This coding style where you write tests before you write the actual implementation is also known as TDD (Test-driven development).
After successfully testing, you can focus on writing clean implementations with as minimal code as possible.
Getting Rid Of Regression Bugs:
Do you know the feeling when you have just finished a new feature of your application and want to release it to production and all of a sudden, an old feature isn't working anymore? You are absolutely clueless about why this is happening and will probably waste a lot of time searching for the issue.
This situation would have never occurred if you had tested your old features. You could have frequently run those tests to check if your application is still working as expected. The tests would also give you a better idea of what exactly isn't working anymore because the appropriate test cases would fail.
Types of tests
There are a few different types of tests, and it is essential to know how they differ from each other. Most applications will require you to write multiple kinds of tests to get the best result possible.
Unit tests:
The purpose of a unit test is to validate the functionality of a relatively small piece of software, independently from other parts. Unit tests are narrow in scope, which allows us to cover all cases to ensure that every single part works correctly.
They are small and highly focused tests that can efficiently be executed on your local machine because of their fast execution time. You are going to have hundreds, if not thousands of these tests and run them on a regular basis while developing.
The only downside to these kinds of tests is that they are not executed on real devices and therefore have lower fidelity than the other types of tests.
Integration tests:
Integration tests demonstrate that the different parts of your application work together in a real-life production environment. They verify that two separate modules or components are working together in the way they should.
These tests are of medium size and have a much higher execution time then Unit tests. They aren't executed as often but are still vital for checking the health status of your applications. Their fidelity is also a lot higher because they run on real devices and verify the actual interaction between various components of your application.
End-to-End tests:
End-to-End tests validate complex scenarios from end to end, and usually require external resources, like databases or web servers, to be present. Imagine you have an application with a sign-up flow comprising of several steps, and you want to test the entire flow, thats where End-to-End tests come into play.
E2E tests will also run on real devices just like integration tests and therefore, will again be quite slow in their execution.
The only downside to these kinds of tests is that debugging them and finding out what went wrong if a particular test fails becomes very hard because of their vast scope.
Concepts
Before starting to write tests for your code, you first need to be familiar with the most crucial testing concepts and when you need to use them. These concepts will influence the architecture of your application and how you write code in general but more on that in a later section.
Matchers:
Matchers let you validate the results and values of your tests in different ways and are used to make sure that the results of the test match your expectations.
Imagine you have a function that calculates the result of a certain factorial number. Testing the function can then be done using the expect() function and a simple matcher that checks if the result of the function matches the expected value.
test('factorial of 2', () => { expect(factorial(2)).toBe(2);});The expect() function checks if the result meets the conditions defined by the matcher. We will make use of different matchers in the Jest testing framework at a later point in this guide.
Mocking:
An object under a test might have dependencies on other objects or services. To isolate the behavior of an object, you want to replace the other objects it interacts with by mocks that simulate the behavior of the real objects.
Mocks help your tests to avoid test unreliability (flakiness) and improve the speed of your tests. They are also useful if the real objects are impractical to incorporate into tests.
In short, mocking is creating objects or services that simulate the behavior of real objects (A database, for example).
Lifecycle:
When testing, you often execute multiple tests after each other and have some setup work that needs to happen before the tests run. Most frameworks provide helper functions to handle these scenarios.
Here is an example of lifecycle methods in the Jest testing framework.
beforeEach(() => { // Initialize objects});afterEach(() => { // Tear down objects});Testable architecture
Before starting to write tests for your code, you first need to make sure that your application's architecture is testable. If it is not, you need to understand why not and what you can do about it.
Untestable architecture is probably the most common reason why many people find testing tedious and difficult. If your code is not structured properly, you are definitely going to find it difficult to write tests for it.
Let's explore some important concepts you should know when talking about testable architecture.
Dependency injection:
Dependency injection is a concept where an object supplies the dependencies of another object. Instead of using the new keyword whenever creating a new object, all you need to do is ask the other object to give you the instance you want.
This concept helps when you need to change the implementation of some object, e.g. when you mock it for a particular test. Many modern frameworks like Angular and Nest.js have dependency injection already build in, but it is still good to know how it functions at a base level.
For more information on dependency injection, you can visit the following article.
SRP (Single responsibility principle):
The single responsibility principle, also known as SRP, is one of the SOLID principles and defines that a function should have a single purpose. This makes it far easier to test that each function does its part correctly.
If your function or service is performing more than one responsibility, then it is time to identify those responsibilities and separate them into individual functions.
Avoid side effects:
Your functions depend on external variables and services, and you have to set up that variable or service before testing your function. Youll also have to trust that any other code being run isnt altering that same variables and states.
That is why you should avoid writing functions that alter any external state (like writing to a file or saving values to a database). This prevents side effects and allows you to test your code with confidence.
Law of Demeter:
The Law of Demeter, which is also known as the principle of least knowledge states that a specific unit should have limited knowledge of the other units it coordinates with. The more your code depends on the internal details of the objects it interacts with, the more difficulty you will have when writing tests for them.
More information about the Law of Demeter can be found here.
Overview of the different testing tools
Now that you have an overview of the essential concepts in the testing world and when you need to use them, let's continue by looking at a short summary of the different Javascript testing tools that are available today.
Note: I will not cover every tool there is but instead look at the most important once to give you a quick overview of there benefits and weaknesses.
Jest:
Jest is an open-source testing framework created by Facebook with a focus on simplicity. Jest makes it faster and easier to write JavaScript tests by having everything included out of the box and needing zero configuration. Jest also runs your tests in parallel, providing a smoother, faster test run.
Mocha:
Mocha is a flexible JavaScript testing libraries available and aims to make asynchronous testing simple and fun. It provides developers with a basic test framework and gives them the option to choose which assertion, mocking, and spy libraries they want to use.
It requires some additional setup and configuration but gives you complete control of your testing framework in return.
Cypress:
Cypress is an all in one testing tool that is focused on making End-to-End testing easy and modern. Their tests are executed in the browser themself which gives them a better execution time and no network lag.
Cypress is used to deal with complex UIs running on modern Javascript stacks. By using their framework and assertion library, it becomes easy to validate states in the UI. Cypress will then automatically wait for your application to reach this state before moving on.
Cypress is a newer and more modern tool than Jest and Mocha and is an excellent start for beginners and End-to-End testing in general.
Introduction to Jest
As already mentioned above, this guide will focus on the Jest testing framework because it is the most popular framework out there. But most of the concepts apply to all testing frameworks and can be useful no matter which technology you are using.
Jest is an open-source project maintained by Facebook and is especially well suited for Unit and Integration testing. Its strengths are:
- It is simplistic and fast
- It provides everything out of the box and thereby doesn't require and configuration (though you can change the configuration if you so choose)
- It can perform snapshot testing
Now we will explore some practical examples so you can put your knowledge into practice.
Installation
Jest can be installed using either npm or yarn:
yarn add --dev jest# ornpm install --save-dev jestNotice that this will install Jest as a dev dependency as part of your package.json file in the current project. You can alternatively install it globally if you so choose.
yarn global add jest# ornpm install jest -gYou can also add this line to your package.json to run your test using the test command.
{ "scripts": { "test": "jest" }}Your first test
Now that we have installed Jest it is finally time to write our first test. But before we do that, we will write some basic code that we can test in the first place.
For that, we will create two files so we can get going.
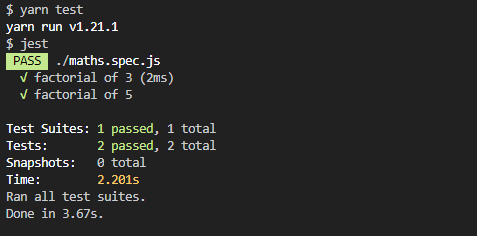
touch maths.jstouch maths.spec.jsWe will use the following function for calculating a factorial number to write our first test.
function factorialize(num) { if (num < 0) return -1; else if (num == 0) return 1; else { return num * factorialize(num - 1); }}module.exports = { factorialize }Here are some very basic test cases for this small function.
const { factorialize } = require("./maths");test("factorial of 3", () => { expect(factorialize(3)).toBe(6);});test("factorial of 5", () => { expect(factorialize(5)).toBe(120);});Running the yarn test command in your terminal should give you the following output:
Matchers
As already said above matchers let you validate the results and values of your tests in different ways.
They are most commonly used to compare the result of the expect() function to the value passed as an argument to the matcher (That is also what we did above).
Here is a list of the most common matchers:
- toBe - compares for strict equality (e.g. ===)
- toEqual - compares the values of two variables/objects
- toBeNull - checks if the value is null
- toBeDefined - checks if the value is defined
- toBeUndefined - checks if the value is undefined
- toBeTruthy - checks if the value is true (similar to an if statement)
- toBeFalsy - checks if the value is false(similar to an if statement)
- toBeGreaterThan - checks if the result of the expect() function is greater than the argument
- toContain - checks if the result of expect() contains a value
- toHaveProperty - checks if an object has a property, and optionally checks its value
- toBeInstanceOf - checks if an object is an instance of a class
These matchers can also be negated using the not statement:
test("factorial of 3 is not 5", () => { expect(factorialize(3)).not.toBe(5);});You can also use additional matchers that are maintained by the Jest community.
Setup and Teardown
Often when writing tests, you will have to do some kind of setup like initializing variables before tests run and some sort of action after they have finished.
Jest provides two different ways you can do that.
One-Time Setup:
In some cases, you only need to do the setup once, at the beginning of your test file. In that scenario, you can use the beforeAll() and afterAll() helper functions that will execute before the tests start and after all have finished.
beforeAll(() => { return initializeDatabase();});afterAll(() => { return clearDatabase();});test('query from database', () => { expect(database.getObject('Florida')).toBeTruthy();});Repeating setup for each test:
If you have a setup process that needs to run before each test then you should use the beforeEach() and afterEach() functions.
beforeEach(() => { initializeDatabase();});afterEach(() => { clearDatabase();});test('query from database', () => { expect(database.getObject('Florida')).toBeTruthy();});Note: There will be scenarios where you will use both of these setup processes together to get the best results.
Grouping tests
You can also group related tests together so you can isolate the setup and teardown functions. Grouping tests will also help you get a better overview of your different test cases.
describe('testing factorial function', () => { beforeAll(() => { //do something }) afterAll(() => { //do something }) test("factorial of 3", () => { expect(factorialize(3)).toBe(6); }); test("factorial of 5", () => { expect(factorialize(5)).toBe(120); }); test("factorial of 3 is not 5", () => { expect(factorialize(3)).not.toBe(5); });})Testing async functions
It is common for Javascript code to run asynchronously using either promises or callbacks. The problem with testing asynchronous code is knowing when the code that you are testing is actually complete. Jest has several ways to handle this.
Promises:
Testing promises is straight forward in Jest. Just return the promise and Jest will wait for the promise to resolve. If the promise fails, the test will automatically fail aswell.
// string.jsconst reverseString = str => { return new Promise((resolve, reject) => { if (!str) { reject("Empty string"); return; } resolve(str.split("").reverse().join("")); });};module.exports = reverseString;// string.spec.jsconst reverseString = require("./string");test(`reverseString 'String' to equal 'gnirtS'`, () => { return reverseString("String").then(str => { expect(str).toBe("gnirtS"); });});You can also catch rejected promises using the catch() function.
test(`reverseString '' to reject promise`, () => { return reverseString("String").catch(error => { expect(e).toMatch("Empty string"); });});Async await:
Alternatively, we can use async and await for testing promises.
const reverseString = require("./string");test(`reverseString 'String' to equal 'gnirtS' using await`, async () => { const str = await reverseString("String") expect(str).toBe("gnirtS");}); Note: You need to make your testing function async to use async and await.
Callbacks:
By default Jest tests complete once they reach the end of their execution which means that the test will be completed before the callback is called. This can be fixed by passing a single argument named done to your test function. Jest will wait until the done callback is called before finishing the test.
// string.jsfunction reverseStringCallback(str, callback) { callback(str.split("").reverse().join(""))}module.exports = {reverseStringCallback};// string.spec.jsconst {reverseStringCallback} = require("./string");test(`reverseStringCallback 'string' to equal 'gnirts'`, (done) => { reverseStringCallback('string', (str) => { expect(str).toBe('gnirts') done() })})If done() is never called, the test will fail with a timeout error.
Mocking
Mocking is creating objects or services that simulate the behavior of real objects and plays a vital part in testing. The goal for mocking an object or function is to replace something we dont control like an external service with something we do, that is why its essential that what we replace it with something that has all the features we need.
Using mocks also helps you to inspect information about your code e.g. if a function has already be called and which parameters were used.
Passing Mocks to functions:
One of the common ways to use the Mock function is by passing it as an argument to the function you are testing. This allows you to run your tests without importing the real dependencies and objects you would pass in your real application.
const multiplyNumbers = (a, b, callback) => { callback(a * b);};test("calls callback with arguments added", () => { const mockCallback = jest.fn(); multiplyNumbers(1, 2, mockCallback); expect(mockCallback).toHaveBeenCalledWith(2);});This strategy is great but requires that your code supports dependency injection. If that is not the case you will need to mock already existing modules or functions instead.
Mocking a single function:
You can mock a single function using Jest.fn():
const lodash = require('lodash')lodash.chunk = jest.fn(() => 'test')test(`Test lodash chunk function`, () => { const result = lodash.chunk(['a', 'b', 'c', 'd'], 2) expect(result).toBe('test') expect(lodash.chunk).toHaveBeenCalled() expect(lodash.chunk).toHaveBeenCalledWith(['a', 'b', 'c', 'd'], 2)})Here I create a mock of the lodash.chunk function and test if it gets called and if the parameters are right.
Mocking Modules:
Mocking single functions works well if you only use one or two functions of a package or library but can get very cluttered when you need more functions of a module. Here we use jest.mock to automatically set the exports of an entire module instead of mocking the modules manually.
jest.mock('lodash');test(`Test lodash chunk function`, () => { const result = lodash.chunk(['a', 'b', 'c', 'd'], 2) expect(lodash.chunk).toHaveBeenCalled() expect(lodash.chunk).toHaveBeenCalledWith(['a', 'b', 'c', 'd'], 2) const concatResult = lodash.concat(2, [3], [[4]]); expect(lodash.concat).toHaveBeenCalled() expect(lodash.concat).toHaveBeenCalledWith(2, [3], [[4]])})As you can see I can now call all functions of the lodash library as mock objects.
The only disadvantage of this strategy is that it is difficult to access the original implementation of the module. For those use cases, you can use the spyOn function instead.
Spying packages:
You can also spy on a package without creating a mock for it. This is done using the spyOn() function provided by Jest.
const lodash = require('lodash')test(`Test lodash chunk function`, () => { const spy = jest.spyOn(lodash, 'chunk') const result = lodash.chunk(['a', 'b', 'c', 'd'], 2) expect(lodash.chunk).toHaveBeenCalled() expect(lodash.chunk).toHaveBeenCalledWith(['a', 'b', 'c', 'd'], 2)})Important things you should look at
There are a few more concepts you should definitely look at on your way to mastering testing in Javascript. But I would greatly recommend learning the basics first and putting them into practice in your applications.
- Snapshot testing - Is used for testing the UI of your application
- CI (Continous Integration) - The practice of automating the integration of code changes from multiple contributors into a single software project
- CD (Continous Deployment) - Is a software release process that uses automated testing to validate if changes to a codebase are correct
- Automated dependency updates
It is vital to practice testing in your own applications. If you do it long enough, then you will master the art of testing and make your applications more stable and secure in the process.
Sources:
Here is a list of the sources I used for this article:
- Official Jest documentation
- Introduction to Jest
- Understanding and mastering testing in Android
- Testing best practices
- Understanding Jest Mocks
Conclusion
You made it all the way until the end! I hope that this article helped you understand the basics of automated testing in Javascript.
If you have found this useful, please consider recommending and sharing it with other fellow developers. If you have any questions or feedback, let me know using my contact form or contact me on twitter.
Original Link: https://dev.to/gabrieltanner/an-introduction-to-testing-in-javascript-54jc
Dev To
More About this Source Visit Dev To