
An Interest In:
Web News this Week
- April 1, 2024
- March 31, 2024
- March 30, 2024
- March 29, 2024
- March 28, 2024
- March 27, 2024
- March 26, 2024
Some of Our Sources
- BoingBoing
- Technology Review
- Simplebits
- Six Revisions
- Creative Curio
- Fuel Your Creativity
- Naldz Graphics
- My Ink Blog
- Reencoded
- The Verge
Help Webnuz
Referal links:
Build This Cool Password Checklist with React and CSS
My other blog about building cool sign up form got a lot of attention, so I decided to write another tutorial for a ~cool form~.
This is a tutorial for how to build this animated password checklist:
Tutorial
Table of Contents
- Preliminary Junk
- Update Password Form
- MustContainItem Component
- Validation Checklist Functionality
Preliminary Junk

To create this demo, I entered create-react-app into my terminal, deleted the preliminary junk, and set up a file structure like this:
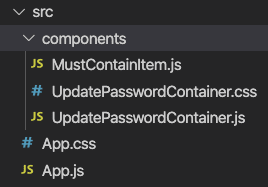
I added some basic styles to things and created a class called cfb that adds a flexbox centering the children of an element to which its applied. Also, I found out some nice colors using Coolors.co.
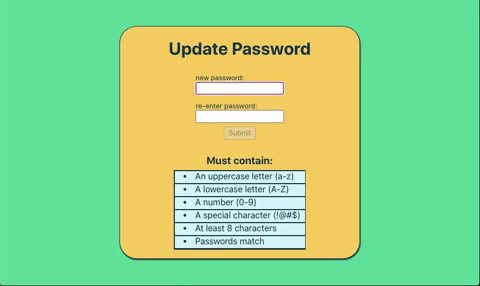
Update Password Form
This projects purpose is to validate a password as its entered into an update form. The first thing I need is a password to validate. In UpdatePasswordContainer.js, I set up a form:
const UpdatePasswordContainer = () => { // form inputs const [passwordOne, setPasswordOne] = useState("") const [passwordTwo, setPasswordTwo] = useState("")... return ( <div className="UpdatePasswordContainer cfb"> <h1> Update Password</h1> {/* update password form */} <form className="password-form cfb"> {/* password one */} <label> new password: <br/> <input type="password" value={passwordOne} onChange={e=>setPasswordOne(e.target.value)} onKeyUp={validatePassword}/> </label> {/* password two */} <label> re-enter password: <br/> <input type="password" value={passwordTwo} onChange={e=>setPasswordTwo(e.target.value)} onKeyUp={validatePassword} /> </label> {/* input button */} <input className="submit-button" type="submit" disabled={!allValid}/> </form>...I will explain validatePassword() in detail later, but it checks the password to make sure it meets the requirements.
The allValid variable enables the submit button if the password passes all requirements.
Otherwise, this is a fairly typical React form. Its inputs update the useState hook onChange for each input and then displays the useState variable as its value.
MustContainItem Component
Each item on the list will be represented by a MustContainItem component which looks like this:
const MustContainItem = props => { const { data } = props const label = data[0] // name of item const meetsReq = data[1] // boolean of whether or not req is satisfied // returns string of classes based on props aliased meetsReq const setClass = () => { const classArr = ["must-line"] if (meetsReq) classArr.push('cross-out') return classArr.join(' ') } return ( <div className="must-item"> <li className="must-text">{label}</li> <div className={setClass()}></div> </div> );}export default MustContainItem;The MustContainItem takes props of data, which is an array containing a string that labels the item and a boolean of whether or not the requirement has been met.
In the div with class must-item, I put label in a li node. Then I created a div that receives its class from a function called setClass().
setClass() returns a string of classnames that will conditionally animate a line striking through label based on meetsReq, the boolean from props.
Heres the CSS:
.must-container{ margin-bottom: 1em; border: 0.1em solid #073B4C;}.must-item{ position: relative; width: 15em; height: 1em; padding: 0.2em 0; border-bottom: 0.1em solid #073B4C; background-color: #DAF3FC;}.must-text{ position: absolute; z-index: 0; top: 0.6em; left: 1em; width: 100%; padding: 0; margin: 0; line-height: 0;}.must-line{ position: absolute; z-index: 1; top: 0.5em; width: 0; height: 0.2em; background-color: #EF476F; transition: 0.5s;}.cross-out{ width: 100%;}I give the must-item parent container a position: relative; so that the child li node and must-line div are positioned absolutely on top of each other.
must-line gets a z-index of 1. It's positioned on top of must-text which has a z-index of 0. It will cover the text when it appears.
Initially, must-line gets a width of 0. When I add the class cross-out, the divs width expands to 100% and, due to transition, the div's width animates between sizes.
Validation Checklist Functionality
The final step is to actually check the password to see if it meets the requirements and update all the relevant components.
First, I set up a useState hook for each requirement that I want to put on a new password. Then, I set up a hook for when all the requirements are met, allValid.
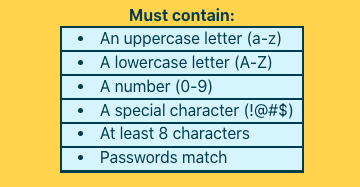
// booleans for password validations const [containsUL, setContainsUL] = useState(false) // uppercase letter const [containsLL, setContainsLL] = useState(false) // lowercase letter const [containsN, setContainsN] = useState(false) // number const [containsSC, setContainsSC] = useState(false) // special character const [contains8C, setContains8C] = useState(false) // min 8 characters const [passwordMatch, setPasswordMatch] = useState(false) // passwords match // checks all validations are true const [allValid, setAllValid] = useState(false)Next, I set up an array of arrays. Each of the inner arrays contains the label string and corresponding useState variable to pass to a MustContainItem as props.
// labels and state boolean corresponding to each validation const mustContainData = [ ["An uppercase letter (a-z)", containsUL], ["A lowercase letter (A-Z)", containsLL], ["A number (0-9)", containsN], ["A special character (!@#$)", containsSC], ["At least 8 characters", contains8C], ["Passwords match", passwordMatch] ]I map() this array creating a MustContainItem for each array in the array, passed to the component as props named data.
{/* creates a MustContainItem for each password validation with props of label and boolean of state */} <h4>Must contain:</h4> <div className="must-container cfb"> {mustContainData.map(data=> <MustContainItem data={data}/>)}Everything is set up at this point except for the actual validating of the password.
I check the password after each character is added or deleted in case a required character is added and then later deleted. For this, I used onKeyUp. Each time, a key is lifted, I run the function validatePassword().
<input type="password" value={passwordOne} onChange={e=>setPasswordOne(e.target.value)} onKeyUp={validatePassword}/>validatePassword() runs a series of conditional statements.
const validatePassword = () => { // has uppercase letter if (passwordOne.toLowerCase() != passwordOne) setContainsUL(true) else setContainsUL(false) // has lowercase letter if (passwordOne.toUpperCase() != passwordOne) setContainsLL(true) else setContainsLL(false) // has number if (/\d/.test(passwordOne)) setContainsN(true) else setContainsN(false) // has special character if (/[~`!#$%\^&*+=\-\[\]\\';,/{}|\\":<>\?]/g.test(passwordOne)) setContainsSC(true) else setContainsSC(false) // has 8 characters if (passwordOne.length >= 8) setContains8C(true) else setContains8C(false) // passwords match if (passwordOne !== "" && passwordOne === passwordTwo) setPasswordMatch(true) else setPasswordMatch(false) // all validations passed if (containsUL && containsLL && containsN && containsSC && contains8C && passwordMatch) setAllValid(true) else setAllValid(false) }Each conditional checks the passwordOne variable stored in a useState hook for a different thing. If passwordOne meets the requirement, it updates that specific requirements useState hook. If the hook updates, the strikethrough animation is triggered. Viola.
Hope this is interesting or helpful!
Again, you can find all the code here.
Best, Jason.
Original Link: https://dev.to/cooljasonmelton/build-this-cool-password-checklist-with-react-and-css-4j1e
Dev To
More About this Source Visit Dev To