
An Interest In:
Web News this Week
- April 20, 2024
- April 19, 2024
- April 18, 2024
- April 17, 2024
- April 16, 2024
- April 15, 2024
- April 14, 2024
Some of Our Sources
- BoingBoing
- Engadget
- Techcrunch
- Technology Review
- Just Creative
- Smashing Apps
- Noupe
- Web Design Ledger
- Design Modo
- The Verge
Help Webnuz
Referal links:
Show off Github repos in your Gatsby site using Github GraphQL API
Want to show off your Github repositories in your Gatsby site?
Preview:

Even if you don't know GraphQL, this guide shows you just enough GraphQL to get you started learning it and using it.
We'll use Github GraphQL API v4 to get all the repositories from your Github account and display it in your Gatsby site!
Let's get into it!
GraphQL
Intro to GraphQL
A GraphQL API allows us to more efficiently create and consume APIs.
For example, we might fetch something like this using REST:
- GET
/api/:name/projects - GET
/api/:name/projects/:project_id - GET
/api/:name/projects/:project_id/description - GET
/api/:name/projects/:project_id/name - GET
/api/:name/projects/:project_id/watchers - GET
/api/:name/projects/:project_id/watchers/:watcher_id - GET
/api/:name/projects/:project_id/watchers/:watcher_id/name
In GraphQL, we don't have to "overfetch" and just get all data we need all at once from one endpoint:
query { user(name: "myname") { projects { name description watchers { name } } }}That's just the tip of the iceberg for GraphQL.
For a more detailed guide to GraphQL:

Github GraphQL API
Github provides a GraphQL API in their v4 update.
They even provided a GraphiQL instance named "Gituhb GraphQL API explorer", which is basically an interactive "sandbox" for testing out queries on live Github data.
This is similar to the GraphiQL you can access locally on your Gatsby site, normally on http://localhost:8000/___graphql, but with the context of your Github account
Github GraphQL API explorer
Go to Github GraphQL API explorer
After you sign-in to github, you can now make queries!
Try this one...
query { viewer { login name repositories(first: 10) { nodes { name description } } }}...which gets your Github login, name, and names of your first 10 repositories.
The node here represent each of the repositories found, which we can get the fields name and description from.

The nice thing with GraphiQL is that it gives you auto-complete. The docs on the upper-right corner are also super useful.
Query to get all the repo details we need
{ viewer { login name repositories(first: 10) { nodes { id name description url updatedAt forkCount openGraphImageUrl stargazers { totalCount } readme: object(expression: "master:README.md") { ... on Blob { text } } licenseInfo { id } primaryLanguage { name } languages(first: 10) { nodes { name } } } } }}Which gives something like this:

I'll let you explore the Repository object to see details on the repo fields, but here are some notes:
We got the README contents by using an expression and getting the text from the Blob returned. Details here Github Community: GraphQL getting filename file content and commit date
The
openGraphImageUrlcontains your repo's Social Media Preview, which shows when you post your Github repo on Facebook, Twitter, blog, etc. This defaults to your Github profile photo, but it can be customized on the repo settings. Max 1MB for the photo. Photo by Christian Wiediger on Unsplash
Cool!
For details on using the explorer:
Docs on Using Github GraphQL API explorer
"We can get the data, but how can we get this into our web app?"
Github
Generate a personal access token
A personal access token gives access to our app so it can make requests to our Github account:
- read repository details
- read user profile data
- create gists
- create and delete repositories
- read and write security keys
- etc
To get a personal access token, you'll have to go to Developer Settings and generate one with the access scopes your app needs.
You'll only need repo and user access for this exercise.

Copy-paste the personal access token somewhere since it will disappear next time you go to this page!
Gatsby - Node part
You'll need a Gatsby site
If you don't have one, you can use this default starter
$ gatsby new my-default-starter https://github.com/gatsbyjs/gatsby-starter-default...$ cd my-default-starter/$ gatsby developThere's a lot more starters here to choose from. Take your pick at Gatsby starters
Put the query somewhere in the "Node" part of Gatsby
To keep organized, let's create a file github-api.js where we can put our GraphQL query from before.
// github-api.jsexports.githubApiQuery = `query($github_login: String!) { user(login: $github_login) { name repositories(first: 10) { nodes { ... } } } }`This is the query we used before to get repo details, but since we're not on our Github account's context anymore:
vieweris not available- Github login of account to be queried must be specified
GraphQL variables
A GraphQL variable $github_login of type String:
- passed from the plugin config, and received by the query
- used to identify which Github
userto get info from, byloginname
We're using Node syntax since this will be
required later ingatsby-config.js
Put personal Access Token in an .env
Putting plaintext API keys in our config code is not secure!
It's such a bad idea that Github revoked my Personal Access Token as soon as I tried pushing it to a public repo! I had to get a new one

Thanks for forcing me to follow secure practices, Github!
Let's use dotenv library and put sensitive keys like this in a .env file
$ yarn add dotenv.env file
GITHUB_LOGIN=your_github_loginGITHUB_PERSONAL_ACCESS_TOKEN=your_github_personal_access_tokenInstall and configure Gatsby Plugin for pulling data from Github GraphQL API
$ yarn add gatsby-source-github-api Configure plugin in gatsby-config.js with the query
// gatsby-config.js// init. environment variablesconst dotenv = require('dotenv');dotenv.config();const { githubApiQuery } = require('./github-api')...plugins: [ ... { resolve: `gatsby-source-github-api`, options: { url: "https://api.github.com/graphql", // default Github GraphQL v4 API endpoint // token: required by the GitHub API token: process.env.GITHUB_PERSONAL_ACCESS_TOKEN, // GraphQLquery: defaults to a search query graphQLQuery: githubApiQuery, // variables: defaults to variables needed for a search query variables: { github_login: process.env.GITHUB_LOGIN } } } ...- Import the query from the module we created before
- Configure the plugin so it can connect to Github GraphQL API successfully
- Import Github credentials from
.env:GITHUB_PERSONAL_ACCESS_TOKENandGITHUB_LOGIN - Supply
github_loginvariable here, so the$github_loginvariable in the query will have the value
Start it up!
$ gatsby developNow that our data is available from the backend, let's use this on the frontend/UI side!
Gatsby - React part
Formulate frontend query with local GraphiQL
Fire up local GraphiQL http://localhost:8000/___graphql to see our Github data

Soooo nice to use GraphiQL, isn't it? You can just click away to formulate your query.
Copy-paste the resulting query on the "Query window" so we can use in our React component.
Create a Page
Create a page where you want to showcase your repos, like a Projects page.
// pages/projects.jsimport React from "react";export default function Projects() { return ( <div> Projects will go here </div> );} useStaticQuery hook for querying GraphQL data
Static Query queries GraphQL at build time.
- The nice thing is that it can appear anywhere in the component tree (vs page query that has to be top-level page component)
- The nicer thing with the hooks version
useStaticQueryis that you don't need Render Props to use it. Just run it and use thedataresult!
Github data only gets pulled once during build, since it's a Static Query after all. Meaning, it won't get latest updates from your Github, until site is rebuilt.
// pages/projects.js...import { useStaticQuery } from "gatsby"...export default function Projects() { const data = useStaticQuery( graphql` query MyQuery { allGithubData { nodes { data { user { repositories { nodes { description forkCount id name openGraphImageUrl updatedAt(fromNow: true) url primaryLanguage { name } languages { nodes { name } } readme { text } stargazers { totalCount } } } } } } } } ` )const repos = data.allGithubData.nodes[0].data.user.repositories.nodesconsole.log(repos) return ( <div> <h1>Projects</h1> <h2>Github Repos</h2> <ul> { repos.map(repo => <li key={repo.id}>{repo.name}: {repo.description}</li> ) } </ul> </div> );Note that our query pretty much reflects the query we passed to the plugin. The difference is that Gatsby gives us a bit more customizations for our frontend code.
For example, for the updatedAt field, we can upgrade from a boring timestamp "2020-07-16T02:06:57Z" to something like "updated 1 hour ago" with the use of updatedAt(fromNow: true)
Play around with your local GraphiQL (http://localhost:8000/___graphql) to find out all these fanciness.


Awesome!
Our fictional github hero has forked a few popular repos for demo
Now that we have all the data we need on the UI side, time to React!
React component
Some highlights:
- parse README.md using
react-markdown, make it scrollable so it doesn't fill the page with one repo's README - Social Media Preview image (
openGraphImageUrl) on the right side - liberal use of flexbox
You can view the Projects view implementation here:
Projects vies
Voila!
BONUS: Deploy in Netlify
After you built this into your Gatsby site and pushed the code to a Github repo...
This is so meta! A Github repo about getting Github repos .
Gif from Giphy - computer infinite endless

Create a new site from your Gatsby site repo
From your Netlify dashboard, create new site and follow steps to create one from a Github repo
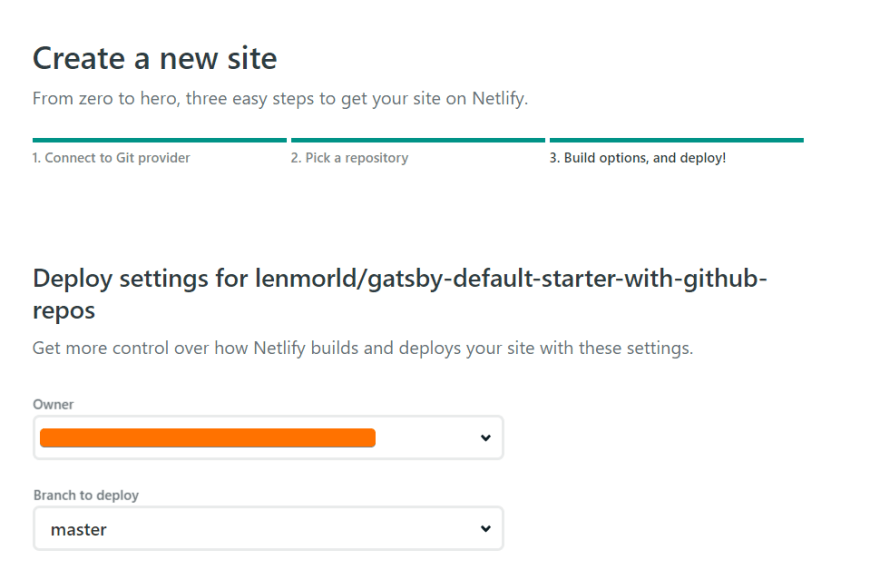
The nice thing is that you can specify the environment variables before deploy.
Remember that we can't commit
.envto remote since that would expose our secrets to the cloud. So we have to configure the env. variable directly on our cloud provider, which is Netlify in this case

Deploy!
Code
Full implementation here built on top of gatsby-default-starter:
Full Code
Catch you in the next one! Have fun GraphQL-ing!
Original Link: https://dev.to/lennythedev/show-off-your-github-repos-in-your-gatsby-site-using-graphql-421l
Dev To
More About this Source Visit Dev To