
An Interest In:
Web News this Week
- April 15, 2024
- April 14, 2024
- April 13, 2024
- April 12, 2024
- April 11, 2024
- April 10, 2024
- April 9, 2024
Some of Our Sources
- BoingBoing
- Team Treehouse
- Spoon Graphics
- Smashing Magazine
- Inspiredology
- Web Designer Depot
- FanExtra - PSD
- Crazy Leaf Design
- CSS Tricks
- Willems Lab
Help Webnuz
Referal links:
How to Build Your Own Website - Introduction to HTML, CSS, and JavaScript
The world of web development and design is rapidly growing. Whether you're establishing a professional online presence, showcasing a design portfolio, or recording your everyday life, creating a website has become a popular way to connect with the world. As the selection of frameworks and tools continues to expand, however, figuring out this process may seem daunting and overwhelming to beginner coders.
For those who are beginners, this blog is a great way to ease into the basics of web development.
In this tutorial, you will learn how to do the following:
Install a code editor
Code HTML, CSS, and JavaScript files
Run a functional basic website
Coding Environment
Getting Started
We will be using Visual Studio Code as our source code editor, a text editor specialized for writing computer programs, to create the files for our website. In order to get started, download Visual Studio Code and install the right version for your computer.
HTML, CSS, and JavaScript Files
First, open your terminal or command prompt, which is a command line system on your operating system that allows you to execute commands on your computer, and type the following:
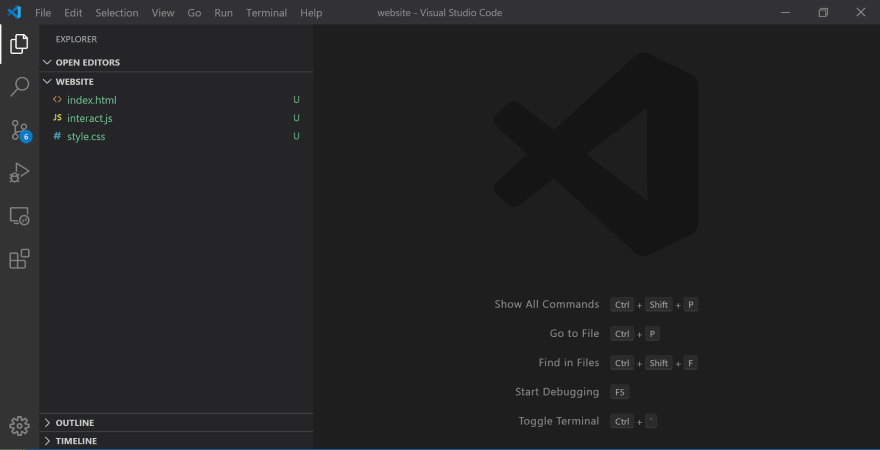
code index.html style.css interact.jsThis will automatically create, name, and open the three files you'll need for your website in Visual Studio Code. Save each file by selecting File > Save and exit the app with File > Exit. Create and name a new folder (we named our folder "website") and move the three files into it to keep them all in one place. Then, in Visual Studio Code, go to File > Open Folder to open your folder and display your files.
Building the Foundation: HTML File
HTML stands for Hypertext Markup Language and is the standard markup language, which is a computer processing system designed for annotating and presenting text, for displaying content on a website.
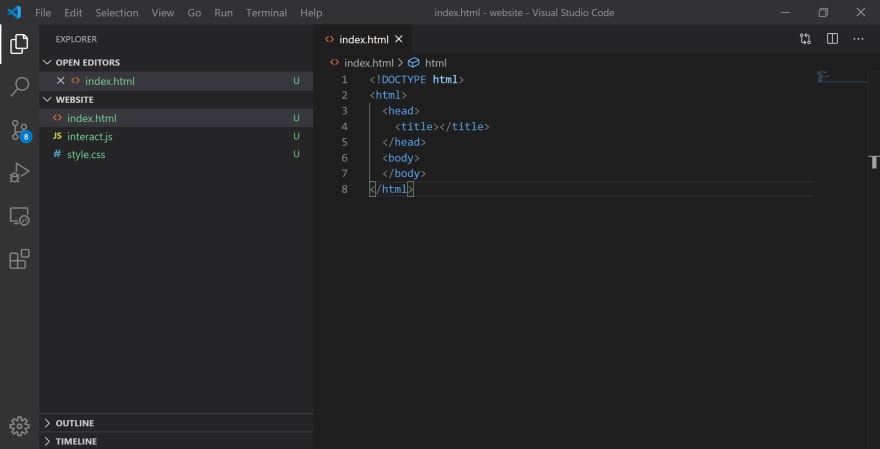
In your index.html file, type in the following lines of code:
<!DOCTYPE html><html> <head> <title></title> </head> <body> </body></html>This is the basic underlying structure used for most websites online. Before we start editing our code, let us look over what we currently have and understand what each part represents.
<!DOCTYPE html> indicates which version of HTML is being used; in this case, we are using the latest version, HTML5.
HTML code is composed of elements, or chunks of information stored between a set of opening and closing tagsfor instance, <html></html> are the opening and closing tags for the html element. Think of these elements as separate boxes with each indented element as a smaller box within a larger enclosing box, marked by its opening and closing tags.
To create the title of our website, add text between the <title></title> tags:
... <head> <title>My Website</title> </head>...Even though it won't be displayed on the web page, having a title is important because it represents your website in search engines, becomes the default name of your website when it's bookmarked, and allows for easy navigation of this page of your website.
To add text to the body of the web page, we will use a heading tag <h1></h1>, which is a ranked tag that can be numbered up to <h6></h6>, and a paragraph tag <p></p> between the opening and closing tags of the body element. Write any text you would like to feature on your web page between these tags:
... <body> <h1>My Website</h1> <p>Hello World.</p> <p>This is my website.</p> </body>...If you want to enter multiple blocks of text separated by line breaks, you must use another <p></p> element for each indented block of text. HTML will not be able to detect or display the line breaks in your code onto your web page.
To add an image to our web page, we will use an image tag <img>, which does not have a closing tag because it is a void element. Void elements can't hold any kind of content besides attributes, which are additional bits of information featured in an element's heading tag. The <img> tag will include two attributes, src and alt. The src attribute will contain the URL or file name of the image. If the image can't load on the website, the alt attribute will display an alternative text message in replacement of that image. Add any image and text description you would like to have on your web page:
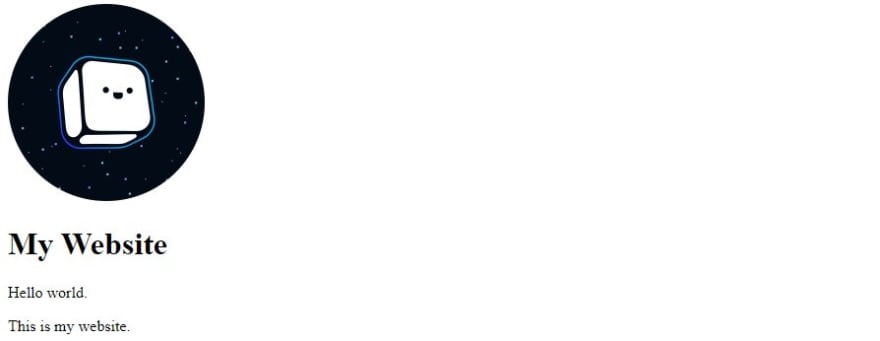
... <body> <img src="image.png" alt="Bit Project Cube"> <h1>My Website</h1> <p>Hello world.</p> <p>This is my website.</p> </body>...Note that if you are using a local image from your computer, you must place the file in the same folder as the other three files for your website.

Now, we can run our website and see what we've created so far. Go into your folder and double-click on your html filethis will prompt your website to open in a web browser:
Stylizing Content: CSS File
CSS stands for Cascading Style Sheets and is the standard style sheet language for defining and stylizing aspects on a website.
Before we can add anything to our CSS file, we need to link our CSS file in our HTML file by adding a <link /> tag to the head element. The <link /> uses a ref attribute, which describes the relationship between the HTML file and the linked file, and a href attribute, which states the location or name of the linked file. Add the following line to the head element of your HTML file:
... <head> <title>My Website</title> <link rel="stylesheet" href="style.css" /> </head>...To start stylizing our website, let's go over how CSS works.
A CSS file is called a stylesheet, which is a template file that consists of a web page's font and layout settings. Stylesheets are composed of declaration blocks that are defined by a selector and contain attributes between curly brackets. For our website, we will use an img selector and a body selector to customize the image and text of our web page:
img {}body {}For the img selector, we will add the width attribute, which will determine the width of all images on our web page in pixels. To alter how your image appears, feel free to run your website multiple times, increasing and decreasing the number of pixels in between each run until you are satisfied with the result:
img { width: 200px; }...For the body selector, we will first adjust the characteristics of the text on our page by adding the following attributes and values:
...body { font-family: helvetica; text-align: center;}You can customize the font of the text on your website by selecting a value from this CSS font list and adding it to your font-family attribute. There are also many other attributes you can add to your body selector to stylize the text on your website, such as font-style, font-size, font-weight, and so on. The center value for the text-align attribute will center whatever is listed inside the body element in your HTML file.
Then, we can add some color to our website by adding the following attributes:
...body { font-family: helvetica; text-align: center; background: aliceblue; color: darkslategray;}You can customize the color of your web page and its text by using the background attribute and the color attribute, respectively. Feel free to browse this browser-supported colors list and select any color you would like to use for your website.
This is what your completed CSS file should look like:

Now, let us run our file again to review the stylizations we have added to our website:

Adding Interactivity: JavaScript File
JavaScript is a programming language used in web development to add interactivity to websites through dynamic behavior such as buttons, pop-up windows, and so on. For our website, we will add an element that displays today's date on our website, and the following JavaScript code we will use for this interactive feature is based on this Microsoft Docs Module.
Before we start coding our JavaScript file, we need to create an element in our HTML file to display our date by adding a set of <p></p> tags with an id attribute. This assigns a unique identity named today to an HTML element that can be stylized by CSS and/or manipulated by JavaScript. We also need to link our JavaScript file in the HTML file by adding a set of <script></script> tags with a src attribute to our head element:
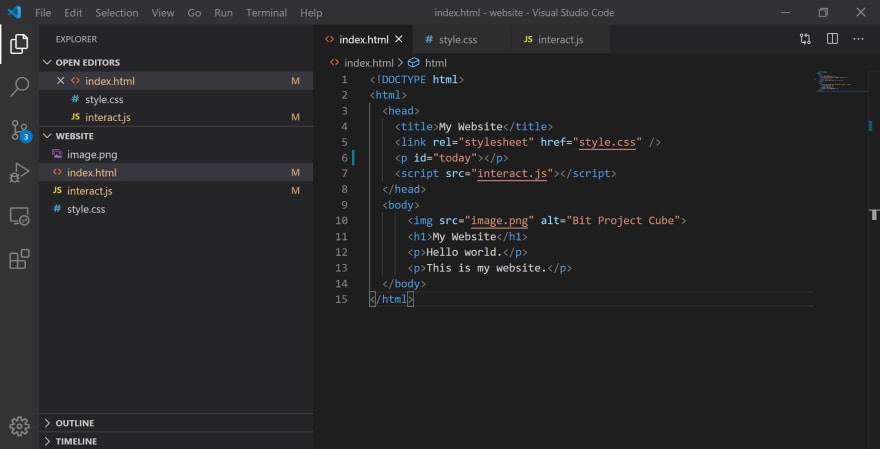
... <head> <title>My Website</title> <link rel="stylesheet" href="style.css" /> <p id="today"></p> <script src="interact.js"></script> </head>...This is what your completed HTML file should look like:
Moving back to our JavaScript file, we first need to activate strict mode for our website to prevent any silent errors from occurring by decreasing the chance of JavaScript making any false assumptions:
'use strict'To acquire the current date, we will create a variable named currentDay. To retrieve the data we need, use the new operator to instantiate a new Date() object:
let currentDay = new Date();To format the data into today's date, we will create another variable named newFormat and use toDateString(). This will remove the time and time zone from the data we received and only reveal today's date:
let newFormat = currentDay.toDateString();To add this data onto the website, we will create one more variable named getData to retrieve our today element from our HTML file by using getElementById() :
let getData = document.getElementById('today');Finally, after retrieving our today element, we need to insert the data we received into it by using innerHTML and equate it to our newFormat variable to finish our JavaScript code:
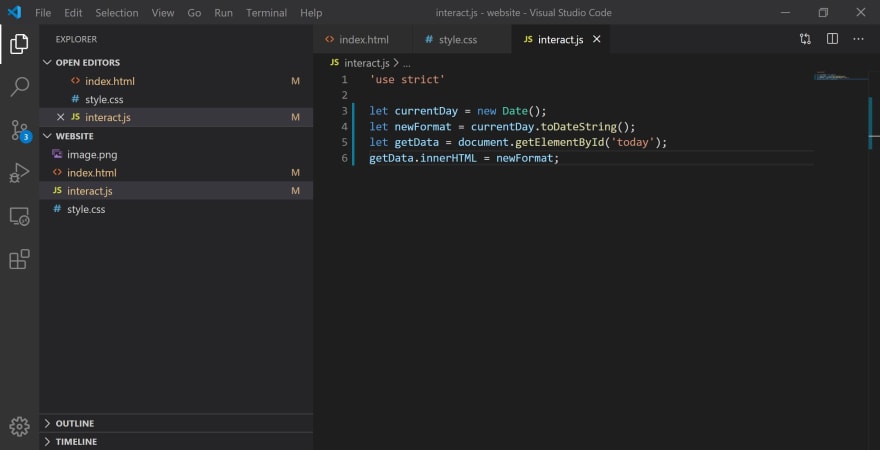
'use strict'let currentDay = new Date();let newFormat = currentDay.toDateString();let getData = document.getElementById('today');getData.innerHTML = newFormat;This is what your completed JavaScript file should look like:
We've completed the code for our website!

Conclusion
Congrats on creating your own website!
Throughout this tutorial, we discussed the basic components of a website's structureHTML, CSS, and JavaScriptand built a solid foundation of knowledge that will let you dive into the world of web development and design with confidence.
Feel free to continue adding more features like photos, music, and additional pages to your site by researching the other attributes you can create with HTML, CSS, and JavaScriptthe possibilities are endless! By using this website as a base for future endeavors, you will learn to flesh out the complexity of your web design projects, turn your web application ideas into a reality, and potentially even jumpstart a career as a web developer.
Original Link: https://dev.to/bitproject/how-to-build-your-own-website-introduction-to-html-css-and-javascript-1923
Dev To
More About this Source Visit Dev To