
Some of Our Sources
- Simplebits
- Spoon Graphics
- Smashing Magazine
- Abduzeedo
- Noupe
- My Ink Blog
- Web Design Ledger
- Willems Lab
- Daily Now
- The Verge
Help Webnuz
Referal links:
Use gRPC interceptor for authorization with JWT
Hello everyone and welcome back to the gRPC course!
Today we will learn how to use gRPC interceptors to authenticate and authorize users with JWT.
Here's the link to the full gRPC course playlist on Youtube
Gitlab repository: pcbook-go and pcbook-java
What is a gRPC interceptor?
Well, basically, its like a middleware function that can be added on both server side and client side.
- A server-side interceptor is a function that will be called by the gRPC server before reaching the actual RPC method. It can be used for multiple purposes such as logging, tracing, rate-limiting, authentication and authorization.
- Similarly, a client-side interceptor is a function that will be called by the gRPC client before invoking the actual RPC.

In this lecture, we will:
- First, implement a server interceptor to authorize access to our gRPC APIs with JSON web token (JWT). With this interceptor, we will make sure that only the users with some specific roles can call a specific API on our server.
- Then, we will implement a client interceptor to login user and attach the JWT to the request before calling the gRPC API.
A simple server interceptor
Alright, lets start by adding a simple interceptor to our gRPC server. There are 2 types of interceptor: 1 for unary RPCs and the other for stream RPCs.
Unary interceptor
In this grpc.NewServer() function, lets add a new grpc.UnaryInterceptor() option. It expects a unary server interceptor function as input.

We can press Command and click on the function name to go to its definition, copy the function signature and paste it to our server/main.go file.
It has some input parameters, such as a context, a request, a unary server info, and the actual unary handler. It returns a response and an error.
func unaryInterceptor( ctx context.Context, req interface{}, info *grpc.UnaryServerInfo, handler grpc.UnaryHandler,) (interface{}, error) { log.Println("--> unary interceptor: ", info.FullMethod) return handler(ctx, req)}func main() { ... grpcServer := grpc.NewServer( grpc.UnaryInterceptor(unaryInterceptor), ) ...}Here we just write a simple log saying "unary interceptor" together with the full method name of the RPC being called.
Then we call the actual handler with the original context and request, and return its result.
Stream interceptor
We can do the same for the stream interceptor:
- Add
grpc.StreamInterceptor()option. - Follow the definition to get the function signature.
- Copy and paste it to the
server/main.gofile. - Pass that function to the stream interceptor option.
- Write a log with the full RPC method name.
- This time the handler will be called with the original server and stream parameter.
func streamInterceptor( srv interface{}, stream grpc.ServerStream, info *grpc.StreamServerInfo, handler grpc.StreamHandler,) error { log.Println("--> stream interceptor: ", info.FullMethod) return handler(srv, stream)}func main() { ... grpcServer := grpc.NewServer( grpc.UnaryInterceptor(unaryInterceptor), grpc.StreamInterceptor(streamInterceptor), ) ...}Run client & server
Alright, lets try it! First start the server, Then open a new tab and run the client.

As you can see on the server logs, the unary interceptor is called 3 times for the create laptop RPC.
This is the full name of that RPC: /techschool.pcbook.LaptopService/CreateLaptop. It includes the package name techschool.pcbook and the service name LaptopService.
Now lets enter y on the client to rate the 3 created laptops.
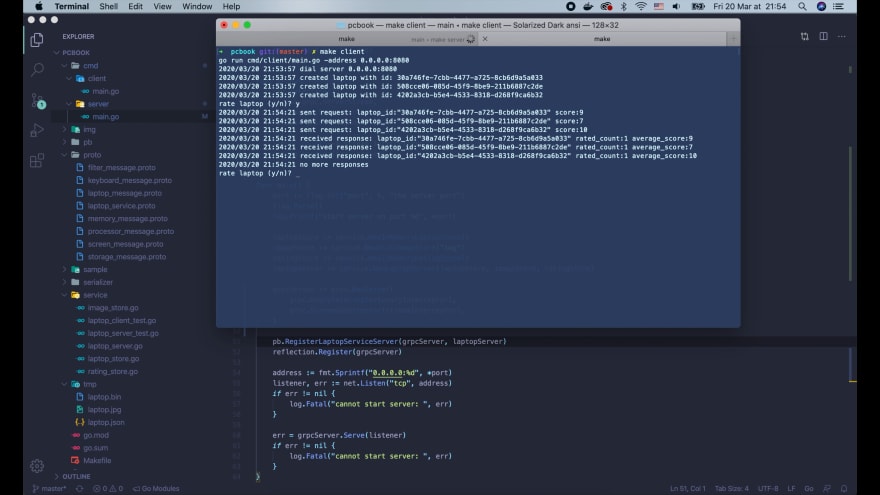
This time on the server side, the stream interceptor is called once.

Awesome!
So now youve got some ideas of how the server interceptor works. We will extend its functionality to authenticate and authorize user requests.
To do that, we will need to add users to our system, and add a service to login user and return JWT access token.
User struct
Lets create service/user.go file and define a new User struct. It will contain a username, a hashed_password, and a role.
type User struct { Username string HashedPassword string Role string}We add a NewUser() function to make a new user, which takes a username, a password, and a role as inputs, and returns a User object and an error.
We should never store plaintext password in the system, so here we use bcrypt to hash the password first. Lets use the default cost for now.
func NewUser(username string, password string, role string) (*User, error) { hashedPassword, err := bcrypt.GenerateFromPassword([]byte(password), bcrypt.DefaultCost) if err != nil { return nil, fmt.Errorf("cannot hash password: %w", err) } user := &User{ Username: username, HashedPassword: string(hashedPassword), Role: role, } return user, nil}If an error occurs, just wrap and return it. Else, we create a new user object with the username, the hashed password, the role and return it.
Next we define a method on the user to check if a given password is correct or not. All we need to do is to call bcrypt.CompareHashAndPassword() function, pass in the users hashed password, and the given plaintext password. Then return true if error is nil.
func (user *User) IsCorrectPassword(password string) bool { err := bcrypt.CompareHashAndPassword([]byte(user.HashedPassword), []byte(password)) return err == nil}I will add one more function to clone the user. This function will be useful for us later because were gonna store users in memory.
func (user *User) Clone() *User { return &User{ Username: user.Username, HashedPassword: user.HashedPassword, Role: user.Role, }}User store
Alright, Now lets create service/user_store.go file and define a UserStore interface, just like what we did for laptop store and rating store in previous lectures.
It will have 2 functions:
- One function for saving a user to the store.
- And the other function to find a user in the store by username.
type UserStore interface { Save(user *User) error Find(username string) (*User, error)}Now lets implement this interface with the in-memory user store. It has a mutex to control concurrent access, and a users map with key is the username. I will write a fuction to build a new in-memory user store, and initialize the users map in it.
type InMemoryUserStore struct { mutex sync.RWMutex users map[string]*User}func NewInMemoryUserStore() *InMemoryUserStore { return &InMemoryUserStore{ users: make(map[string]*User), }}Then we need to implement the Save and Find function of the interface.
In the Save function, first we acquire the write lock. Then check if a user with the same username already exists or not. It it does, we return an error. Otherwise, we just clone the input user and put it into the map.
func (store *InMemoryUserStore) Save(user *User) error { store.mutex.Lock() defer store.mutex.Unlock() if store.users[user.Username] != nil { return ErrAlreadyExists } store.users[user.Username] = user.Clone() return nil}For the Find function, we acquire a read lock. Then we get the user by username from the map. If it is nil, we just return nil. Else we return a clone of that user.
func (store *InMemoryUserStore) Find(username string) (*User, error) { store.mutex.RLock() defer store.mutex.RUnlock() user := store.users[username] if user == nil { return nil, nil } return user.Clone(), nil}And thats it. The user store is ready.
JWT manager
Now lets implement a JWT manager to generate and verify access token for users.
The JWTManager struct contains 2 fields:
- The secret key to sign and verify the access token,
- And the valid duration of the token.
These 2 fields should be passed as input parameters of the NewJWTManager() function.
type JWTManager struct { secretKey string tokenDuration time.Duration}func NewJWTManager(secretKey string, tokenDuration time.Duration) *JWTManager { return &JWTManager{secretKey, tokenDuration}}In order to work with JWT, I will use the jwt-go library. Let's run this command in the terminal to install it:
go get github.com/dgrijalva/jwt-goOK, now back to our JWT manager. The JSON web token should contain a claims object, which has some useful information about the user who owns it.
So Im gonna declare a custom UserClaims. It will contain the JWT StandardClaims as a composite field.
type UserClaims struct { jwt.StandardClaims Username string `json:"username"` Role string `json:"role"`}This standard claims has several useful information that we can set, but for the purpose of this demo, Im just gonna use 1 field, which is the ExpiresAt time of the token.
As you might notice, the claims has a Valid() function, that will automatically check if the token is expired or not for us when we call the parse token function later.
Beside the standard claims, we also add a username field, and another field to store the role of the user because we want to do role-based authorization.
Generate & sign access token
Next, lets write a function to generate and sign a new access token for a specific user.
In this function, we first create a new user claims object. For the standard claims, I only set the ExpiresAt field.
We have to add the token duration to the current time and convert it to Unix time. Then we set the username and role of the user.
func (manager *JWTManager) Generate(user *User) (string, error) { claims := UserClaims{ StandardClaims: jwt.StandardClaims{ ExpiresAt: time.Now().Add(manager.tokenDuration).Unix(), }, Username: user.Username, Role: user.Role, } token := jwt.NewWithClaims(jwt.SigningMethodHS256, claims) return token.SignedString([]byte(manager.secretKey))}We call jwt.NewWithClaims() function to generate a token object. For simplicity, here I use a HMAC based signing method, which is HS256. For production, you should consider using stronger methods, Such as RSA or Eliptic-Curve based digital signature algorithms.
The last and also the most important step is to sign the generated token with your secret key. This will make sure that no one can fake an access token, since they dont have your secret key.
Parse & Verify access token
Now lets add another function to verify an access token, and return a user claims if the token is valid.
We just have to call jwt.ParseWithClaims(), pass in the access token, an empty user claims, and a custom key function. In this function, Its very important to check the signing method of the token to make sure that it matches with the algorithm our server uses, which in our case is HMAC. If it matches, then we just return the secret key that is used to sign the token.
func (manager *JWTManager) Verify(accessToken string) (*UserClaims, error) { token, err := jwt.ParseWithClaims( accessToken, &UserClaims{}, func(token *jwt.Token) (interface{}, error) { _, ok := token.Method.(*jwt.SigningMethodHMAC) if !ok { return nil, fmt.Errorf("unexpected token signing method") } return []byte(manager.secretKey), nil }, ) if err != nil { return nil, fmt.Errorf("invalid token: %w", err) } claims, ok := token.Claims.(*UserClaims) if !ok { return nil, fmt.Errorf("invalid token claims") } return claims, nil}The ParseWithClaims() function will return a token object and an error. If the error is not nil, we return invalid token.
Else we get the claims from the token and convert it to a UserClaims object. If the conversion fails, we return invalid token claims error. Otherwise, just return the user claims.
And were done!
Implement Auth service server
The next thing we need to do is to provide a new service for client to login and get the access token.
Lets create a new proto/auth_service.proto file.
We define a LoginRequest message with 2 fields: a string username, and a string password. Then a LoginResponse message with only 1 field: the access_token.
message LoginRequest { string username = 1; string password = 2;}message LoginResponse { string access_token = 1; }service AuthService { rpc Login(LoginRequest) returns (LoginResponse) {};}We define a new AuthService. It has only 1 unary RPC: Login, which takes a LoginRequest as input, and returns a LoginResponse.
Alright, Now lets run make gen in the terminal to generate new codes for this service.
The pb/auth_service.pb.go file is generated. Now just like what we did with the laptop server in the previous lectures, Im gonna create a new service/auth_server.go file to implement this new service.
The AuthServer struct will contains a UserStore and a JWTManager. Lets add a function to build and return a new AuthServer object.
type AuthServer struct { userStore UserStore jwtManager *JWTManager}func NewAuthServer(userStore UserStore, jwtManager *JWTManager) *AuthServer { return &AuthServer{userStore, jwtManager}}Then we open the generated file pb/auth_service.pb.go file to copy the Login function signature and paste it to our service/auth_server.go file. Then make it a method of the AuthServer struct.
This method is very easy to implement. First we call userStore.Find() to find the user by username. If theres an error, just return it with an Internal error code.
Else, if the user is not found or if the password is incorrect then we return status code NotFound with a message saying the username or password is incorrect.
func (server *AuthServer) Login(ctx context.Context, req *pb.LoginRequest) (*pb.LoginResponse, error) { user, err := server.userStore.Find(req.GetUsername()) if err != nil { return nil, status.Errorf(codes.Internal, "cannot find user: %v", err) } if user == nil || !user.IsCorrectPassword(req.GetPassword()) { return nil, status.Errorf(codes.NotFound, "incorrect username/password") } token, err := server.jwtManager.Generate(user) if err != nil { return nil, status.Errorf(codes.Internal, "cannot generate access token") } res := &pb.LoginResponse{AccessToken: token} return res, nil}If the user is found and the password is correct, we call jwtManager.Generate() to generate a new access token. If an error occurs, we return it with Internal status code.
Otherwise, we create a new login response object with the generated access token, and return it to the client.
Add auth service to gRPC server
OK, now we have to add this new authentication service to the gRPC server. Lets open cmd/server/main.go file.
First we need to create a new InMemoryUserStore. Then we create a new JWTManager with a secret key and token duration.
To make it simple, I just define them as constants here. In reality, we should load them from environment variables or a config file. For the demo purpose, lets set the token duration to be 15 minutes.
const ( secretKey = "secret" tokenDuration = 15 * time.Minute)func main() { ... userStore := service.NewInMemoryUserStore() jwtManager := service.NewJWTManager(secretKey, tokenDuration) authServer := service.NewAuthServer(userStore, jwtManager) pb.RegisterAuthServiceServer(grpcServer, authServer) ...}Then we create a new AuthServer with the UserStore and JWTManager. And we call pb.RegisterAuthServiceServer to add it to the gRPC server.
Seed users
In order to test the new login API, we have to add some seed users. I will write a function to create a user given its username, password and role, and save it to the user store.
func createUser(userStore service.UserStore, username, password, role string) error { user, err := service.NewUser(username, password, role) if err != nil { return err } return userStore.Save(user)}Then in the seedUsers() function, I call the createUser() function 2 times to create 1 admin user and 1 normal user. Lets say they have the same secret password.
func seedUsers(userStore service.UserStore) error { err := createUser(userStore, "admin1", "secret", "admin") if err != nil { return err } return createUser(userStore, "user1", "secret", "user")}Then in the main function, we call seedUsers() right after creating the user store.
func main() { ... userStore := service.NewInMemoryUserStore() err := seedUsers(userStore) if err != nil { log.Fatal("cannot seed users: ", err) } ...}Try the auth service with Evans CLI
Alright. Lets try it! I will start the gRPC server. Then use the Evans client to connect to it.
When we call show service, we can see the new AuthService with a Login RPC in the result.
Lets select the AuthService and call Login RPC with username admin1 and an incorrect password.

The server returns incorrect username/password as expected. Now lets call login again, but this time enter a correct password for admin1.

The request is successful, and weve got an access token.
Lets copy this token and go to jwt.io on the browser. Paste the token into the Encoded area.
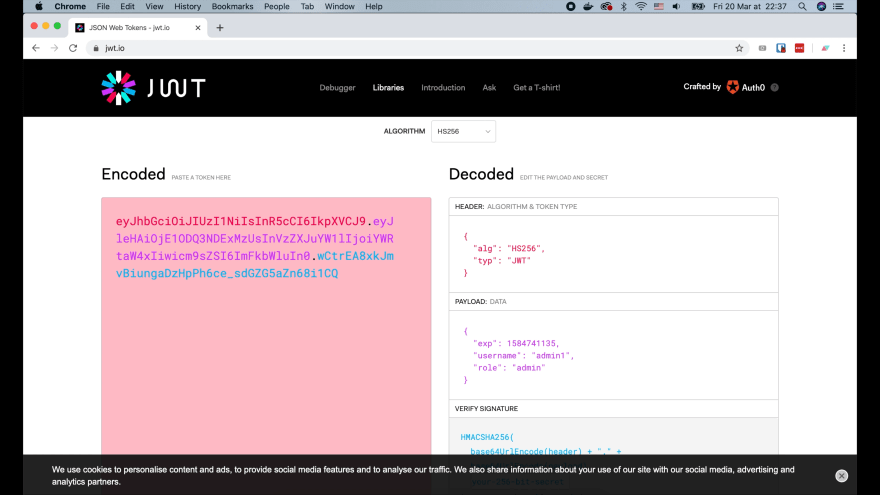
We can see on the Decoded area, the header part contains the algorithm HS256, and token type JWT. The payload part contains the user claims with an expire time, a username, and a role.
So the login RPC is working perfectly. However we havent written a proper interceptor to verify the token yet. So lets go back to the code and do that.
Implement server's auth interceptor
I will create a new service/auth_interceptor.go file, and define a new AuthInterceptor struct inside it.
This interceptor will contain a JWT manager and a map that define for each RPC method a list of roles that can access it. The key of the map is the full method name, and its value is a slice of role names.
type AuthInterceptor struct { jwtManager *JWTManager accessibleRoles map[string][]string}Lets write a NewAuthInterceptor() function to build and return a new auth interceptor object. The jwt manager and accessible roles map will be the input parameters of this function.
func NewAuthInterceptor(jwtManager *JWTManager, accessibleRoles map[string][]string) *AuthInterceptor { return &AuthInterceptor{jwtManager, accessibleRoles}}Now I will add a new Unary() method to the auth interceptor object, which will create and return a gRPC unary server interceptor function.
Then lets open cmd/server/main.go file, and copy the unaryInterceptor() function that weve written before. And paste it inside this Unary() function. Its exactly the function that we need to return.
func (interceptor *AuthInterceptor) Unary() grpc.UnaryServerInterceptor { return func( ctx context.Context, req interface{}, info *grpc.UnaryServerInfo, handler grpc.UnaryHandler, ) (interface{}, error) { log.Println("--> unary interceptor: ", info.FullMethod) // TODO: implement authorization return handler(ctx, req) }}Similarly, we add a new Stream() method, which will create and return a gRPC stream server interceptor function. Then copy and paste the stream interceptor function here.
func (interceptor *AuthInterceptor) Stream() grpc.StreamServerInterceptor { return func( srv interface{}, stream grpc.ServerStream, info *grpc.StreamServerInfo, handler grpc.StreamHandler, ) error { log.Println("--> stream interceptor: ", info.FullMethod) // TODO: implement authorization return handler(srv, stream) }}Now in the main.go file, we have to create a new interceptor object with the jwt manager and a map of accessible roles. For this demo, I will just write a function to return this constant map.
Then in the grpc.NewServer() function, we can pass in the interceptor.Unary() and interceptor.Stream().
func main() { ... interceptor := service.NewAuthInterceptor(jwtManager, accessibleRoles()) grpcServer := grpc.NewServer( grpc.UnaryInterceptor(interceptor.Unary()), grpc.StreamInterceptor(interceptor.Stream()), ) ...}Define accessible roles
Now for the accessibleRoles() function, we need to prepare a list of RPC methods and the roles that can access each of them.
To get the full RPC method name, lets open the terminal and run make client. Then in the server logs, we can see the full method name of the CreateLaptop RPC: /techschool.pcbook.LaptopService/

We know that all methods of LaptopService will starts with the same path, so I define a constant for it here.
Then we can create and return a map like this:
- The first method is
CreateLaptop, which onlyadminusers can call. - The
UploadImagemethod is also accessible foradminonly. - The
RateLaptopmethod can be called by bothadminanduser. - And lets say the
SearchLaptopAPI is accessible by everyone, even for non-registered users. So the idea is: we dont putSearchLaptopor any other publicly accessible RPCs in this map.
func accessibleRoles() map[string][]string { const laptopServicePath = "/techschool.pcbook.LaptopService/" return map[string][]string{ laptopServicePath + "CreateLaptop": {"admin"}, laptopServicePath + "UploadImage": {"admin"}, laptopServicePath + "RateLaptop": {"admin", "user"}, }}OK, now lets get back to the AuthInterceptor. We will define a new authorize() function, which will take a context and method as input, and will return an error if the request is unauthorized.
func (interceptor *AuthInterceptor) authorize(ctx context.Context, method string) error { // TODO: implement this}Then in the Unary() function, we call interceptor.authorize() with the input context and info.FullMethod. If error is not nil, we return immediately.
In similar fashion, For the Stream() function, we call interceptor.authorize() with the stream context and info.FullMethod, and return right away if an error is returned.
func (interceptor *AuthInterceptor) Unary() grpc.UnaryServerInterceptor { return func( ctx context.Context, req interface{}, info *grpc.UnaryServerInfo, handler grpc.UnaryHandler, ) (interface{}, error) { log.Println("--> unary interceptor: ", info.FullMethod) err := interceptor.authorize(ctx, info.FullMethod) if err != nil { return nil, err } return handler(ctx, req) }}// Stream returns a server interceptor function to authenticate and authorize stream RPCfunc (interceptor *AuthInterceptor) Stream() grpc.StreamServerInterceptor { return func( srv interface{}, stream grpc.ServerStream, info *grpc.StreamServerInfo, handler grpc.StreamHandler, ) error { log.Println("--> stream interceptor: ", info.FullMethod) err := interceptor.authorize(stream.Context(), info.FullMethod) if err != nil { return err } return handler(srv, stream) }}Implement authorize function
Now lets implement the authorize() function.
First we get the list of roles that can access the target RPC method. If its not in the map, then it means the RPC is publicly accessible, so we simply return nil in this case.
Else, we should get the access token from the context. To do that, we use the grpc/metadata package.
We call metadata.FromIncomingContext() to get the metadata of the request. If its not provided, we return an error with Unauthenticated status code.
Else we get the values from the authorization metadata key. If its empty, we return Unauthenticated code because the token is not provided.
func (interceptor *AuthInterceptor) authorize(ctx context.Context, method string) error { accessibleRoles, ok := interceptor.accessibleRoles[method] if !ok { // everyone can access return nil } md, ok := metadata.FromIncomingContext(ctx) if !ok { return status.Errorf(codes.Unauthenticated, "metadata is not provided") } values := md["authorization"] if len(values) == 0 { return status.Errorf(codes.Unauthenticated, "authorization token is not provided") } accessToken := values[0] claims, err := interceptor.jwtManager.Verify(accessToken) if err != nil { return status.Errorf(codes.Unauthenticated, "access token is invalid: %v", err) } for _, role := range accessibleRoles { if role == claims.Role { return nil } } return status.Error(codes.PermissionDenied, "no permission to access this RPC")}Otherwise, the access token should be stored in the 1st element of the values. We then call jwtManager.Verify() to verify the token and get back the claims. If an error occurs, it means the token is invalid. So we just return Unauthenticated code to the client.
Else, we iterate through the accessible roles to check if the users role can access this RPC or not. If the users role is found in the list, we simply return nil. If not, we return PermissionDenied status code, and a message saying user doesnt have permission to access this RPC.
And were done with the server authorization interceptor! Lets test it on the terminal. First start the server. Then run the client.
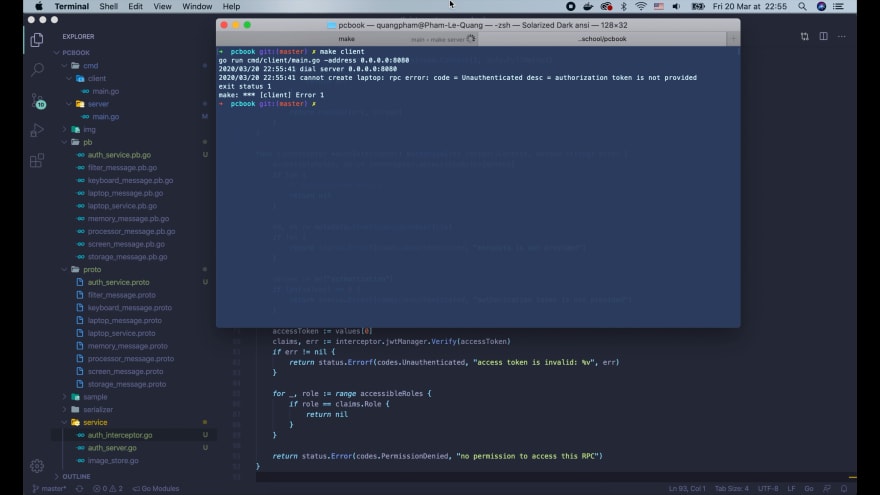
Weve got unauthenticated error, with reason authorization token is not provided. That's exactly what we expect, because we havent login and add access token to the request on the client side yet.
So lets do that now!
Implement Auth service client
As our client code is getting bigger, I will create a separate client package for it. Then create a new auth_client.go file inside this folder.
Lets define the AuthClient struct to call authentication service. This struct will contain a service field, which is the AuthServiceClient generated by protoc.
It also contains a username and a password that will be used to login and get access token.
type AuthClient struct { service pb.AuthServiceClient username string password string}As usual, we define a function to create and return a new AuthClient object. It will have 3 input parameters: a grpc client connection, a username and a password.
func NewAuthClient(cc *grpc.ClientConn, username string, password string) *AuthClient { service := pb.NewAuthServiceClient(cc) return &AuthClient{service, username, password}}The service is created by calling pb.NewAuthServiceClient() and pass in the connection.
Next we write a Login() function to call Login RPC to get access token. Just like other RPC, we create a context with timeout after 5 seconds, call defer cancel().
func (client *AuthClient) Login() (string, error) { ctx, cancel := context.WithTimeout(context.Background(), 5*time.Second) defer cancel() req := &pb.LoginRequest{ Username: client.username, Password: client.password, } res, err := client.service.Login(ctx, req) if err != nil { return "", err } return res.GetAccessToken(), nil}Then we make a login request with the provided username and password. And call service.Login() with that request.
If error is not nil, we simply return it. Else, we return the responded access token to the caller. And the auth client is completed.
Implement client interceptor
Now lets learn how to use it to build a client interceptor. Im gonna create a new client/auth_interceptor.go file in the client packge.
The idea is: we will intercept all gRPC requests and attach an access token to them (if necessary) before invoking the server.
Similar to what we did on the server, I will define an AuthInterceptor struct. It contains an auth client object that will be used to login user, a map to tell us which method needs authentication, and the latest acquired access token.
type AuthInterceptor struct { authClient *AuthClient authMethods map[string]bool accessToken string}What does that mean? Well, basically what we will do is to launch a separate go routine to periodically call login API to get a new access token before the current token expired.
So in the NewAuthInterceptor() function, beside the auth client and auth methods, we also need a refresh token duration parameter. It will tell us how often we should call the login API to get a new token.
func NewAuthInterceptor( authClient *AuthClient, authMethods map[string]bool, refreshDuration time.Duration,) (*AuthInterceptor, error) { interceptor := &AuthInterceptor{ authClient: authClient, authMethods: authMethods, } err := interceptor.scheduleRefreshToken(refreshDuration) if err != nil { return nil, err } return interceptor, nil}In this function, first we will create a new interceptor object. Then we will call an internal function: scheduleRefreshToken() to schedule refreshing access token and pass in the refresh duration. If an error occurs, just return it. Or else, return the interceptor.
Setup schedule to refresh token
Now lets implement the scheduleRefreshToken() function.
First we will need a function to just refresh token with no scheduling. In this function, we just use the auth client to login user.
func (interceptor *AuthInterceptor) refreshToken() error { accessToken, err := interceptor.authClient.Login() if err != nil { return err } interceptor.accessToken = accessToken log.Printf("token refreshed: %v", accessToken) return nil}Once the token is returned, we simply store it in the interceptor.accessToken field. We write a simple log here to observe later, then return nil at the end.
Now in the scheduleRefreshToken() function, we should make sure to call refreshToken() successfully for the first time so that a valid access token is always available to be used.
Then after that, we launch a new go routine. Here I use a wait variable to store how much time we need to wait before refreshing the token.
func (interceptor *AuthInterceptor) scheduleRefreshToken(refreshDuration time.Duration) error { err := interceptor.refreshToken() if err != nil { return err } go func() { wait := refreshDuration for { time.Sleep(wait) err := interceptor.refreshToken() if err != nil { wait = time.Second } else { wait = refreshDuration } } }() return nil}Then we launch an infinite loop, call time.Sleep() to wait. And after that amount of waiting time, call interceptor.refreshToken().
If an error occurs, we should only wait a short period of time, lets say 1 second, before retrying it. If theres no error, then we definitely should wait for refreshDuration.
And the token refreshing schedule is done.
Attach token to the request context
Now comes the important part: adding interceptors to attach the token to the request context.
Just like what we did on the server side, this time we define a Unary() function to return a gRPC unary client interceptor.
Inside this interceptor function, lets write a simple log with the calling method name. Then check if this method needs authentication or not. If the method doesnt require authentication, then nothing to be done, we simply invoke the RPC with the original context.
If it does, we must attach the access token to the context before invoking the actual RPC.
func (interceptor *AuthInterceptor) Unary() grpc.UnaryClientInterceptor { return func( ctx context.Context, method string, req, reply interface{}, cc *grpc.ClientConn, invoker grpc.UnaryInvoker, opts ...grpc.CallOption, ) error { log.Printf("--> unary interceptor: %s", method) if interceptor.authMethods[method] { return invoker(interceptor.attachToken(ctx), method, req, reply, cc, opts...) } return invoker(ctx, method, req, reply, cc, opts...) }}So I will define a new attachToken() function to attach the token to the input context and return the result.
func (interceptor *AuthInterceptor) attachToken(ctx context.Context) context.Context { return metadata.AppendToOutgoingContext(ctx, "authorization", interceptor.accessToken)}In this function, we just use metadata.AppendToOutgoingContext(), pass in the input context together with an authorization key and the access token value.
Make sure that the authorization key string matches with the one we used on the server side.
The stream interceptor can be implemented in a similar way. We write a log, then check if the method requires authentication or not.
If it does, call streamer() with the context that has been attached with access token or else, just call streamer with the original one.
func (interceptor *AuthInterceptor) Stream() grpc.StreamClientInterceptor { return func( ctx context.Context, desc *grpc.StreamDesc, cc *grpc.ClientConn, method string, streamer grpc.Streamer, opts ...grpc.CallOption, ) (grpc.ClientStream, error) { log.Printf("--> stream interceptor: %s", method) if interceptor.authMethods[method] { return streamer(interceptor.attachToken(ctx), desc, cc, method, opts...) } return streamer(ctx, desc, cc, method, opts...) }}And were done with the client-side auth interceptor.
Refactor the gRPC client
Now lets open the cmd/client/main.go file. Before adding the interceptors to the client, Im gonna refactor this a bit.
Lets move this big chunk of code to a separate laptop_client.go file inside the new client package.
In this file, lets define a LaptopClient struct. It will contain the LaptopServiceClient object. Then as usual, we define a function to create a new laptop client object. It will receive a client connection as input. And use that connection to make a new laptop service client.
// LaptopClient is a client to call laptop service RPCstype LaptopClient struct { service pb.LaptopServiceClient}// NewLaptopClient returns a new laptop clientfunc NewLaptopClient(cc *grpc.ClientConn) *LaptopClient { service := pb.NewLaptopServiceClient(cc) return &LaptopClient{service}}Now we must turn the CreateLaptop() function into a method of laptop client object, and make it public with a uppercase letter C.
Then we do similar things for the SearchLaptop(), UploadImage() and RateLaptop() function.
func (laptopClient *LaptopClient) CreateLaptop(laptop *pb.Laptop) {...}func (laptopClient *LaptopClient) SearchLaptop(filter *pb.Filter) {...}func (laptopClient *LaptopClient) UploadImage(laptopID string, imagePath string) {...}func (laptopClient *LaptopClient) RateLaptop(laptopIDs []string, scores []float64) error {...}Now lets go back to the cmd/client/main.go file.
We have to change the pb.LaptopServiceClient to client.LaptopClient. Then call laptopClient.CreateLaptop. We do the same things for all other test functions.
func testCreateLaptop(laptopClient *client.LaptopClient) { laptopClient.CreateLaptop(sample.NewLaptop())}func testSearchLaptop(laptopClient *client.LaptopClient) {...}func testUploadImage(laptopClient *client.LaptopClient) {...}func testRateLaptop(laptopClient *client.LaptopClient) {...}func main() { ... authClient := client.NewAuthClient(cc1, username, password) ...}Add auth interceptor to the client
Now in the main function, we should call client.NewLaptopClient() and pass in the gRPC connection.
const ( username = "admin1" password = "secret")func main() { serverAddress := flag.String("address", "", "the server address") flag.Parse() log.Printf("dial server %s", *serverAddress) cc1, err := grpc.Dial(*serverAddress, grpc.WithInsecure()) if err != nil { log.Fatal("cannot dial server: ", err) } authClient := client.NewAuthClient(cc1, username, password) ...}This is a bit tricky, but were gonna need a separate connection for the auth client because it will be used to create an auth interceptor, which will be used to create another connection for the laptop client.
So Ive changed the connection name to cc1, and create a new auth client with it. To make it simple, here I define username and password as constants.
Then lets create a new interceptor with the auth client. The refresh duration will also be a constant, lets say for this demo, we will refresh it every 30 seconds.
func main() { ... interceptor, err := client.NewAuthInterceptor(authClient, authMethods(), refreshDuration) if err != nil { log.Fatal("cannot create auth interceptor: ", err) } ...}And we also need to write a function authMethods() to define the list of methods that requires authentication.
Im just gonna copy and paste them from the server interceptor, and change this to a map string bool, and change all these values to true.
func authMethods() map[string]bool { const laptopServicePath = "/techschool.pcbook.LaptopService/" return map[string]bool{ laptopServicePath + "CreateLaptop": true, laptopServicePath + "UploadImage": true, laptopServicePath + "RateLaptop": true, }}Alright, back to the main function. We will dial server to create another connection. But this time, we also add 2 dial options: the unary interceptor and the stream interceptor.
func main() { ... cc2, err := grpc.Dial( *serverAddress, grpc.WithInsecure(), grpc.WithUnaryInterceptor(interceptor.Unary()), grpc.WithStreamInterceptor(interceptor.Stream()), ) if err != nil { log.Fatal("cannot dial server: ", err) } laptopClient := client.NewLaptopClient(cc2) testRateLaptop(laptopClient)}And were done with the client.
Test the client's auth interceptor
Lets open the terminal and try it. First run the server. Then run make client.

This time we can see the token refreshed and unary interceptor logs, and 3 laptops were created successfully.
Lets enter y to rate them.

All successful! And we can now see the log for stream interceptor. On the server side, we also see some logs for both unary and stream interceptors.
And after a while, on the client side, we will see that the token is getting refreshed as well.
Before we finish, lets change the username to user1 and see what happens.

As you might expect, weve got permission denied error, because only an user with the admin role can call create laptop API.
So everything is working perfectly. Awesome!
And thats it for todays lecture. I hope you enjoyed it.
Thanks for reading and Ill catch you guys in the next one!
Original Link: https://dev.to/techschoolguru/use-grpc-interceptor-for-authorization-with-jwt-1c5h
Dev To
More About this Source Visit Dev To