
An Interest In:
Web News this Week
- March 27, 2024
- March 26, 2024
- March 25, 2024
- March 24, 2024
- March 23, 2024
- March 22, 2024
- March 21, 2024
Some of Our Sources
- Simplebits
- Team Treehouse
- Joshua Blankenship
- Pearsonified
- Spoon Graphics
- Vandelay Design
- Crazy Leaf Design
- CSS Globe
- Specky Boy
- TechPowerUp
Help Webnuz
Referal links:
Setting up a CI/CD workflow on GitHub Actions for a React App (with GitHub Pages and Codecov)
In this tutorial, I'm going to show you how to create a simple workflow that I use on my personal projects with React.
This workflow created on GitHub Actions will be responsible for automatically test the source code, generate a test coverage report and upload it on Codecov, build and deploy the project on GitHub Pages. All these jobs are activated by a push or pull request event on master branch.
All the source code can be found in this repository:
dyarleniber / react-workflow-gh-actions
Source code of the post: Setting up a CI/CD workflow on GitHub Actions for a React App (with GitHub Pages and Codecov)
Getting started
GitHub Actions allows you automate, customize, and execute software development workflows right in your GitHub repository.
A workflow is a configurable automated process made up of one or more jobs. You can configure your workflows to run when specific activity on GitHub happens, at a scheduled time, or when an event outside of GitHub occurs.
The workflow configuration is define by a YAML file. GitHub provides preconfigured workflow templates.
First, on your React App GitHub repository, navigate to the main page of the repository, click Actions.
Then, you'll see suggestions of CI templates that are the best fit for your project. You can use workflow templates as a starting place to build your custom workflow.
In this case, click Set up this workflow, under the name of the template Node.js.
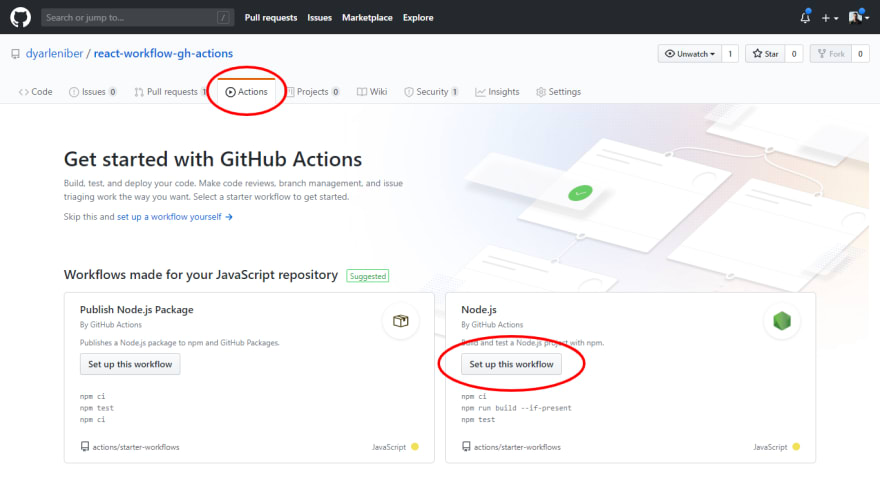
Finally, you'll see a default YAML file like this:
# This workflow will do a clean install of node dependencies, build the source code and run tests across different versions of node# For more information see: https://help.github.com/actions/language-and-framework-guides/using-nodejs-with-github-actionsname: Node.js CIon: push: branches: [ master ] pull_request: branches: [ master ]jobs: build: runs-on: ubuntu-latest strategy: matrix: node-version: [10.x, 12.x, 14.x] steps: - uses: actions/checkout@v2 - name: Use Node.js ${{ matrix.node-version }} uses: actions/setup-node@v1 with: node-version: ${{ matrix.node-version }} - run: npm ci - run: npm run build --if-present - run: npm testThere are 2 events that trigger the workflow on push or pull request. The virtual environment used to run the workflow is an Ubuntu machine in the latest version.
In the steps section, 2 actions and 3 NPM scripts are being used. The first action actions/checkout@v2 is a standard that you must include in your workflow before other actions when your workflow requires a copy of your repository's code. The second one, as the name suggests, it is a set up for Node.js, as you can see, the set up is made in different versions of Node.js, through an array with all the versions used.
Besides these actions, you can browse and search for actions in GitHub Marketplace to use in your workflows.
GitHub Marketplace is a central location for you to find actions created by the GitHub community.
Test coverage report generation
Let's start changing the name, the Node.js version and the NPM scripts used in the workflow:
name: CI/CDon: push: branches: [ master ] pull_request: branches: [ master ]jobs: build: runs-on: ubuntu-latest strategy: matrix: node-version: [12.x] steps: - name: Checkout repository uses: actions/checkout@v2 - name: Set up Node.js ${{ matrix.node-version }} uses: actions/setup-node@v1 with: node-version: ${{ matrix.node-version }} - name: Install dependencies run: npm install - name: Run the tests run: npm test - name: Build run: npm run buildAfter set up Node.js, now, we are installing the dependencies, running the tests and building the application.
You can define a name for each step.
Now, we are going to use Codecov to upload and compare test coverage reports. Codecov is one of the most popular code coverage solution, and it's totally free for open source projects.
First, go to the Codecov website and create an account, you can use your GitHub account to sign up.
Next, access your account on the website, click Repositories, after, click Add new repository and choose the repository you want to use.
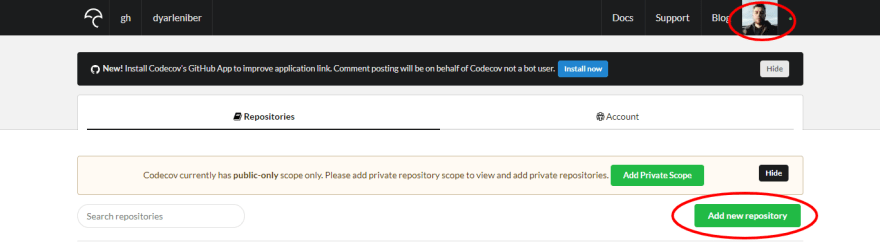
You will see a token, that token will not be useful if your repository is public, otherwise, if your repository is private, you must copy it, as you will need to use it later.
There is an action available in GitHub Marketplace, that easily upload reports to Codecov, we will use it.
The first thing we need to do is change the npm test command to generate the test reports:
- name: Run the tests and generate coverage report run: npm test -- --coverageAfter that, include the following action in the workflow:
- name: Upload coverage to Codecov uses: codecov/codecov-action@v1If you repository is private, you must include the codecov token, through a secret that makes your token accessible in the workflow. Like this:
- name: Upload coverage to Codecov uses: codecov/codecov-action@v1 with: token: ${{ secrets.CODECOV_TOKEN }}We'll create a secret on GitHub for deployment in a moment.
Deployment on GitHub Pages
We'll use GitHub Pages to deploy our application. GitHub Pages are public pages hosted and published through GitHub.
Before adding new steps to the workflow, we need to install and configure a new package in the project.
- Add homepage to
package.json.
Open your package.json and add a homepage field for your project:
"homepage": "https://myusername.github.io/my-app",- Install
gh-pagesand adddeploytoscriptsinpackage.json.
Run:
$ npm install --save gh-pagesAdd the following scripts in your package.json:
"predeploy": "npm run build","deploy": "gh-pages -d build",The
predeployscript will run automatically beforedeployis run.
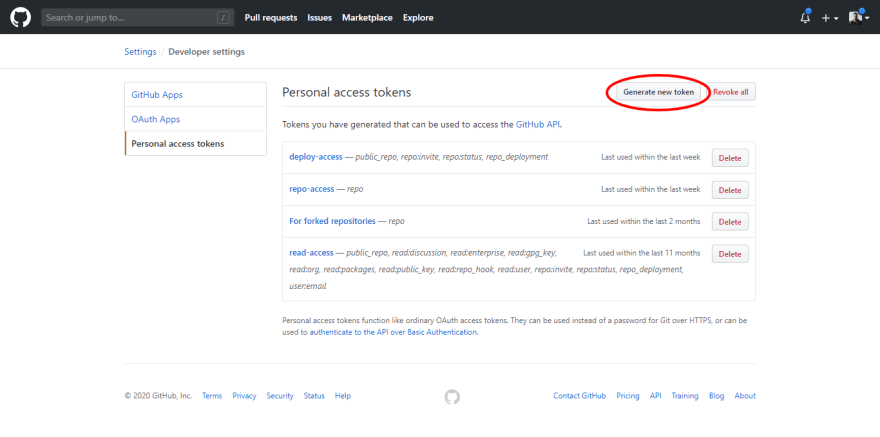
Now we are going to create a new access token, in order to deploy our application through the workflow.
Go to the Personal access tokens area in the Developer settings of your GitHub profile and click Generate new token.
Fill up a note (What's this token for?) and in the repo scope, select only the first 4 options.
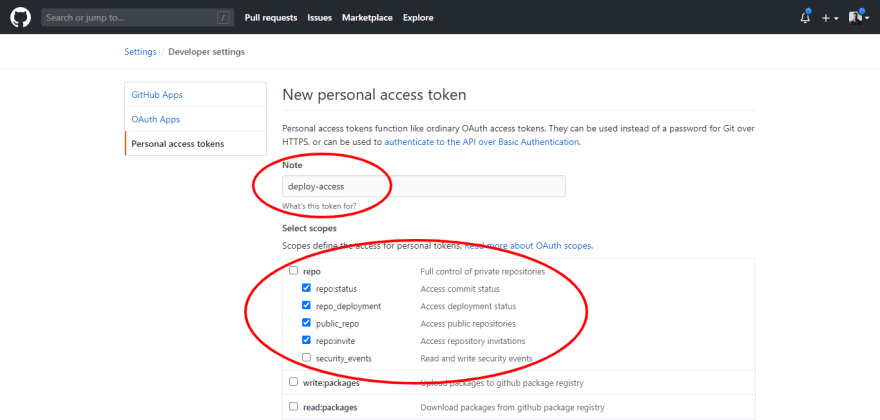
Copy the generated token.
Now, in order to use this token in the workflow on GitHub Actions, we have to create a secret for our repository.
Secrets are encrypted environment variables that allows you to store sensitive information in your repository. The secrets you create are available to use in GitHub Actions workflows.
On GitHub, navigate to the main page of the repository, under your repository name, click Settings. In the left sidebar, click Secrets. And finally, Click Add a new secret.
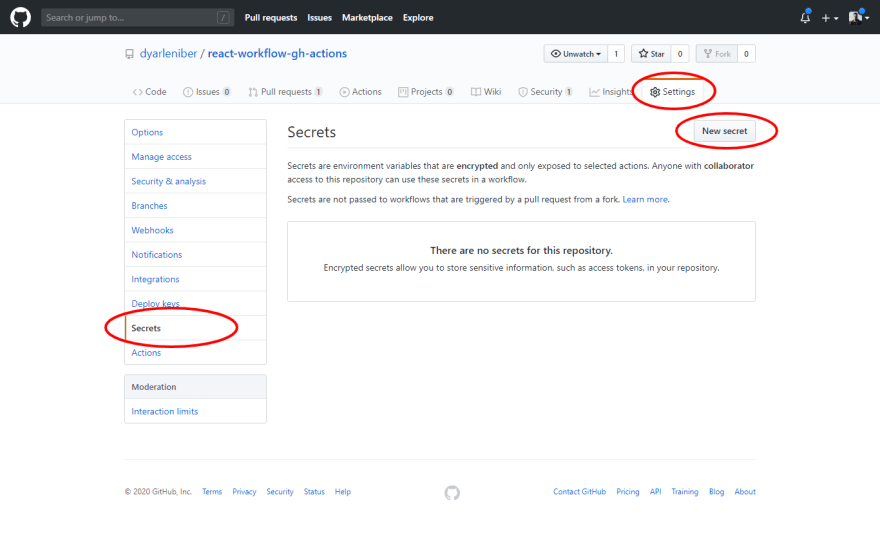
Type a name for your secret in the Name input box, like ACTIONS_DEPLOY_ACCESS_TOKEN.
Enter the value for your secret (which should be the personal access token we just created).
Click Add secret.
Finally, we can include the script npm run deploy as the last step in our workflow.
But, before that, we should make some configurations in the Git. To ensure that it will have all the necessary access to be able to deploy the application.
Your last step on your workflow should be some like this:
- name: Deploy run: | git config --global user.name $user_name git config --global user.email $user_email git remote set-url origin https://${github_token}@github.com/${repository} npm run deploy env: user_name: 'github-actions[bot]' user_email: 'github-actions[bot]@users.noreply.github.com' github_token: ${{ secrets.ACTIONS_DEPLOY_ACCESS_TOKEN }} repository: ${{ github.repository }}The name and email information need not necessarily be your real information. And you must replace ACTIONS_DEPLOY_ACCESS_TOKEN with the name of the secret you just created.
The github.repository variable will automatically get the name of your repository.
To learn more about environment variables on GitHub Actions, please, read this article.
After adding the deploy command on your workflow, click Start commit, and click Commit new file.
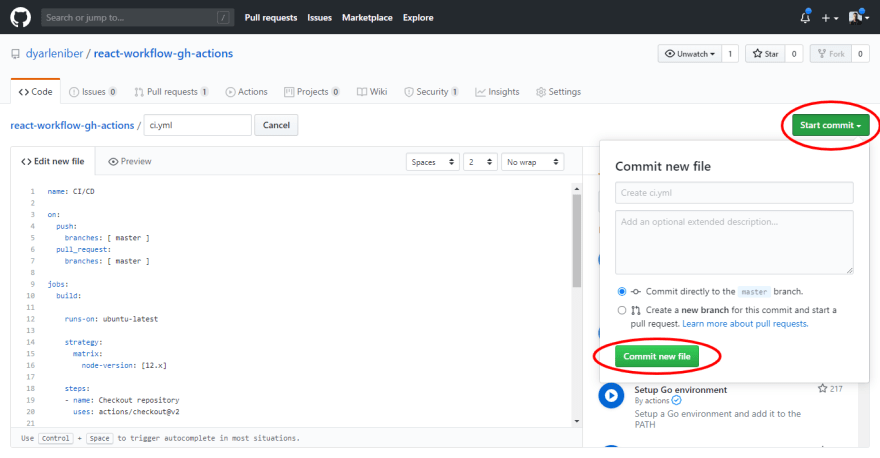
Your final workflow file should be like this:
name: CI/CDon: push: branches: [ master ] pull_request: branches: [ master ]jobs: build: runs-on: ubuntu-latest strategy: matrix: node-version: [12.x] steps: - name: Checkout repository uses: actions/checkout@v2 - name: Set up Node.js ${{ matrix.node-version }} uses: actions/setup-node@v1 with: node-version: ${{ matrix.node-version }} - name: Install dependencies run: npm install - name: Run the tests and generate coverage report run: npm test -- --coverage - name: Upload coverage to Codecov uses: codecov/codecov-action@v1 - name: Build run: npm run build - name: Deploy run: | git config --global user.name $user_name git config --global user.email $user_email git remote set-url origin https://${github_token}@github.com/${repository} npm run deploy env: user_name: 'github-actions[bot]' user_email: 'github-actions[bot]@users.noreply.github.com' github_token: ${{ secrets.ACTIONS_DEPLOY_ACCESS_TOKEN }} repository: ${{ github.repository }}Make sure GitHub Pages option in your GitHub project settings is set to use the gh-pages branch:

Now, in every push or pull request event on master branch, the CI/CD workflow will be activated. And you will be able to see if all steps have passed or not.

Adding status badges
You can also add a workflow status badge to your repository. Status badges show whether a workflow is currently failing or passing. A common place to add a status badge is in the README.md file of your repository, but you can add it to any web page you'd like.
This is the default URL for adding a workflow status badge provided by GitHub Actions:
https://github.com/<OWNER>/<REPOSITORY>/workflows/<WORKFLOW_NAME>/badge.svgIf your workflow uses the name keyword, you must reference the workflow by name. If the name of your workflow contains white space, you'll need to replace the space with the URL encoded string %20.
For more information about GitHub Actions workflow status badge, read this article.
For instance, this will be the badge that I will put in my README.md file:
Codecov also provided a badge you can use in your projects. This is an example of an URL:
[](https://codecov.io/gh/<OWNER>/<REPOSITORY>)In my case, my URL will be:
[](https://codecov.io/gh/dyarleniber/react-workflow-gh-actions)You can also use this amazing website: Shields.io to customise your badges. Accessing the website you will see many options of badges categories you can use, such as Build, Code Coverage, Size, Downloads, License and so on. In each category you can select the service you are using, fill up the name of the repository, customise as you prefer, and copy the link of the badge.
For example, this will be my custom coverage badge:
[](https://codecov.io/gh/dyarleniber/react-workflow-gh-actions)I also included a license badge:
These badges in your README.md file, should look like this:

You can explore the Shields.io website and see the different options of badges available.
References
Original Link: https://dev.to/dyarleniber/setting-up-a-ci-cd-workflow-on-github-actions-for-a-react-app-with-github-pages-and-codecov-4hnp
Dev To
More About this Source Visit Dev To