
An Interest In:
Web News this Week
- April 20, 2024
- April 19, 2024
- April 18, 2024
- April 17, 2024
- April 16, 2024
- April 15, 2024
- April 14, 2024
Some of Our Sources
- Slashdot
- Smashing Magazine
- TutsPlus - Design
- You The Designer
- Fuel Your Creativity
- Noupe
- 24 Ways
- Design Modo
- Willems Lab
- Dev To
Help Webnuz
Referal links:
Basic URL Shortener from Scratch Using NodeJS
In this blog, we will see how to build a URL Shortner like bitly or shorturl using NodeJS.
We may have heard many times that people are asking to build a URL shorter as an interview question, its not that complex but giving it a start to build one is complex though :).
So without wasting time lets do it.
What is a URL Shortner
A URL shortener is a simple tool that takes a long URL and turns it into whatever URL you would like it to be.
Why we need it
Sometimes the links to a location or generally to a social platform become so big that it becomes difficult to manage them. A URL shorter will help in managing, track-compile click data, and one important point they promote sharing.
npm Packages We Are Going To Use
config : It lets you define a set of default parameters, and extend them for different deployment environments (development, QA, staging, production, etc.). For production, we have to define production.js similarly for development devlopment.js. By default, it will look for default.js.
This will be used to store config related to DB and others.
valid-url: This module collects common URI validation routines to make input validation, and maintaining easier and more readable. All functions return an untainted value if the test passes, and undefined if it fails.
This will be used to validate the URL given by the user for a shortening purpose.
shortid: ShortId creates amazingly short non-sequential URL-friendly unique ids.
This will be used to generate a unique id for each shortened URL.
express: The Express philosophy is to provide small, robust tooling for HTTP servers, making it a great solution for single-page applications, web sites, hybrids, or public HTTP APIs.
This will be used to create the server and route different HTTP path.
mongoose: Mongoose is a MongoDB object modeling tool designed to work in an asynchronous environment. Mongoose supports both promises and callbacks. As they use promise we will use async and await feature of JS.
This will be used for connecting with MongoDB, saving, updating and querying the DB.
Next, lets setup MongoDB for setting our database.
Setting Up MongoDB Atlas
I wanted to use the cloud setup of MongoDB instead of a local setup, you can choose what fits better for you.
Steps for setting up cloud MongoDB Atlas account:
- Visit the site https://www.mongodb.com/cloud/atlas
- Make an account, the cloud setup is free
- Create a cluster
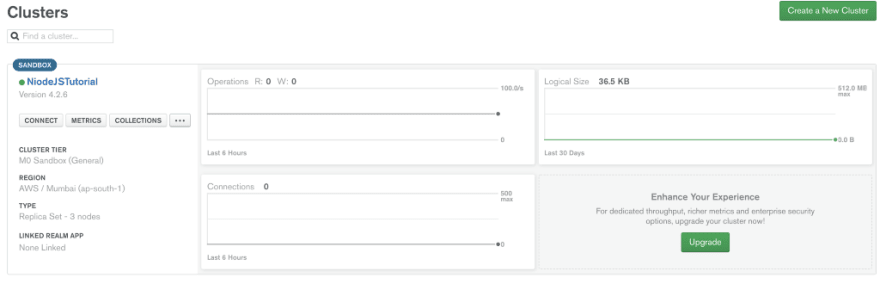
- Go to Connect, create a user
- Go to connect your application, you will see a URL (just remember the location of URL). Password will be replaced by your account password.
Setting Up The Project
Create a separate directory for your project urlshortner , open that directory in your favorite IDE. I am using Visual Studio Code here.
Go inside the folder and type npm init , give the necessary details for setting up the project.
Next, we need to download necessary node packages which we discussed earlier, type following command to download them
npm i express config mongoose shortid valid-urlThe above command will update package.jsonwith the dependencies and download the needed packages inside node_modules folder.
Phewwwwww, Lets Do The Coding Part Now
Open your code editor. Create a folder for storing the config, give the folder name config . Create a file inside folder default.js and give your MongoDB connect URL (we setup it earlier, I told you to remember it ) and baseURL.
- replace the password with the password you have set up for the user.
- allowedClick is a kind of restriction, that how many times the same URL can be used. Later can be used for pricing purpose. You can change it depending on your needs.
Config file for MongoDB setup
We will import necessary packages and connect with MongoDB
Define Schema For Storing URL Details
- mongoose.Schema will define the document details which it will store. When we will code it will be much clear what each detail does.
urlCode : This will store the unique id related to each URL.
longURL : This is the URL which we need to short.
shortUrl : This is the actual short URL
clickCount : This stores how many times users have used the short URL.
Define Route for Shortening the URL
Create a folder name routes , inside that create a file shorturl.js which will have the code for shortening the URL.
Lets understand the code.
First of all, we imported the necessary packages which will be required later on. Used express package to create a route, using that route created an HTTP POST handler.
Next marked it async as it ensures that the function returns a promise, and wraps non-promises in it. Using async allow us to useawait , it makes JavaScript wait until that promise settles and returns its result.
We take out the URL submitted for shortening purposes from the request body, also fetch base URL which is mentioned in default.js . Next, we check if the URL submitted for shortening is a valid URL or not using the isUri method of valid-url package.
After the checking is successful we will query MongoDB to check if the URL sent for shortening already shorten or not. If shorten just return that result else short the URL.
mongoose methods returns a promise so we added await before it to wait till we get response.
For shortening the URL we will generate a unique id using generate method of shortid package. Next, append baseURL with the unique id to generate a URL as a short URL. Also, as the short URL is generated for the first time we will mark the clikcCount to be zero. Save the document and return the result as JSON.
Sample response (sending an amazon product links which need to be shortened).
Define Route for Redirecting the Short URL top Destination
Create a new file inside routes folder named getshortenurl.js .
Lets understand the code.
First of all, we imported the necessary packages which will be required later on. Used express package to create a route, using that route created an HTTP GET handler. The URL will be getting shortUrl as a parameter. This parameter is the unique code that we appended to the baseUrl.
Next, we extract the shortUrl in a separate variable. As the code is unique so we can search the DB if we have any document with that unique code. The return result is stored in a variable.
If the return result is a document that means we have already shortened the URL. Check the clicked count of the returned document if the clicked count is passed the limit which we set in default.js, if yes return an error else increase the click count of the document and update it in the DB also, redirect to the long URL using the redirect method of res object.
Lets Combine Everything
We need to have the main file which will combine all this together, remember we havent created the server yet.
The baseURL which we configured in default.js has the value http://localhopst:8000/v1, because our app is running in localhost and the server is listening on POST 8000. The URL for getShortenUrlRoute is /v1/ so that is appended to the baseUrl..
Lets understand the code.
Import necessary packages with that import the routes which we have created in previous step, import config for MongoDB connection.
Connect to the DB, create the server and connect to a PORT (here its 8000).
app.use(express.json({})) this will parse incoming request body in JSON format.
Next, connect the router to the appropriate URL. Now lets hope things work out. Start the app by using node index.js and play.
After creating a short URL paste the short URL in your browser it should redirect to the main URL.
I hope this blog will help you in understanding the basics of how to make a URL shorter. For code, you can refer to here on GitHub.
If you enjoyed reading this, dont forget the like.
Thank you.
If you enjoyed the content buy me a coffee. SachinSarawgi.
Original Link: https://dev.to/sachinsarawgi/url-shortner-with-limit-onclick-count-4maf
Dev To
More About this Source Visit Dev To