
An Interest In:
Web News this Week
- April 19, 2024
- April 18, 2024
- April 17, 2024
- April 16, 2024
- April 15, 2024
- April 14, 2024
- April 13, 2024
Some of Our Sources
- Technology Review
- TutsPlus - Code
- Smashing Magazine
- Six Revisions
- You The Designer
- Naldz Graphics
- Web Design Ledger
- Wal You
- Design Modo
- Android Dissected
Help Webnuz
Referal links:
Beginner's Guide to Google OAuth with Passport.js
As a user, it's very often we choose to use our Google (or Facebook, Twitter, etc) account to sign into a web application, as it is more convenient and quick than creating a new log in account. Usually the process goes like this:
- You click "Sign in with Google" button
- You get redirected to a Google consent screen, asking if you grant permission for the app to gain access to your Google profile info
- You click "Allow"
- Get redirected to the actual application
The process seems very simple. But when I first implemented Google log-in for my web app, I realized there was much more going on behind the scene. I decided to implement it with the help of an authentication middleware known as Passport.js.
Based on what I learned, this article will take you through the process of using Passport.js to set up Google OAuth for an Express.js web application. Please note that this article will not cover any EJS template and refactoring process.
Prerequisites
You'll need to have:
An existing app built with Express.js and Mongo database
Users collection in your Mongo DB, created by mongoose's users model class. There has to be googleId set up as a String in your user schema.
This collection is for storing users' Google ID so that the app will be able to associate resources (such as posts) with these users and to identify them after they sign out and sign in again.
- Passport.js and Passport Google OAuth 2.0 strategy installed.To check if they have been installed, run the following command in the terminal.
cat package.json | grep passport If they have been installed, the result will be similar to the following.
"passport": "^0.4.1","passport-google-oauth20": "^2.0.0"If the result is empty, run the following command in your terminal to install them.
npm install passport passport-google-oauth20 --saveOAuth Flow
The following flow chart shows the big picture of OAuth flow, from the developer's perspective.
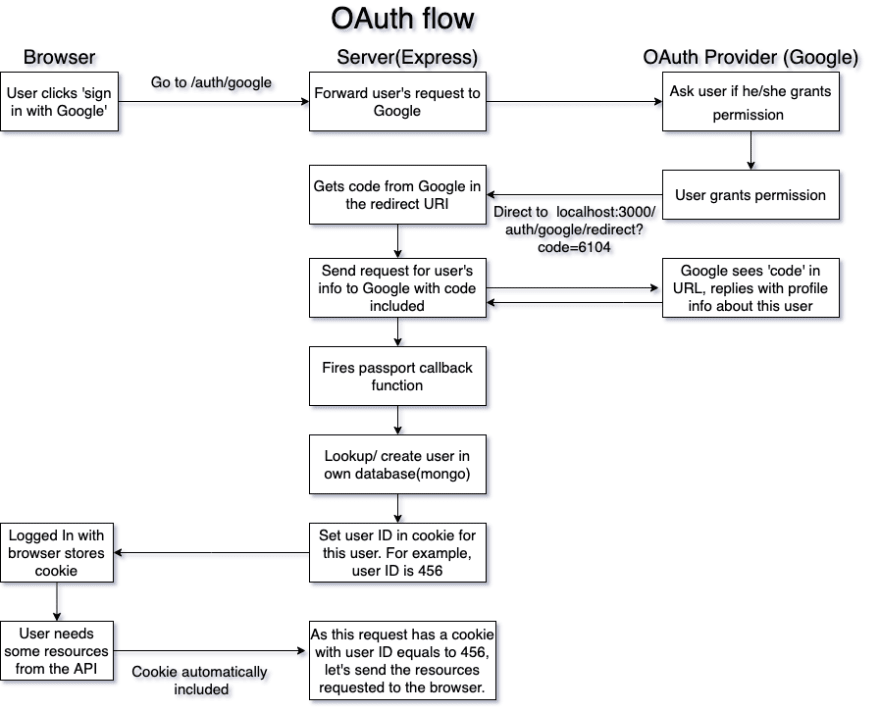
We will discuss these steps in a moment. To kick things off, first we need to set up Passport and configure its strategy.
Preparation Step 1: Passport setup
To set up Passport, you will need to require both Passport and Passport-Google-OAuth2.0 and instruct Passport to use a new instance of Google Strategy.
const passport = require("passport");const GoogleStrategy = require("passport-google-oauth20").Strategy;passport.use(new GoogleStrategy());Preparation Step 2: Getting credentials from Google
In order for Google to identify which application's Passport interacts with their API, you will need to obtain clientID and clientSecret in Google Developers Console. You may refer to this guide for the steps.
You will also be asked to fill out the "Authorized JavaScript Origins" and "Authorized redirect URI". Authorized JavaScript should be your localhost URL that your app listens to (e.g. http://localhost:3000), whereas Authorized redirect URI would be the route that you would like the user to be sent to after he/she grants permission to your app. In this example, we set it up as http://localhost:3000/auth/google/redirect.
Preparation step 3: Securing the keys
For security, before hooking the Google credentials to our Google strategy, we need to save them in a keys.js file of config folder. We should add this file to gitignore so that it won't be committed to Git.
module.exports = { mongodb:{ dbURI: "your_mongo_atlas_SRV_address" }, google:{ clientID:"your_client_ID", clientSecret:"your_client_secret" }};Preparation step 4: Configuring Google Strategy
The next step would be requiring the keys file we just created in app.js as well as configuring Google Strategy by hooking it to your Google credentials and Authorized redirect URI you just created in the Google Developers Console.
For now, don't worry about the second argument accessToken - I will explain in implementation Step 3 below.
const passport = require("passport");const GoogleStrategy = require('passport-google-oauth20').Strategy;const keys = require("./config/keys");passport.use( new GoogleStrategy( { clientID: keys.google.clientID, clientSecret: keys.google.clientSecret, callbackURL: "/auth/google/redirect" }, accessToken => { console.log("access token: ", accessToken); } ));Now let's go over the basic OAuth flow again. I've included code snippets to show how to implement the flow.
Implementation Step 1: When user clicks "Log in with Google"
The app then hands control to Passport to communicate with Google to handle authentication. User will be directed to the Google page asking for user's permission.
Passport has already been set up previously so it will start the OAuth flow.
app.get("/auth/google", passport.authenticate("google", { scope: ["profile", "email"] }));A quick explanation of scope: it specifies which user's Google information that you want your app to get access to. In this example, I need access to the user's Google profile and email address, which is why I put profile and email next to the scope. A whole list of scopes can be found here.
Implementation Step 2: After user clicks "Allow" on the consent screen
The page will redirect to your redirect URI which you set up in Google Developers Console. The URI also contains a code from Google, which will be used by Passport to request Google for user's info.
app.get("/auth/google/redirect",passport.authenticate('google'));Implementation Step 3: When Google replies with the user's profile info
The server fires passport callback function, which looks up or creates user in our app's database.
Since we only want one user record no matter how many times the user signs in, first our app needs to check whether our database already has this user with the given Google profile ID. If the answer is yes, we can skip creating a user in our database. However, if it's not the case, we need to create a new user.
To achieve this, we need to modify the passport callback function to the following. We also need to require mongoose and the users model of our database.
const passport = require('passport');const GoogleStrategy = require('passport-google-oauth20').Strategy;const mongoose = require('mongoose');const keys = require('./config/keys');const User = require("your_user_model_file_path");passport.use( new GoogleStrategy({ clientID: keys.google.clientID, clientSecret: keys.google.clientSecret, callbackURL: '/auth/google/redirect' }, (accessToken, refreshToken, profile, done) => { // passport callback function //check if user already exists in our db with the given profile ID User.findOne({googleId: profile.id}).then((currentUser)=>{ if(currentUser){ //if we already have a record with the given profile ID done(null, currentUser); } else{ //if not, create a new user new User({ googleId: profile.id, }).save().then((newUser) =>{ done(null, newUser); }); } }) }));A quick explanation of the arguments in the callback function:
accessToken: Access tokens are the thing that applications use to make API requests on behalf of a user. In this example, we won't use any access token.
refreshToken: Access tokens typically have a limited lifetime. When they expire and if the app wants to gain access to a protected resource, refresh token are used to allow an app to obtain a new access token without prompting the user. We also don't need to use any refresh token in this example.
done function: this is called to tell passport that we have finished looking up or creating a user and it should now proceed with the authentication flow.
null: an error object which tells passport things are fine and there is no error.
Implementation Step 4: Calling Passport's serializeUser function.
In other words, Passport generates some identifying token, stuff it inside a cookie and send to the user's browser.
user in the code refers to the user model instance we just looked up or created in our database, whereas user.id is the ID assigned by Mongo, instead of Google profile ID.
Imagine a scenario when the user can log in your app with Facebook or Twitter account apart from Google. That means he/ she can be logged in without a Google ID. That's why we use user.id instead of Google ID in the serializeUser function.
passport.serializeUser((user, done) => { done(null, user.id);});Implementation Step 5: Later the user needs some resources from our app on the browser, say, asking for some posts...
the cookie will be automatically added to the request sent to the server. Server will then take the identifying token from cookie, pass into deserializeUser function to turn it into a user.
Passport then figures out the user has already been authenticated and directs the server to send the requested posts to the user's browser.
passport.deserializeUser((id, done) => { User.findById(id).then(user => { done(null, user); });});Implementation Step 6: Instruct Passport to use cookies to handle authentication for us
First, let's install cookie-session by running the following command in the terminal.
npm install cookie-session --saveWe then need to require cookie-session in our app.js file.
const cookieSession = require("cookie-session");Next, let's create a key to encrypt the cookie and store it inside keys.js file in config folder. The key can be any random characters.
module.exports = { mongodb:{ dbURI: "your_mongo_atlas_SRV_address" }, google:{ clientID:"your_client_ID", clientSecret:"your_client_secret" } session:{ cookieKey:"cookie_key_set_up_by_you" }};After this step, let's add the following to your app.js file to tell your app to use cookie session and to tell passport to use cookie-session to handle authentication. maxAge refers to the milliseconds of the duration that the cookie will last.
app.use(cookieSession({ // milliseconds of a day maxAge: 24*60*60*1000, keys:[keys.session.cookieKey]}));app.use(passport.initialize());app.use(passport.session());Implementation Step 7: Test if it works!!
User model instance we got from deserializeUser function is now added to the req object as req.user .
We can make use of req.user to test if the whole OAuth works.
First, we can modify the callback route for Google to redirect to to the following.
router.get("auth/google/redirect",passport.authenticate("google"),(req,res)=>{ res.send(req.user); res.send("you reached the redirect URI");});Then, we set up a logout route.
app.get("/auth/logout", (req, res) => { req.logout(); res.send(req.user); });To test, let's restart the server and go to http://localhost:3000/auth/google.
If it works, you will be directed to Google consent screen.
After you click "Allow", you should be able to see req.user object which contains information that you set up for your user model (i.e. at least google ID) and the message "you reached the redirect URI".
To check if logout function works, you can go to http://localhost:3000/auth/logout. If you don't see any req.user object, it means the cookie has been destroyed and now you logged out!
Congratulations! We did it! We have successfully used Passport.js to set up Google OAuth in our web application.
If you want to find out when I put out new blog posts, you can follow me on Twitter, where I will post the link as soon as my new post is published.
References:
Original Link: https://dev.to/phyllis_yym/beginner-s-guide-to-google-oauth-with-passport-js-2gh4
Dev To
More About this Source Visit Dev To