
An Interest In:
Web News this Week
- April 17, 2024
- April 16, 2024
- April 15, 2024
- April 14, 2024
- April 13, 2024
- April 12, 2024
- April 11, 2024
Some of Our Sources
- Engadget
- Mashable
- Pearsonified
- Smashing Apps
- Creative Curio
- Web Designer Depot
- CSS Globe
- Web Resource Source
- Willems Lab
- The Verge
Help Webnuz
Referal links:
Develop and Dockerize a Blogging API With Deno, Oak, andMySQL
If you're someone who has been working with Node.js for a while, chances are you've heard of Deno, the new JavaScript runtime with special attention towards security.
Although it's at an early stage of its life, there are a good number of modules out there. Thanks to services like Pika, one can even use npm packages inside Deno.
In this project, my goal was to see how much effort it takes to build a simple API with authentication using whatever modules are available for the runtime at this moment and also if I can dockerize it with ease or not.
I must admit, it was easier than I thought. By utilizing some third party modules and an excellent hayd/deno docker image created by Andy Hayden, I was able to get a functional blogging API up and running with stateless authentication within around 4 hours. The modules I've used are -
- oak-a middleware framework for Deno's net server.
- deno_mysql-MySQL and MariaDB (5.5 and 10.2+) database driver for Deno.
- bcrypt-a is a port of jBCrypt to TypeScript for use in Deno.
- djwt-the absolute minimum to make JSON Web Tokens in Deno.
- slugify-a string slugifier.
Source Code
Source code for this tutorial can be found in the simplified-tutorial-version branch of following repository-
Introduction toOak
Oak is a middleware framework for Deno inspired by the popular Koa middleware framework. Before we begin working on the project, having an understanding of a few concepts like middleware and routing is crucial.
Middleware
Create a file app.ts somewhere in your computer and put following code there -
import { Application } from "https://deno.land/x/oak/mod.ts";const app = new Application();app.use((ctx) => { ctx.response.body = "Hello World!";});console.log("app running -> http://localhost:3000");await app.listen({ port: 3000 });The code can be run by executing following command on your terminal-
deno run --allow-net app.tsDeno uses URLs for importing modules and third-party modules can be pulled in from https://deno.land/x which is a hosting service for ES modules.
Once the Application class is imported from Oak, an app instance can be created. app.use() function is used for registering middleware. The function passed as a parameter to app.use() call is the actual middleware. All middleware in Oak has access to a context object denoted by ctx that contains things like the request and response objects. If you want to learn about the context in more detail follow this link.
A middleware can either end a request by returning a response or can pass it to the next one using the next method. Middleware are processed as stack. A more complex example with middleware for logging incoming requests with response time can be created with following the code -
import { Application } from "https://deno.land/x/oak/mod.ts";const app = new Application();// Loggerapp.use(async (ctx, next) => { await next(); const rt = ctx.response.headers.get("X-Response-Time"); console.log(`${ctx.request.method} ${ctx.request.url} - ${rt}`);});// Timingapp.use(async (ctx, next) => { const start = Date.now(); await next(); const ms = Date.now() - start; ctx.response.headers.set("X-Response-Time", `${ms}ms`);});// Hello World!app.use((ctx) => { ctx.response.body = "Hello World!";});console.log("app running -> http://localhost:3000");await app.listen({ port: 3000 });Two new middleware has been added for logging the incoming request and the time took to respond in the console respectively. You can test out the code again by restarting the server.
Middleware can be exported and imported as well. Create a directory called middleware on the root of your project and create two files named logger.ts and timer.ts respectively. Code for logger.ts is as follows -
export default async (ctx: any, next: any) => { await next(); const rt = ctx.response.headers.get("X-Response-Time"); console.log(`${ctx.request.method} ${ctx.request.url} - ${rt}`);}And for timer.ts as follows -
export default async (ctx: any, next: any) => { const start = Date.now(); await next(); const ms = Date.now() - start; ctx.response.headers.set("X-Response-Time", `${ms}ms`);}Now import these two exported functions inside app.ts and register using app.use() function -
import { Application } from 'https://deno.land/x/oak/mod.ts';import logger from "../middleware/logger.ts";import timer from "../middleware/timer.ts";const app = new Application();app.use(logger);app.use(timer);// Hello World!app.use((ctx) => { ctx.response.body = "Hello World!";});console.log("app running -> http://localhost:3000");await app.listen({ port: 3000 });Yeah, that's better. Middleware can be either asynchronous or synchronous though most of the middleware in this project is going to be asynchronous. This directory will be now used as our project root. As we go forward more complex middleware will be added.
Routing
In Oak, the Router class can be used for producing middleware to enable routing based on the path-name of the request. So far the application responds with hello world no matter what endpoint we hit, that's not what we want. So modify app.ts to look like following -
import { Application, Router, Status } from "https://deno.land/x/oak/mod.ts";import logger from "../middleware/logger.ts";import timer from "../middleware/timer.ts";const app = new Application();const router = new Router();app.use(logger);app.use(timer);// Hello World!router.get("/", (ctx) => { ctx.response.status = Status.OK; ctx.response.type = "json"; ctx.response.body = { status: "success", message: "Hello World!", data: null, };});app.use(router.routes());console.log("app running -> http://localhost:3000");await app.listen({ port: 3000 });To use the Router class, an instance of it has to be created. Routes with GET, POST, PUT, PATCH, DELETE methods can be created by calling the corresponding function on the Router instance. You can learn more about this class by following this link.
Each route registration takes the path-name as a string and a function as middleware. Just like the app.use() call, all route middleware has access to the context.
Status code for the response can be set using ctx.response.status property. A status is a simple number, the Status class provides properties containing status codes for various situations so, Status.OK is 200, Status.NotFound is 404, you get the idea.
Type and contents of the response can be set using ctx.response.type and ctx.response.body properties.
Routes can be registered in the app instance using app.use() call passing router.routes() as a parameter, where router is the instance of Router class.
I'm using JSend-a specification for a simple, no-frills, JSON based format for application-level communication but you're free to use whatever you like.
Project Structure
I will try not to complicate the project structure very much, only what's necessary-

To create this folder structure open your terminal inside your project root and execute the following command-
mkdir controllers db docker-entrypoint-initdb.d routes; touch controllers/blogs.ts controllers/auth.ts db/mysql.ts docker-entrypoint-initdb.d/blogs.sql docker-entrypoint-initdb.d/users.sql middleware/authorize.ts middleware/error.ts routes/blogs.ts routes/auth.tsWe've already created the middleware directory, middleware/logger.ts, middleware/timer.ts and app.ts files so, I'm skipping them in the command.
Once the structure is ready, open the project in a code editor like Visual Studio Code.
An official VSCode extension is available in the market place-Deno
The first thin we'll deal with is the Docker setup in next section.
Docker Setup
Open up the Dockerfile and update its content as follows-
FROM hayd/alpine-deno:latestEXPOSE 3000WORKDIR /usr/appCOPY . .CMD [ "run", "--unstable", "--allow-net", "--allow-env" "--allow-read" "app.ts" ]I've used the excellent hayd/deno image as the base. The dockerfile loads the base image, sets a working directory, copies all the project file and, sets the default command to run.
Entry-point for this image is the deno executable itself, so all we need to pass in the CMD instruction is the list of arguments to be passed.
If you want to learn more about dockerfile, you can from the official Dockerfile reference page.
Next, open up the docker-compose.yml and update its content as follows-
version: "3.8"services: db: image: mysql:5.7.30 # https://hub.docker.com/_/mysql command: --default-authentication-plugin=mysql_native_password --explicit_defaults_for_timestamp restart: always volumes: - ./docker-entrypoint-initdb.d:/docker-entrypoint-initdb.d environment: MYSQL_USER: "dino" MYSQL_DATABASE: "deno-blog" MYSQL_PASSWORD: guUNSPq6DN7uH3F7 MYSQL_ROOT_PASSWORD: 63eaQB9wtLqmNBpg api: build: . command: run --unstable --allow-net --allow-env --allow-read app.ts restart: always depends_on: - db volumes: - ./:/usr/app ports: - 3000:3000 environment: - DB_HOST=db # this should be identical to the database service name - DB_USER=dino - DB_DATABASE=deno-blog - DB_PASSWORD=guUNSPq6DN7uH3F7 - TOKEN_SECRET=QA3GCPvnNO3e6x29dFfzbvIlP8pRNwif # don't forget to change thisIn this compose file, there are two services. For the db service, I'm using the official mysql image with a version tag of 5.7.30. All the configuration options used here can be found on the image page at the docker hub.
The api service uses our previously created dockerfile for building the container. The rest of the file is pretty self-explanatory I think.
Again if you want to learn more about docker compose file you from the official Compose file version 3 reference page.
Install the official docker extension of VSCode to avoid unwanted mistakes - Docker
The last thing we have to is write the SQL code for table initialization. Open up docker-entrypoint-initdb.d/blogs.sql and update its content as follows-
CREATE TABLE IF NOT EXISTS blogs ( id int(11) NOT NULL AUTO_INCREMENT, title varchar(255) NOT NULL, content text NOT NULL, slug varchar(255) NOT NULL UNIQUE, created_at timestamp NOT NULL DEFAULT CURRENT_TIMESTAMP, PRIMARY KEY (id)) ENGINE=InnoDB AUTO_INCREMENT=2 DEFAULT CHARSET=utf8;And update docker-entrypoint-initdb.d/users.sql file content as follows-
CREATE TABLE IF NOT EXISTS users ( id int(11) NOT NULL AUTO_INCREMENT, name varchar(255) NOT NULL, email varchar(255) NOT NULL UNIQUE, password varchar(255) NOT NULL, created_at timestamp NOT NULL DEFAULT CURRENT_TIMESTAMP, PRIMARY KEY (id)) ENGINE=InnoDB AUTO_INCREMENT=2 DEFAULT CHARSET=utf8;To test out our set-up, open-up terminal inside the project root and run following command-
docker-compose up --buildThere will be a wall of text but look for something like the following-
db_1 | 2020-06-08T17:27:05.115386Z 0 [Note] Event Scheduler: Loaded 0 eventsdb_1 | 2020-06-08T17:27:05.116258Z 0 [Note] mysqld: ready for connections.db_1 | Version: '5.7.30' socket: '/var/run/mysqld/mysqld.sock' port: 3306 MySQL Community Server (GPL)If everything goes fine the application should be running on http://127.0.0.1:3000 address.
You can stop the application by hitting control + c key combination. The --build parameter is only necessary when you have to rebuild the container. Otherwise you can use docker-compose up to restart the container when needed.
You can learn more about docker-compose command line interface from the official Compose command-line interface reference page.
Also I think this is a good time to configure the database driver. In this project, I won't be using any ORM or query builder. Instead, we'll use the MySQL driver itself to execute our queries. So open up the db/mysql.ts file and add following code to it -
import { Client } from "https://deno.land/x/mysql/mod.ts";const client = await new Client().connect({ hostname: Deno.env.get("DB_HOST"), username: Deno.env.get("DB_USER"), password: Deno.env.get("DB_PASSWORD"), db: Deno.env.get("DB_DATABASE"),});export default client;Here, we're importing Client class and creating a connection to the database. The connect() function takes necessary configuration as its parameter. These configuration parameters will come from the environment as set in the docker-compose.yml file. We're then default exporting the object.
Now that we have Docker set-up we're going to work on the API functionalities. And for that we're going to follow these three steps-
- Write controller function.
- Import and register controller function as route middleware.
- Register routes from router instance in app instance.
So let's begin implementing the CRUD functionalities.
CRUD Operations
We'll implement five endpoints-
- Index-for returning all the blogs in database.
- Read-for returning single blog based on slug.
- Create-for creating new blogs.
- Update-for updating individual blogs.
- Delete-for deleting individual blogs.
As mentioned previously, we'll implement functionalities in three steps.
Step 1: Open up the controllers/blogs.ts file and put following code in it -
import { Status } from "https://deno.land/x/oak/mod.ts";import client from "../db/mysql.ts";export async function index(ctx: any) { const blogs: any = (await client.execute("SELECT * FROM blogs")).rows; ctx.response.status = Status.OK; ctx.response.type = "json"; ctx.response.body = { status: "success", message: `${blogs.length} blogs found in database`, data: { blogs }, }}Here is the middleware function responsible for getting all blogs from the database. This function will be used as route middleware in the next step.
The code is almost self-explanatory. We're importing MySQL client from db/mysql.ts. Queries can be executed by calling client.execute() function. We're querying the blogs table and saving the returned rows in a variable called blogs. We're then returning a well-formatted response with appropriate status code, type, and payload.
If you want to learn more about about the usage of this database driver follow this link.
Step 2: In this step, open up routes/blogs.ts file and update it's content to look like the following -
import { Router } from "https://deno.land/x/oak/mod.ts";import { index, } from "../controllers/blogs.ts";const router = new Router();router.get("/blogs", index);export default router;We're importing the index function from controllers/blogs.ts file and using that as the middleware for /blogs route. We're also exporting the router object from this file.
Step 3: The last step is registering the routes in the app instance. Open up app.ts file and update its code to look like the following -
import { Application, Router, Status } from "https://deno.land/x/oak/mod.ts";import logger from "./middleware/logger.ts";import timer from "./middleware/timer.ts";import blogs from "./routes/blogs.ts";const app = new Application();const router = new Router();app.use(logger);app.use(timer);router.get("/", (ctx) => { ctx.response.status = Status.OK; ctx.response.type = "json"; ctx.response.body = { status: "success", message: "Hello World!", data: null, };});app.use(router.routes()) .use(blogs.routes());console.log("app running -> http://localhost:3000");await app.listen({ port: 3000 });Most of the code in this file remains unchanged from our previous example. Only new things are the importing of the router object from routes/blogs.ts at line 6 and registration of the routes in the app instance at line 25.
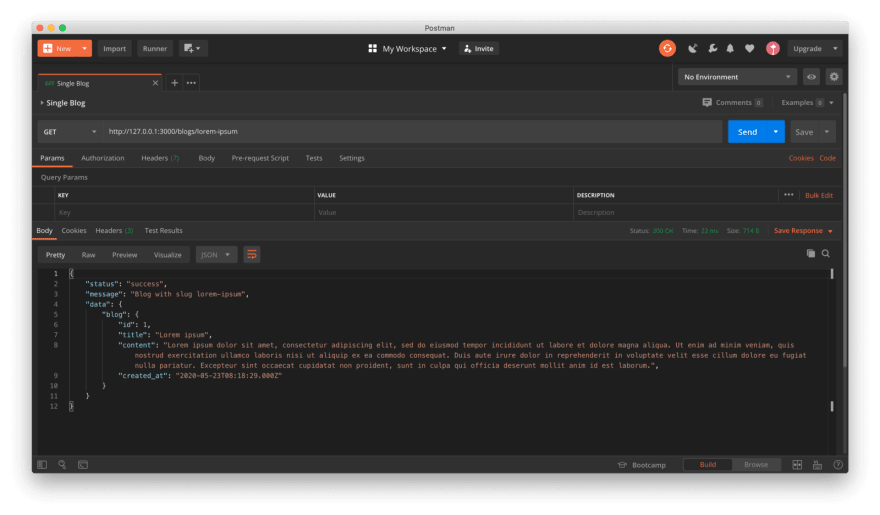
With all the three previously mentioned steps done, now we're ready to test out this endpoint. Restart the server and visit http://127.0.0.1:3000/blogs to see the output it produces-

Assuming that you've done the docker setup properly and have not made any mistakes in your code, you should see a success response. I have previously created blogs in the database, but in your case, you should get 0 blogs and an empty array.
Error Handling
As you may have already noticed there is a surprising lack of error handling in this application. If the code fails at any given time, it's hard to understand what's going on as all we're gonna get is a blank response with a status code.
One thing that we can do is we can put try-catch blocks inside our controller functions so that we can respond properly in cases of failures. But then we'll have to copy and paste the same looking error responses in all our controller functions which are not ideal.
A better idea is to write a global middleware like the ones we've written earlier and do the error handling centrally. So open up middleware/error.ts and put following code in it -
import { isHttpError, Status } from "https://deno.land/x/oak/mod.ts";export default async (ctx: any, next: any) => { try { await next(); const status = ctx.response.status || Status.NotFound; if (status === Status.NotFound) { ctx.throw(Status.NotFound, "Not Found!"); } } catch (err) { if (isHttpError(err)) { const status = err.status; ctx.response.status = status; ctx.response.type = "json"; ctx.response.body = { status: status >= 400 && status < 500 ? "fail" : "error", message: err.message, }; } }};This is a simple middleware that catches any error thrown within the app context. In the try block, we pass control to the next middleware in the stack by calling next(). We also check if the user has hit a non-existent route by checking the value of ctx.response.status, if yes we throw a not found error within the app context, catch that and respond with a nicely formatted error response.
Open up app.ts, import the middleware, and register it along with the other middleware functions.
// previously written codesimport error from "./middleware/error.ts";// previously written codesapp.use(error);That's it, the error handling middleware should be ready for action now. Try this out by visiting a non existent endpoint-

That's good enough for this simple project. Lets carry on with the other CRUD endpoints following our three steps procedure.
Step 1: Open up the controllers/blogs.ts file again and add rest of the four functions. The final form of the file should look like as follows -
import { Status } from "https://deno.land/x/oak/mod.ts";import { slugify } from "https://deno.land/x/slugify/mod.ts";import client from "../db/mysql.ts";export async function index(ctx: any) { const blogs: any = (await client.execute("SELECT * FROM blogs")).rows; ctx.response.status = Status.OK; ctx.response.type = "json"; ctx.response.body = { status: "success", message: `${blogs.length} blogs found in database`, data: { blogs }, };}export async function store(ctx: any) { const body = await ctx.request.body(); const title = body.value.title; const slug = slugify(body.value.title, { lower: true }); const content = body.value.content; const result: any = await client.execute( "INSERT INTO blogs (title, slug, content) VALUES (?, ?, ?)", [title, slug, content], ); ctx.response.status = Status.Created; ctx.response.type = "json"; ctx.response.body = { status: "success", message: `${result.affectedRows} blog created in database`, data: { blog: { id: result.lastInsertId, }, }, };}export async function show(ctx: any) { const result = await client.execute( "SELECT * FROM blogs WHERE slug = ?", [ctx.params.slug], ); const rows: any = result.rows; if (rows.length > 0) { const blog: Blog = { id: rows[0].id, title: rows[0].title, content: rows[0].content, created_at: rows[0].created_at, }; ctx.response.status = Status.OK; ctx.response.type = "json"; ctx.response.body = { status: "success", message: `Blog with slug ${ctx.params.slug}`, data: { blog }, }; } else { ctx.throw(Status.NotFound); }}export async function update(ctx: any) { const result = await client.execute( "SELECT * FROM blogs WHERE slug = ?", [ctx.params.slug], ); const rows: any = result.rows; if (rows.length > 0) { const blog = { id: rows[0].id, title: rows[0].title, content: rows[0].content, created_at: rows[0].created_at, }; const body = await ctx.request.body(); blog.title = body.value["title"] ? body.value["title"] : blog.title; blog.content = body.value["content"] ? body.value["content"] : blog.content; await client.execute( "UPDATE blogs SET title = ?, content = ? WHERE slug = ?", [blog.title, blog.content, ctx.params.slug], ); ctx.response.status = Status.OK; ctx.response.type = "json"; ctx.response.body = { status: "success", message: `Blog with slug ${ctx.params.slug} updated`, data: { blog }, }; } else { ctx.throw(Status.NotFound); }}export async function destroy(ctx: any) { const result = await client.execute( "SELECT * FROM blogs WHERE slug = ?", [ctx.params.slug], ); const rows: any = result.rows; if (rows.length > 0) { await client.execute("DELETE FROM blogs WHERE slug = ?", [ctx.params.slug]); ctx.response.status = Status.OK; ctx.response.type = "json"; ctx.response.body = { status: "success", message: `Blog with slug ${ctx.params.slug} deleted`, data: null, }; } else { ctx.throw(Status.NotFound); }}Nothing out of ordinary. Four functions store, show, update, destroy have been added. Slugify is used for generating URL safe slug from the blog title.
In the show, update and destroy functions, a not found exception has been thrown in case of non-existent slugs. These exceptions will be caught by our error handler middleware automatically.
In a real-life scenario, I don't put database queries directly in controller methods like that. The master branch code has a better solution for this problem but for now, let's keep things as simple.
Step 2: Open up routes/blogs.ts and add the newly created middleware with corresponding endpoints. The file's content should look like as follows -
import { Router } from "https://deno.land/x/oak/mod.ts";import { index, show, store, update, destroy } from "../controllers/blogs.ts";const router = new Router();router.get("/blogs", index) .post("/blogs", store) .get("/blogs/:slug", show) .put("/blogs/:slug", update) .delete("/blogs/:slug", destroy);export default router;Routes for creating, updating, and deleting blog entries are going to be of post, put and delete method respectively.
At lines 9, 10, and 11 you can see how to create dynamic path-names. All path parameters are stored in the context inside ctx.params object so the value of:slug can be accessed like this ctx.params.slug inside the controller function.
Given we've already registered all these routers in the app instance, we'll be skipping the third step.
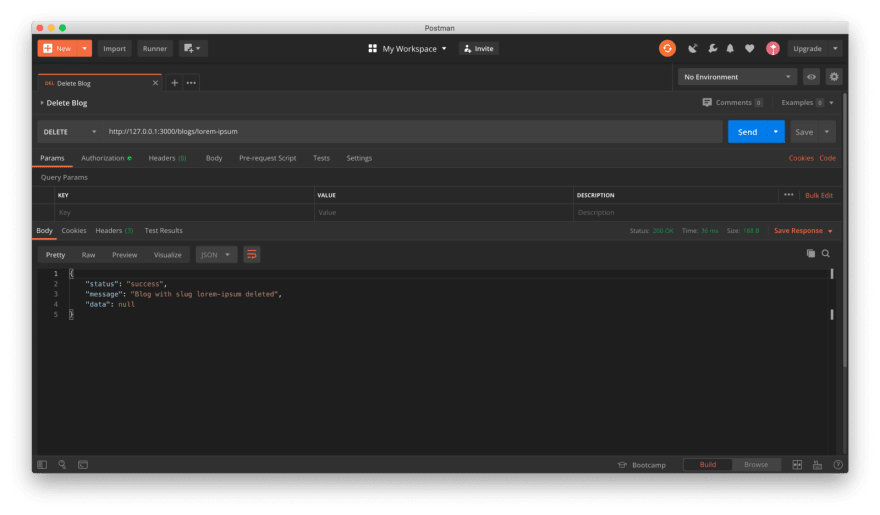
Testing withPostman
So now it's time we test out our API. Don't forget to restart the application.
I'm using Postman for testing the APIs and responses from different endpoints are as follows-


Authentication
The authentication system in this API is a very simple and naive one. It consists of two endpoints-
- Register-for creating new users in database.
- Login-for returning JWTs to users.
There is also a middleware for checking if the user is authenticated or not.
We'll begin by implementing the routes again following our three steps procedure.
Step 1: Open up controllers/auth.ts and put following code in there for register and login routes -
import { Status } from "https://deno.land/x/oak/mod.ts";import { hash, compare } from "https://deno.land/x/bcrypt/mod.ts";import { makeJwt, Jose, Payload } from "https://deno.land/x/djwt/create.ts";import client from "../db/mysql.ts";export async function register(ctx: any) { const body = await ctx.request.body(); const name = body.value.name; const email = body.value.email; const password = await hash(body.value.password); const result = await client.execute( "INSERT INTO users (name, email, password) VALUES (?, ?, ?)", [name, email, password], ); ctx.response.status = Status.Created; ctx.response.type = "json"; ctx.response.body = { status: "success", message: `${result.affectedRows} user registered in database`, data: { todo: { id: result.lastInsertId, }, }, };}export async function login(ctx: any) { const body = await ctx.request.body(); const result = await client.execute( "SELECT * FROM users WHERE email = ?", [body.value.email], ); const rows: any = result.rows; let user: any; if (rows.length > 0) { const user = { id: rows[0].id, name: rows[0].name, email: rows[0].email, password: rows[0].password, created_at: rows[0].created_at, }; if (await compare(body.value.password, user.password)) { const header: Jose = { alg: "HS256", typ: "JWT" }; const payload: Payload = { id: user.id, name: user.name, email: user.email, }; const key: string = Deno.env.get("TOKEN_SECRET") || "H3EgqdTJ1SqtOekMQXxwufbo2iPpu89O"; const token = makeJwt({ header, payload, key }); ctx.response.status = Status.OK; ctx.response.type = "json"; ctx.response.body = { status: "success", message: `Logged in with ${body.value.email}`, data: { accessToken: token }, }; } else { ctx.throw(Status.Unauthorized); } } else { ctx.throw(Status.UnprocessableEntity); }}I must warn you though, this is a perfect example of how not to implement authentication in APIs. There is no conflict checking in the register function, the JWTs never expire, there is no refresh token but for the sake of simplicity, let's roll with it now.
In the register route, we're taking the name, email, password from the user, and creating a new user. Bcrypt is being used for password hashing.
The login route is nothing new until we hit line 47. In this line, we're comparing the password hash with the plain password given by the user. If the passwords match, we generate a long-lived JWT and send it back to the user. If you want to learn more about JWTs, follow this link. Again this is not how you should do authentication in real-life scenarios. It's always better to issue short-lived access token and long-lived refresh token inside a cookie. Also, the key to sign a token comes from an environment variable set inside the docker-compose.yml file.
Step 2: Open up routes/auth.ts and put following code in there -
import { Router } from "https://deno.land/x/oak/mod.ts";import { register, login } from "../controllers/auth.ts";const router = new Router();router.post("/auth/register", register) .post("/auth/login", login);export default router;We're importing the two controller functions, assigning them as middleware for register and login routes. Both routes are post routes.
Step 3: Open up app.ts and update the code to look like as follows -
import { Application, Router, Status } from "https://deno.land/x/oak/mod.ts";import logger from "./middleware/logger.ts";import timer from "./middleware/timer.ts";import error from "./middleware/error.ts";import blogs from "./routes/blogs.ts";import auth from "./routes/auth.ts";const app = new Application();const router = new Router();app.use(logger);app.use(timer);app.use(error);router.get("/", (ctx) => { ctx.response.status = Status.OK; ctx.response.type = "json"; ctx.response.body = { status: "success", message: "Hello World!", data: null, };});app.use(router.routes()) .use(blogs.routes()) .use(auth.routes());console.log("app running -> http://localhost:3000");await app.listen({ port: 3000 });Nothing much has changed except the importing of auth routes at line 8 and registration of them in the app instance at line 29.
Testing withPostman
Again it's time to test out our authentication routes. Restart the application by hitting control + c and running docker-compose up command.
Once the app is running we can test it out-


Authorization Middleware
So far we've implemented endpoints for regsitering users and generating JWTs for them. Now we need a middleware that will check if the user is authenticated or not in certain routes.
Open up middleware/authorize.ts and put following code in there -
import { Status } from "https://deno.land/x/oak/mod.ts";import { validateJwt } from "https://deno.land/x/djwt/validate.ts";export default async (ctx: any, next: any) => { const authHeader = ctx.request.headers.get("authorization"); if (!authHeader) { ctx.throw(Status.Unauthorized, "Access Token Missing!"); } else { const token = authHeader.split(" ")[1]; try { const key: string = Deno.env.get("TOKEN_SECRET") || "H3EgqdTJ1SqtOekMQXxwufbo2iPpu89O"; const { payload }: any = await validateJwt(token, key); ctx.request.user = payload; await next(); } catch (err) { ctx.throw(Status.Unauthorized); } }};In this middleware, we're checking if the user has sent an access token in the authorization header or not. If yes we validate the token and send the user in his merry way by calling next() method. In case of missing or invalid token, we throw an unauthorized exception.
Keep in mind though, the key used for verifying has to be the same as the key used for signing the token.
Using this middleware is very easy. Assume we want the user to be logged in for creating, updating, and deleting blogs. To do that, open up routes/blogs.ts and update its content as follows -
// previously written codesimport authorize from '../middleware/authorize.ts';// previously written codesrouter.get("/blogs", index) .post("/blogs", authorize, store) .get("/blogs/:slug", show) .put("/blogs/:slug", authorize, update) .delete("/blogs/:slug", authorize, destroy);As you can see, all we gotta do is to import the authorize middleware and pass it as an argument for the routes we want. One thing though, the authorize middleware should come before the controller function because middleware are proccessed in the order they are registered.
If the user is authenticated the authorize middleware will hand over the request to the next middleware in the stack, otherwise it'll throw an exception. Simple but functional.
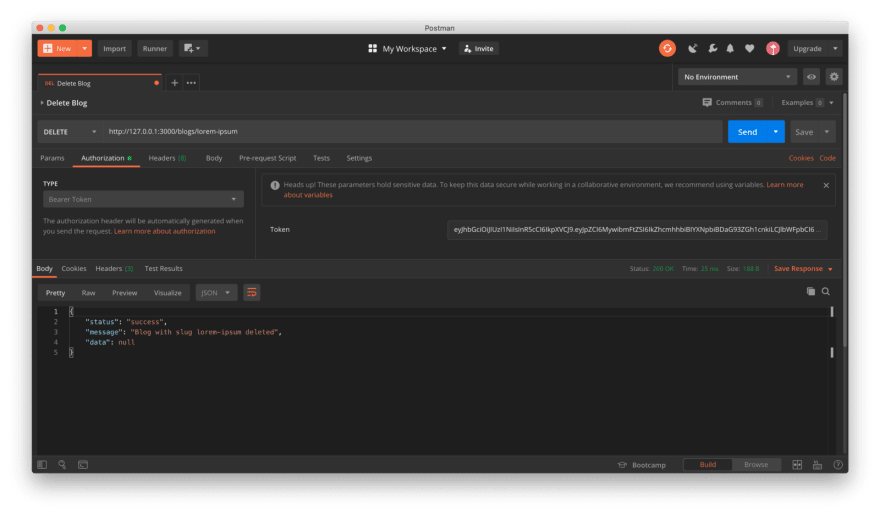
Now if we try to access one of these protected routes without an access token we'll be responded with 401 response-

Adding the access token required from login route as bearer token however lets us in-
What Now?
The source code in the master branch is a bit more complicated, with deps.ts convention, versioned module URLs, better abstraction things like that -
Code in the master branch is often subjected to change whereas the simplified-tutorial-version branch is almost frozen unless there are any breaking issues. Now that you have a somewhat good understanding of how things work, you are free to explore the master branch as well.
Best of luck for your journey to the Deno Land
Original Link: https://dev.to/fhsinchy/develop-and-dockerize-a-blogging-api-with-deno-oak-and-mysql-170e
Dev To
More About this Source Visit Dev To