
An Interest In:
Web News this Week
- April 22, 2024
- April 21, 2024
- April 20, 2024
- April 19, 2024
- April 18, 2024
- April 17, 2024
- April 16, 2024
Some of Our Sources
- Slashdot
- Engadget
- Mashable
- Joshua Blankenship
- TutsPlus - Design
- Fudge Graphics
- Reencoded
- Line 25
- Specky Boy
- Dev To
Help Webnuz
Referal links:
Destination Heroku
In the "Moving Away From AWS and Onto Heroku" article, I provided an introduction of the application I wanted to migrate from Amazon's popular AWS solution to Heroku. While AWS is certainly meeting the needs of my customer (my mother-in-law), I am hoping for a solution that allows my limited time to be focused on providing business solutions instead of getting up to speed with DevOps processes.
Quick Recap
As a TL;DR (too long; didn't read) to the original article, I built an Angular client and a Java API for the small business owned by my mother-in-law. After a year of running the application on Elastic Beanstalk and S3, I wanted to see if there was a better solution that would allow me to focus more on writing features and enhancements and not have to worry about learning, understanding and executing DevOps-like aspects inherent within the AWS ecosystem.
Creating a New Account
The first thing I needed to do was create a new account at Heroku. This process was super-simple, requiring minimal information to get started: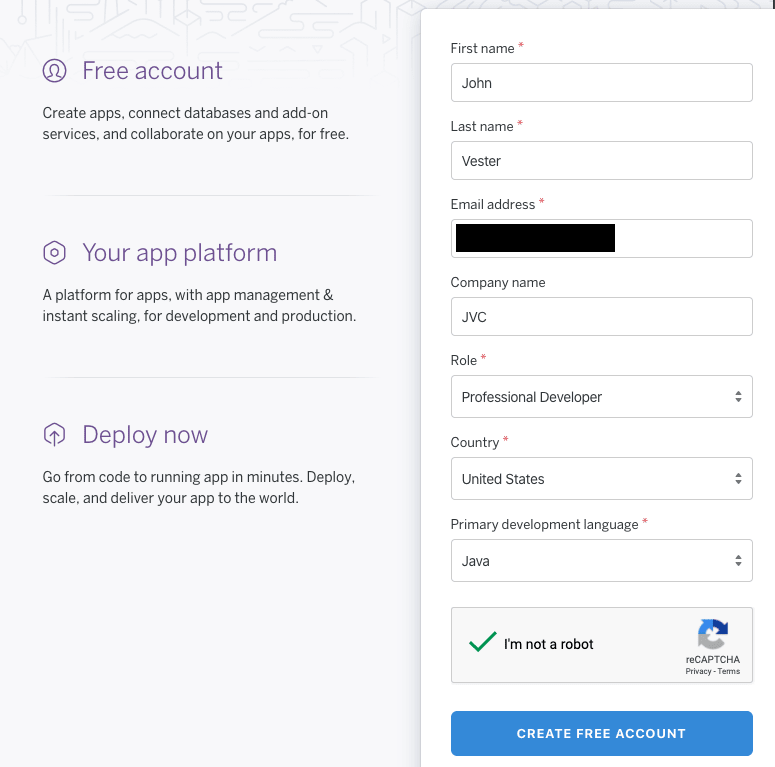
Once my account was created and I was logged in, I was able to use the "Create new app" button to officially tip my toes into the metaphorical Heroku pool:
The new application process asks for a name (I selected "amhs") and a region (United States):
Upon single-clicking the Create app button, I was redirected back to the Heroku home page: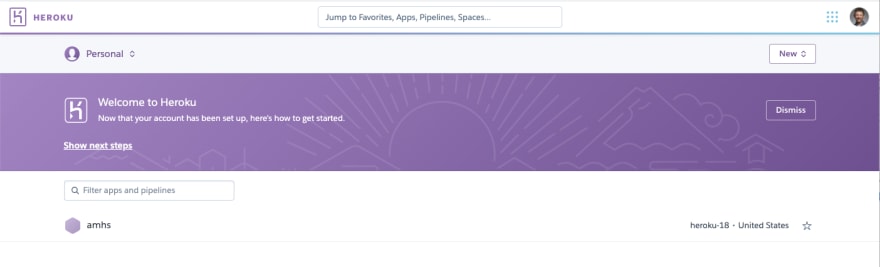
With the "amhs" app now created, I am now ready to dive deeper into the process.
Preparing My Local Machine
To prepare my local MacBook Pro to interact with Heroku, I went ahead and used Homebrew to install the Heroku CLI using the following command in Terminal:brew install heroku/brew/heroku
Once installed, I issued the following command to allow the Heroku CLI to use my information:
heroku login
The login command will interact with your default web browser to complete the authentication process.
heroku: Press any key to open up the browser to login or q to exit:Opening browser to https://cli-auth.heroku.com/auth/cli/browser/key-goes-here
Once validated, a screen similar to what is listed below will appear:
The terminal session will include text similar to what is noted below:
Logging in... doneLogged in as [email protected]
As one might expect, git is also required when using the Heroku CLI. Because of my other development work, I already had git installed, but here are instructions on how to install git.
You can also use brew install git too, if Homebrew is an option on your local machine.
Setting Up the amhs Application
Opening the amhs application in Heroku provides the ability to further configure the application: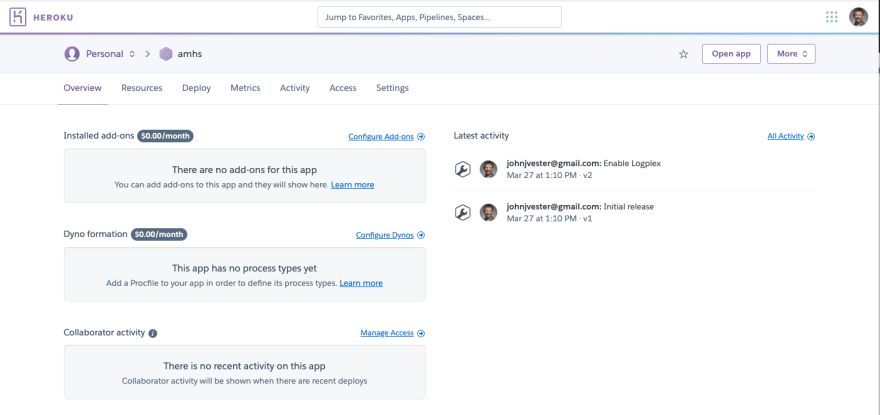
The first thing I knew I needed was a database. For this project, I decided I would utilize MySQL. Searching for an add-on and using the search string of "MySQL" provided the following options:
From some quick research, I decided I would stick to a standardized database and selected the ClearDB MySQL option. I opted to select the Ignite - Free option at this point too:
Please note - you will need to have a credit card on file before you can successfully provision an add-on, which is used as a method to reliably identify and contact the customer in the event of an issue.
With the MySQL option in place, the amhs screen is updated as shown below:
It is also possible to use the following command to complete these same steps:
heroku addons:create cleardb:ignite
The Heroku CLI actually has a utility to make a copy of an existing MySQL database using the following command:
heroku addons:create cleardb:ignite --fork=mysql://user:[email protected]/database
In this case, I decided to set up the database manually and insert some test records, which is described in the following section.
Preparing the Database
With an empty MySQL instance created and running in Heroku, the next step is to send the necessary DDL to create the tables.
However, I need to determine the database URL. The Heroku CLI has the following command to accomplish this task:
heroku config --app amhs
In which the Heroku CLI responds with something like:
=== amhs Config Vars
CLEARDB_DATABASE_URL: mysql://name:[email protected]/heroku_someId?reconnect=true
With this information, I was able to utilize DbVisualizer (my SQL tool of choice) to set up the expected tables and base configuration data.
On the Java API side, I used the connection information to update the spring.datasource values.
Still in a local mode, I restarted the Spring Boot Java API and also a local instance of the Angular application. Once logged in, I was able to access the system configuration to see the test values I had inserted:
At this point, the Java API is running locally, but accessing the new ClearDB database in Heroku.
Getting the Java API Ready for Heroku
With the Java API now using the ClearDB MySQL database, the next step is to update the Spring Boot-based API to run in Heroku.
Since the AMHS application is already in a git repository, I only needed to execute the following Heroku CLI command to allow the API to push updates into the amhs application created within Heroku:
heroku git:remote -a amhs
The Heroku CLI responded with the following output:
set git remote heroku to https://git.heroku.com/amhs.git
I then validated the remote configuration by issuing the following command:
git remote -v
The git CLI responded with the following information:
heroku https://git.heroku.com/amhs.git (fetch)heroku https://git.heroku.com/amhs.git (push)origin [email protected]:my-repo/amhs-api.git (fetch)origin [email protected]:my-repo/amhs-api.git (push)
Next, I went ahead and created a Procfile and placed the text file in the root of the AMHS repository. The contents were simply:
web: java -jar target/amhs-api-2.0.0.jar
The important value is to the right of the "target/", which represents the concatenation of the artifactId and version of the POM for my project.
With everything ready to go, the next step was to check in the changes in my project. Since I am working in a branch called feature/heroku_demo, I executed the following command to push my code (located in the feature/hero_demo branch) into the Heroku git remote (targeting the master branch):
git push heroku feature/heroku_demo:master
The Heroku CLI responded with the following information.
Enumerating objects: 737, done.Counting objects: 100% (737/737), done.Delta compression using up to 16 threadsCompressing objects: 100% (586/586), done.Writing objects: 100% (737/737), 163.43 KiB | 5.11 MiB/s, done.Total 737 (delta 244), reused 0 (delta 0)remote: Compressing source files... done.remote: Building source:remote:remote: -----> Java app detectedremote: -----> Installing JDK 1.8... doneremote: -----> Installing Maven 3.6.2... doneremote: -----> Executing Mavenremote: $ mvn -DskipTests clean dependency:list installremote: [INFO] Scanning for projects...remote: [INFO] ------------------------------------------------------------------------remote: [INFO] BUILD SUCCESSremote: [INFO] ------------------------------------------------------------------------remote: [INFO] Total time: 47.107 sremote: [INFO] Finished at: 2020-04-18T18:31:39Zremote: [INFO] ------------------------------------------------------------------------remote: -----> Discovering process typesremote: Procfile declares types -> webremote:remote: -----> Compressing...remote: Done: 91.2Mremote: -----> Launching...remote: Released v5remote: https://amhs.herokuapp.com/ deployed to Herokuremote:remote: Verifying deploy... done.To https://git.heroku.com/amhs.git* [new branch] feature/heroku_demo -> masterValidating the API
Reviewing the Heroku Overview screen, I can see that my build not only succeeded, but the code was deployed as well!
I was then able to use Postman to issue the following GET request:
https://amhs.herokuapp.com/staff?sortColumn=lastName&sortDirection=asc&status=active
Which returned a 200 HTTP Status code and the following data:
[ { "id":1, "firstName":"Amy", "lastName":"Admin", "nickName":"", "role":{ "id":3, "name":"Admin" }, "manager":null, "active":true, "created":"2020-04-18T13:31:06.000+0000", "updated":"2020-04-18T13:31:16.000+0000", "initials":"AA" }, { "id":3, "firstName":"Alice", "lastName":"Agent", "nickName":"", "role":{ "id":2, "name":"Agent" }, "manager":{ "id":2, "firstName":"Marty", "lastName":"Manager", "nickName":"", "role":{ "id":1, "name":"Manager" }, "manager":null, "active":true, "created":"2020-04-18T13:31:20.000+0000", "updated":"2020-04-18T13:31:28.000+0000", "initials":"MM" }, "active":true, "created":"2020-04-18T13:31:35.000+0000", "updated":"2020-04-18T13:31:44.000+0000", "initials":"AA" }, { "id":2, "firstName":"Marty", "lastName":"Manager", "nickName":"", "role":{ "id":1, "name":"Manager" }, "manager":null, "active":true, "created":"2020-04-18T13:31:20.000+0000", "updated":"2020-04-18T13:31:28.000+0000", "initials":"MM" }]Next, I updated the environment.ts file within the Angular client to use the same Java API and I was able to see the same data, now with my local Spring Boot Java API no longer running:

Adding Security and Environment Variables
To make sure I wasn't dealing with a security issue with Okta integration. I had removed the security for the Java API. Now, I wanted to include the necessary updates to make sure the Java API was secure again.
At the REST controller level, I simply had to include the following annotation:
@PreAuthorize("hasAuthority('AmhsUser') || #oauth2.hasScope('openid')")
Next, I setup the necessary key/value pairs in the Heroku configuration for the amhs application:
Finally, I just had to reference these variables in the application.yml:
security: oauth2: client: clientId: ${CLIENT_ID} clientSecret: ${CLIENT_SECRET} resource: tokenInfoUri: ${TOKEN_INFO_URI}spring: datasource: url: ${CLEARDB_DATABASE_URL}server: port: ${PORT}While the other values for my application.yml are suppressed, I did want to include the server.port reference too, since that is important to keep in mind.
Now, looking at the Overview screen in Heroku, you can see the updates that were made:
To see the logs from the Java API, the following command simply needs to be issued:
heroku logs --tail
Which produces the following output:
2020-04-19T14:12:15.000000+00:00 app[api]: Build started by user [email protected]:12:41.789903+00:00 heroku[web.1]: Restarting2020-04-19T14:12:41.793282+00:00 heroku[web.1]: State changed from up to starting2020-04-19T14:12:41.526199+00:00 app[api]: Deploy 6d365207 by user [email protected]:12:41.526199+00:00 app[api]: Release v11 created by user [email protected]:12:48.587250+00:00 app[web.1]: Setting JAVA_TOOL_OPTIONS defaults based on dyno size. Custom settings will override them.2020-04-19T14:12:48.591623+00:00 app[web.1]: Picked up JAVA_TOOL_OPTIONS: -Xmx300m -Xss512k -XX:CICompilerCount=2 -Dfile.encoding=UTF-82020-04-19T14:12:50.722260+00:00 app[web.1]:2020-04-19T14:12:50.722261+00:00 app[web.1]: :: AMHS API :: Running Spring Boot 2.0.3.RELEASE :: Port #9095 ::2020-04-19T14:12:50.722406+00:00 app[web.1]:2020-04-19T14:12:49.000000+00:00 app[api]: Build succeeded2020-04-19T14:12:50.982144+00:00 app[web.1]: 2020-04-19 14:12:50.978 INFO 4 --- [ main] com.amhs.Application : Starting Application v2.0.0 on 3d90674b-0075-4d18-a6e0-91b6ca68bc3f with PID 4 (/app/target/amhs-api-2.0.0.jar started by u6224 in /app)Seeing that I am running on Spring Boot 2.0.3 certainly added a Spring Boot update to my to-do list. :)
A New Way to Deploy the Java API
One of the primary reasons I wanted to look into Heroku over continuing to utilize AWS was the ability to focus on the business needs of my customer. Working a full-time job and performing freelance writing projects does not provide a great deal of extra time for me - especially with a toddler in the home. Basically, I wanted to find a solution that doesn't require much effort to deploy changes for my mother-in-law to utilize.
With everything in place, the deployment to the amhs app has been reduced to the following git command:
git push heroku master
Which is really easy to remember, since I typically merge my changes into master.
Conclusion
When I look back on my prior instructions (for AWS), the following steps are no longer required:
- manually building the JAR file for use by Elastic Beanstalk
- navigation to Elastic Beanstalk UI
- manually locating and uploading the JAR file created in the steps above
- validating the versions match (
pom.xmland JAR version) - manually pushing the Deploy button
While these steps were not exactly painful, they did require time on my part to execute each time I wanted to release new code for my mother-in-law to utilize. However, with Heroku, all I needed to do was execute a simple git command that I am already familiar with using. There is also the ability to quickly "rollback" to an earlier version - which I will expand upon in a future article. Seems like a win to me.
Not that cost is a core focus of this experiment, but I feel that I should point out that everything that was deployed here will not incur any monthly costs. Not bad, when you consider less work is required for my Heroku solution on a routine basis.
In the next article, I am going to focus on the Angular client and how Heroku can be used instead of AWS S3 to house the static files used by Angular and the associated libraries.
Have a really great day!
Original Link: https://dev.to/heroku/destination-heroku-48ge
Dev To
More About this Source Visit Dev To