
An Interest In:
Web News this Week
- April 19, 2024
- April 18, 2024
- April 17, 2024
- April 16, 2024
- April 15, 2024
- April 14, 2024
- April 13, 2024
Some of Our Sources
- Web Designer Wall
- Team Treehouse
- Fuel Your Creativity
- Reencoded
- Line 25
- Stylized Web
- Specky Boy
- Web Resource Source
- Willems Lab
- TechPowerUp
Help Webnuz
Referal links:
How to Build a Twitch Clone Game Live Streaming App for iOS
In this tutorial, we'll use Stream Chat and Dolby.io's Client SDK to build an app that lets you create a room that streams the contents of your screen and your voice for a large number of viewers and allows them to interact with each other via chat. It will be as simple as possible for the sake of keeping this tutorial as short as possible, but it will function enough to have fun with your friends.

That animation shows an iPhone accessing a channel created by an iPad user who is playing Minecraft. The iPhone user can hear the streamer's voice, see the gameplay, and interact with other watchers via chat.
If you get lost during this tutorial, you can check the completed project in this GitHub repo.
What is Stream Chat?
Build real-time chat in less time. Rapidly ship in-app messaging with our highly reliable chat infrastructure. Drive in-app conversion, engagement, and retention with the Stream Chat messaging platform API & SDKs.
What is Dolby.io's Client SDK?
Dolby Interactivity APIs provide a platform for unified communications and collaboration. In-flow communications refers to the combination of voice, video, and messaging integrated into your application in a way that is cohesive for your end-users. This is in contrast to out-of-app communications where users must stop using your application and instead turn to third-party tools.
Requirements
Set up project
Create the Xcode project
First, we open Xcode and create a Single View App project.

And make sure to select 'UIKit' for the User Interface.
Install dependencies
To install the Stream Chat and Dolby.io's Client SDK dependencies, we'll use CocoaPods. If you prefer Carthage, both frameworks support it as well.
In the folder where you saved the project, run pod init and add StreamChat, VoxeetSDK, and VoxeetScreenShareKit to the Podfile. It should look similar to this:
After you do that, run pod install, wait a bit for it to finish, and open the project via the .xcworkspace that was created.
Configure the Stream Chat dashboard
Sign up at GetStream.io, create the application, and make sure to select development instead of production.

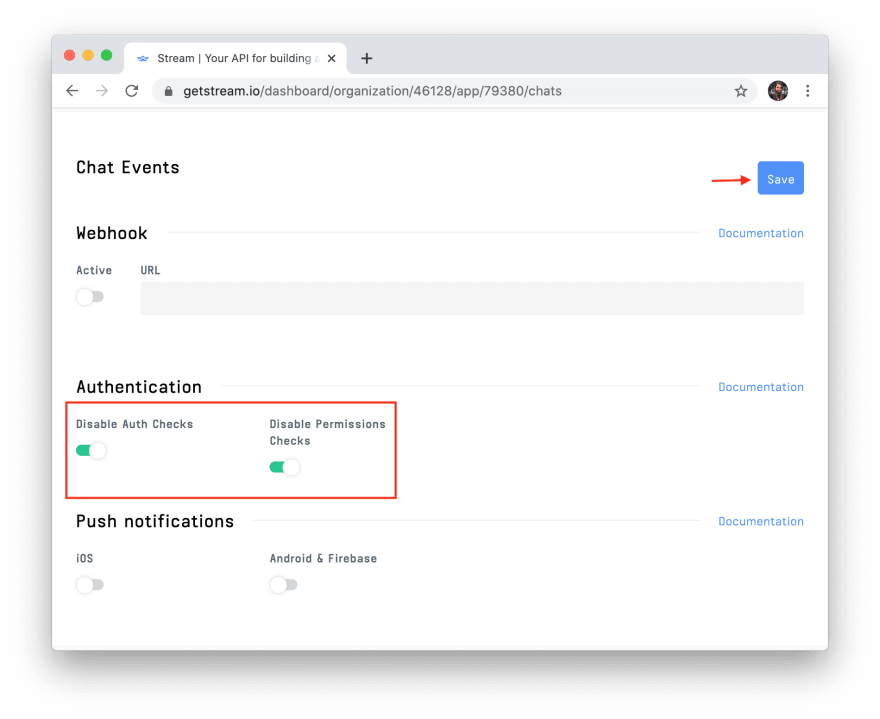
To make things simple for now, let's disable both auth checks and permission checks. Make sure to hit save. When your app is in production, you should keep these enabled.
You can see the documentation about authentication here and permissions here.
Now, save your Stream credentials, as we'll need them to power the chat in the app. Since we disabled auth and permissions, we'll only really need the key for now, but in production, you'll use the secret in your backend to create JWTs to allow users to interact with your app securely.

As you can see, I've blacked out my keys. You should make sure to keep your credentials safe.
Configure the Dolby.io dashboard
Configuring the Dolby.io dashboard is simpler. Just create an account there, and it should already set up an initial application for you.

Now, save your credentials, as we'll need them to power the audio and video streaming in the app. As with the Stream credentials, you use these for development. In production, you'll need to set up proper authentication. It's described in detail here.
Configure Stream Chat and Dolby's SDKs
The first step with code is to configure the Stream and Dolby SDK with the credentials from the dashboards. Open the AppDelegate.swift file and modify it, so it looks similar to this:
That code initializes the Dolby.io and Stream Chat SDKs with credentials you got in the previous two steps.
Create the Join Screen
Let's start building the "Join" screen. This screen consists of two elements: a UITextField for determining the channel's name and a UIButton to join or create the channel depending on whether it was already created. If you're creating it, you're automatically its admin, and you may share the code with other users to join as watchers. It will look similar to the screenshot below.

Go to the Storyboard, select the default view controller, and click Editor > Embed In > Navigation Controller. That will place it under a navigation controller, which we'll use to navigate to the channel screen.

Make sure to rename ViewController to JoinViewController so you don't get confused later on. You can do this easily by right-clicking on ViewController in ViewController.swift and selecting refactor.
To make things simple, let's leave the storyboard like this and use only code from now on. To set up the UITextField and UIButton we need the following code in JoinViewController.swift:
That code sets up the views, the constraints, and the handlers we need. Let's start by extending JoinViewController to define setupViews:
That code will create the UITextField, UIButton, and add them to the controller's view. Next, we need to define constraints between those three. Let's do this by extending JoinViewController to define setupConstraints:
That code will make sure the channelTextField stays on top and center of the screen and the joinButton right below it. Now we need to set up the handler for when the user presses the button. Let's do this again by extending the controller to define setupHandlers:
That code will make it so when the user presses the button a WatchViewController is created with its .channelName property set to the contents of the UITextField. We'll create WatchViewController in the next step.
Create the Watch Screen
Now, let's create the screen where we can view or transmit a stream and chat. We'll start by defining WatchViewController. It will look similar to the animation below.
First step is to create a WatchViewController.swift file and paste the code below.
That code simply defines some variables that we'll need frequently and calls some functions to set everything up on viewDidLoad. We'll create those next. It also makes sure to leave the conference once the view is freed from memory in deinit and hides the status bar on viewDidAppear for presentation purposes.
Additionally, generateUserId() is a simple function that generates a random id for the user. You should define it in a generateUserId.swift file as below.
Next, let's define the functions to set up the views, chat, and stream. First, define setupViews as below.
That code just adds the video and chat views to the view hierarchy.
Next, let's define setupConstraints to specify the layout that those views should take.
That code will make sure the video view sits on top of the chat view on a 1 to 3 ratio for the height.
Next, let's define the setupChat function.
That code simply tells the chatViewController to present a channel with id equal to the channelName property and with type livestream. There are several channel types with different behaviors, and more can be created. You can read about them here. Livestream is the one that fits our use case the most.
Next, we need the functions to configure the video portion.
Those functions will set up a conference session. If the conference is new, the user's screen will be presented. If not, the user will watch the presentation by the user who created the channel.
Now, we need to conform WatchViewController to the VTConferenceDelegate protocol.
That code displays the video feed when a screen share is detected and hides the video when the screen share finishes.
Enable System-wide Screen Sharing
If you run the app now, and create a channel, when you put it in the background, the video stream remains in the app. Of course, this is not good, because we want to stream games and other apps. To fix this, you need to set up App Groups and a Broadcast Upload extension. This process is simple and well described in Dolby.io's documentation. Click this link to head over there.
At the time of writing this tutorial, ReplayKit doesn't work with the new UIScene lifecycle, so you need to rollback to the old AppDelegate approach.
Wrapping up
Congratulations! You've built the basis of a functioning game live streaming app with Stream Chat and Dolby.io. I encourage you to browse through Stream Chat's docs, Dolby's docs, and experiment with the project you just built.
Original Link: https://dev.to/cardoso/how-to-build-a-twitch-clone-game-live-streaming-app-for-ios-5f0p
Dev To
More About this Source Visit Dev To