
An Interest In:
Web News this Week
- April 25, 2024
- April 24, 2024
- April 23, 2024
- April 22, 2024
- April 21, 2024
- April 20, 2024
- April 19, 2024
Some of Our Sources
- Mashable
- Web Designer Wall
- Smashing Magazine
- Crazy Leaf Design
- Fudge Graphics
- Wal You
- CSS Tricks
- Web Resource Source
- Android Headlines
- Dev To
Help Webnuz
Referal links:
Docker on a diet
Docker containers are extremely useful when it comes to CI and CD. As a developer, I was amazed with its possibilities and ease of use. What I didnt know when I started using Docker is that I did it all wrong.
After couple of months building and pushing containers to our private Nexus Registry, our devops approached me and said Hey, your images took all the disk space of the registry, might want to check if they are a little bit oversized?.
 The same goes to bloated docker images
I had two docker images, one for Python application and one for Java. Their total size was whopping 6.5Gbs without applications themselves. After all enhancements its 1.4 Gb for Python and 660Mb for Java, applications binaries included.
In this article I will cover tips and tricks for optimizing docker images size, which will save you registry disk space and (re)deployment time.
Creating a baseline
First thing to do would be extracting common stuff from your images.
All the common libraries, files should be in a base image, so they would be cached inside docker layers. For my case I moved Apache Thrift and custom log rotation utility (which is build from sources) to baseline image, instantly saving 350Mb worth of space.
Few words about layers
 Docker images are like ogres. They have layers
Each docker image consist of series of layers. These layers are changes made to the image with commands like FROM, RUN, COPY, you can think of it as a commits in a git repository. Docker makes use of union file systems to combine these layers into a single image. Union file systems allow files and directories of separate file systems, known as branches, to be transparently overlaid, forming a single coherent file system.
Keep an eye for temporary files
Layers come in handy, because they can be reused during build or deploy, but they also can make image significantly bigger.
Imagine creating image for nodejs application:
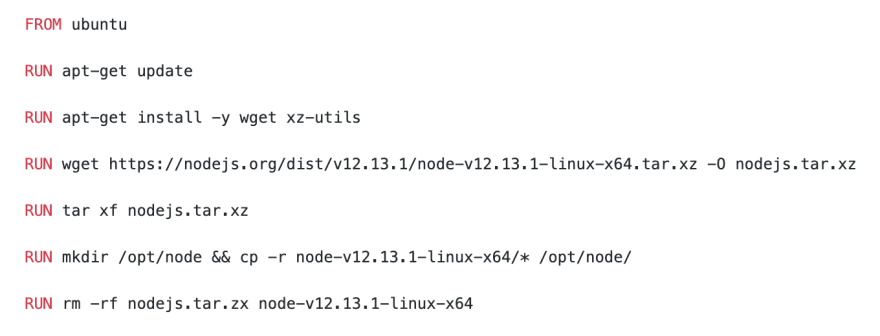
Looks something like we would write in a bash-script, right? Totally wrong for docker though. Size of our new image is 248Mb. Lets look into docker history command:
 History displays size for each layer
Output suggests that we have 67.2Mb of data twice. Thats because we unzipped in one layer and copied in another and rm in the last RUN command had zero impact on previous layers. So the correct way to optimize this example would be:
 All of our commands combined
Notice that there is also a rm -rf /var/lib/apt/lists/ command which will wipe the cache of aptitude. Lets look at docker history again.
 Its dramatically smaller
Dont fall into the COPY trap
The COPY command is used to put data from host machine inside the image during the build process.
Whats bad about COPY is that it creates a separate layer, so the copied data will reside in the image forever. Copying archives or some temporary data is really a bad idea. Prefer wget (or another tool) over COPY if its possible or
Use Multi-Stage Builds
Multi-stage builds is a relatively new feature requiring Docker 17.05 or higher. This added the ability to create temporary image and then use its filesystem during the build of final image. The basic idea is to install all the dependencies and compile all the sources in intermediate image and copy the result to final image. Lets have a look at the example:
 Here we install apache thrift
Looks like we have a lot of build-time only dependencies:
 Notice apt-get row
Now we add another build stage and copy binary from the compiler image:
 Notice the --from argument
Small change and a nice reward:
 Thats 200Mb less
Be careful though and dont remove runtime dependencies of a package!
Java runtime
Have you heard of jlink? Its awesome! You can create your own JRE with only modules you need, which presumably will be smaller than any slim image. I suggest using AdoptOpenJDK image as jlink provider. The idea is to create JRE with jlink and then COPY it using multi-stage build:
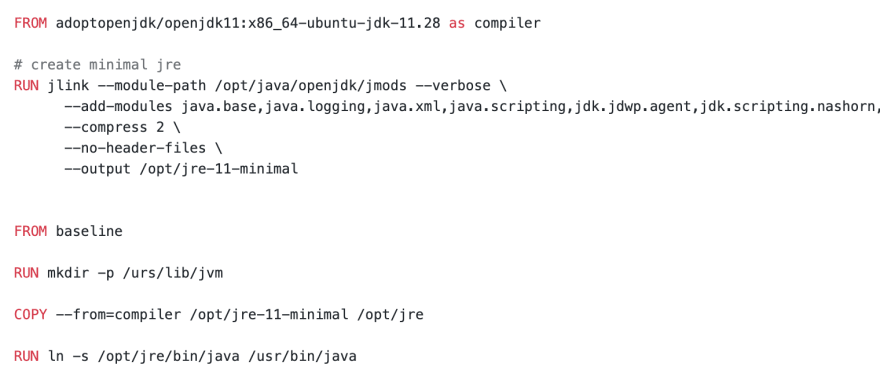 baseline image refers to the first section of article
Lets look through docker images
adoptopenjdk/openjdk11 x86_64-ubuntu-jdk-11.28 323MBadoptopenjdk/openjdk11 jdk-11.0.5_10-ubuntu-slim 250MBadoptopenjdk/openjdk11 x86_64-ubuntu-jre11u-nightly 127MBcustom-jre-build jre11 62.5MBUsing jlink we achieved image two times smaller than the smallest AdoptOpenJDK image. Not to mention the ease of integration between custom JRE and baseline image (a simple COPY instruction).
Java dependencies
 It really does
Most of the projects use Maven or Gradle for dependency management. And sometimes we have a lot of dependencies. In our case it was 400Mb worth of jars! Build tools put all the dependency jars inside the main jar file and given the fact that dependencies are not being update very often, we will have a lot of images with the same dependencies. Looks like like a perfect candidate for moving to another layer!
First, you will need to extract dependencies from you project and if they were updated, push them to your registry.
Lets see how to do it with Maven and SpringBoot. Add excludeGroupIds parameter to your builder plugin configuration:
 pom.xml
And use this little bash script:

Now, how do we know if dependencies were updated and we need to push them? And how do we use that dependencies image as a baseline for application image?
I made this hacky approach where I calculate the md5-hash of pom.xml and try to pull docker image with such hash in version from registry. If its not there create it and push it. This is how I did it:
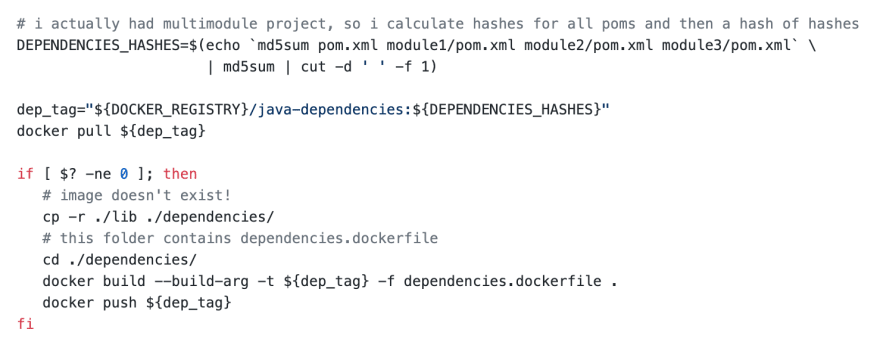 Build java dependencies docker image
 dependencies.dockerfile
Next, we pass dependencies hash to applications dockerfile via ARG command and use it in version of FROM-image:
docker build --build-arg version=${DEPENDENCIES_HASHES} -f application.dockerfile . application.dockerfile
Note, that now there is a maven/gradle plugin jib that does job similar to what Ive written above (not applicable to our case, though, because our Gitlab runner clear cache after every build).
Python specific
I used the same approach as for Java container. I calculate the hash of requirements.txt file and use it as a version for intermediate container.
Inside a dockerfile you should use multi-stage build. In first stage install all the build dependencies and then do pip install --no-cache-dir. In the result stage copy /opt/miniconda3 dir from previous stage.
 Build python dependencies docker image
Lets look at python-dependencies.dockerfile. Dont mind the apt-get install section, these are just packages that I needed for my python dependencies.
 python-dependencies.dockerfile
Whats left to do is create the final python image base on dependencies image. I just copy all python scripts (and a bash script for starting python).
 application.dockerfile
Original Link: https://dev.to/sammyvimes/docker-on-a-diet-1n6j
Dev To
More About this Source Visit Dev To