
An Interest In:
Web News this Week
- March 20, 2024
- March 19, 2024
- March 18, 2024
- March 17, 2024
- March 16, 2024
- March 15, 2024
- March 14, 2024
Some of Our Sources
- BoingBoing
- Team Treehouse
- Just Creative
- Fuel Your Creativity
- FanExtra - PSD
- Stylized Web
- Android Dissected
- Android Headlines
- Hashedout
- TechPowerUp
Help Webnuz
Referal links:
Learn Spring Boot by Annotations
This blog will teach you the basics of Spring Boot by looking at the available annotations. A lot of the magic in Spring Apps happens via annotations such as @Bean, @RestController, and @Component.

Why We Care about Spring Annotations
Spring has some powerful concepts like dependency injection (DI) which is made possible thanks to Spring-managed components. Here, all Classes annotated with @Component are candidates for DI and can be used by other Classes without explicit instantiation. Spring offers a feature called Inversion of Control Container which will do all necessary injections in the background, all magic happens without any work from the developer This is a great example for learning Spring by studying annotations: The Java code of a given Class may look completely normal, but when we consider this metadata, much richer functionality is possible (like DI). There are many of those annotations that significantly add functionality unique to Spring.
I dare to argue that a great way of learning Spring is by understanding the most common annotations. In the rest of this article, we will look at different annotations (from Spring as well as javax.persistence), describe their purpose, and show some code samples. I also created a Java Spring Boot app with all the described annotations included, so if you wanna look at a fully working example, checkout my Github repo.
Spring Annotations Overview
First lets get an overview of what I consider the most important Spring annotations. Let me state that my selection is aimed at people interested in RESTful webservices. For other people, the optimal selection might vary slightly. Anyways, apart from Spring annotations, well also cover metadata tags from the Javax Persistence API. The reason for this: we nearly always use a database in our backend, and this is a feature supported by Javax, not Spring, so I decided to include it here.
Here's a list of annotations we'll cover:
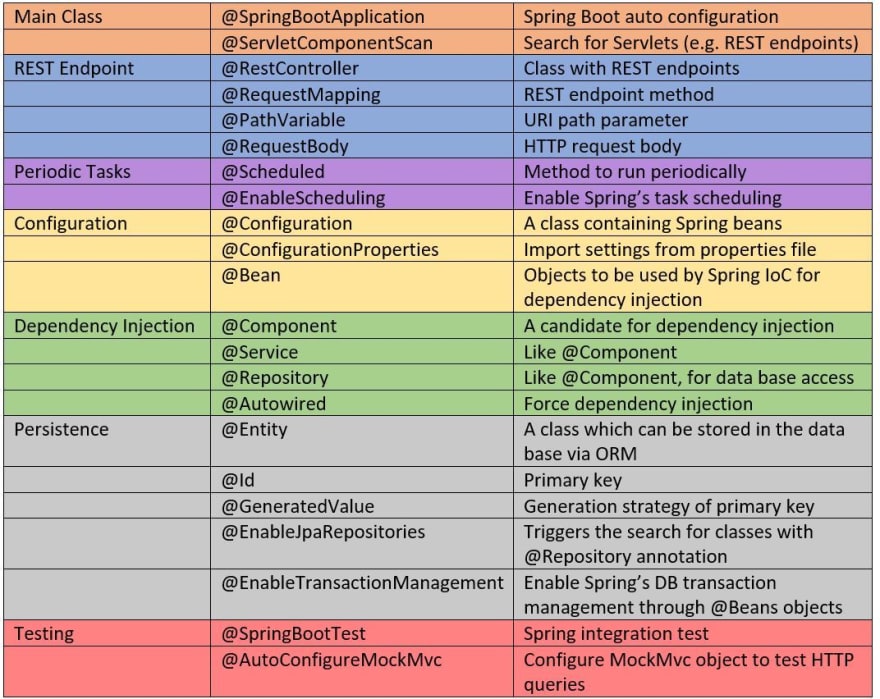
As you can see in the table above, theres quite some annotations to cover in this blog, so I decided to put them into functional groups. Lets get started with syntactic metadata used in the Main class:
Main Class Annotations
Covered in this section:
- @SpringBootApplication
- @ServletComponentScan
Thankfully, in a Spring app, our Main Method doesnt have to do much: we dont need to code up any logic to assemble our service components and boot it up. Instead, all we need is to annotate the Main class with @SpringBootApplication and @ServletComponentScan. The first annotation applies the Spring Boot default configuration such as socket read timeout. The second triggers a search for HTTP endpoints, such as Classes annotated with @RestController.
Heres how our Main class would look like:
@SpringBootApplication@ServletComponentScanpublic class SpringBootAnnotationsApplication { public static void main(final String[] args) { SpringApplication.run(SpringBootAnnotationsApplication.class, args); }}A fully working example can be found in my Github repo in SpringBootAnnotationsApplication.java.
REST Endpoint Annotations
Covered in this section:
- @RestController
- @RequestMapping
- @PathVariable
- @RequestBody
Say our web service should be able to answer to several REST requests. To implement this, we just need a Class annotated with @RestController which contains methods annotated with @RequestMapping. Each such method represents one REST endpoint.
When a REST request arrives, Spring will automatically search for the corresponding method, deserialize the incoming request, put all incoming data into our method parameters, and were ready to perform our own business logic. In the end, our result (a Java object) will get serialized by Spring and returned over HTTP. All we need to worry about is having the right footprint for our method, which should include the following: URI, URI path parameters, URI query parameter, HTTP request body, and HTTP answer body.
@RequestMapping(method = RequestMethod.PATCH, path = "/api/account/{accountId}")public ResponseEntity<AccountRJ> activateAccount( @PathVariable(value = "accountId") Integer accountId, @RequestBody Integer startBalance) { // implement method ...}Heres an example for a corresponding REST request:
PATCH https://www.../api/account/5Request Body: "10"In our code snipped, the accountId would be 5 and startBalance would be 10. The REST answer should be an object of type AccountRJ. To be more specific, the method return value should be of type ResponseEntity<T>. This is a Spring class containing all HTTP reply data such as status code, body, header, etc.
A fully working example can be found in my Github repo in WeatherRestController.java.
Periodic Task Annotations
Covered in this section:
- @Scheduled
- @EnableScheduling
Some web services need to do regular work in the background, such as archiving old data, aggregating data to create statistics etc. Spring makes the implementation of periodic tasks as easy as this:
@Configuration@EnableSchedulingpublic class TaskConfig { @Scheduled(cron = "* * * * * ?") public void doTask() { System.out.println("hello world"); }}As you can see, all we need is a Class annotated with @EnableScheduling and a method annotated with @Scheduled(cron=...). This method will run in the background according to our cron expression, e.g. every 10 minutes, or every hour.
A fully working example can be found in my Github repo in WeatherStatsTask.java.
Configuration Annotations
Covered in this section:
- @Configuration
- @ConfigurationProperties
- @Bean
To get your app up and running quickly, Spring Boot has lots of sensible default configurations like the REST configuration (e.g. read timeout, connect timeout). We can overwrite configuration defaults by defining our own Beans.
@Configurationpublic class RestConfig { @Bean public RestTemplate restTemplate(final RestTemplateBuilder builder) { return builder .setConnectTimeout(Duration.parse("PT5s")) .setReadTimeout(Duration.parse("PT10s")) .build(); }}As displayed above, our Beans are put in a @Configuration-class and the method is annotated with @Bean. The return type is essential here: whenever Spring needs to work with a RestTemplate, it will configure it according to our specification.
As for the third annotation covered in this section: @ConfigurationProperties can be used to automatically fetch configuration values from a .properties or .yaml file and put them into our Java class with the same data structure. This allows us to set config values in a configuration file, which can be easily altered later.
A fully working example can be found in my Github repo in:
- @Configuration, @Bean -> JpaConfig.java
- @ConfigurationProperties -> AnnotationsAppProperties.java
Dependency Injection Annotations
Covered in this section:
- @Component
- @Service
- @Repository
- @Autowired
Spring offers an Inversion of Control (IoC) Container: Instead of manually initializing all members of an object, Spring will inject all necessary dependencies. In the graphic below, you can see a Class requiring an object of another Class:

The Class Parent contains a Child object:
public class Parent { private final Child child; public Parent(Child child) { this.child = child; }}We can now annotate the dependency with @Component as follows:
@Componentpublic class Child { }Now, when Spring IoC must create an object of type Parent, it will automatically create an object of Child, then pass the object as argument to the Parent constructor, thus creating an object where all dependencies are initialized.
Note that the actual dependency chain in a complex application can have several hierarchy levels. Spring IoC will also work for complicated cases where one Class will require another one which again will require a third one and so on. Moreover, Spring IoC even works for Interface-Dependencies: when a Class requires an object of the type of an interface, Spring will search for a Class implementing that interface and inject it.
Now that you understand the meaning behind @Component, lets focus on the other annotations:
@Service: has the same meaning as @Component, but is used for the service layer of an app (with business logic).@Repository: same as @Component, but for Classes performing database access. The standard database exceptions will automatically be caught by Spring and dealt with appropriately.@Autowired: we need to start the dependency-injection-mechanism at the root of the dependency chain. When we ask Spring to initialize the top-level object, this will trigger the initialization and injection of all objects in the dependency chain. The @Autowired annotation can be used for this purpose and put before the top-level object.
A fully working example can be found in my Github repo in:
- @Components -> AnnotationsAppProperties.java
- @Service -> WeatherService.java
- @Repository -> WeatherRepository.java
- @Autowired -> WeatherIntegrationTest.java
Persistence Annotations
Covered in this section:
- @Entity
- @ Id
- @GeneratedValue
- @EnableJpaRepositories
- @EnableTransactionManagement
Similar to the previous sections, annotations come in handy for data persistence: all we need is the right annotations! For the following example, lets just focus on an SQL use case, and lets use Spring Data Jpa. To do the ORM mapping, we need an @Entity class as follows:
@Entitypublic class WeatherPO { @Id @GeneratedValue(strategy=GeneratorionType.IDENTITY) private Long id; private Integer temperature;}In the above code, the WeatherPO class holds all data elements which we want to represent from our relational database. The first member is also annotated with @Id which indicates that this is the primary key. Moreover, we define a strategy to generate new primary keys, again with an annotation!
Now we are ready to define a JpaRepository with which we can fetch WeatherPO objects from the database:
@Repositorypublic interface WeatherRepository extends JpaRepository<WeatherPO, Long> {}When Spring sees the @Repository annotation, it will automatically create an implementing class to access the DB. We can use the Repository via dependency injection:
@Servicepublic class WeatherService { private final WeatherRepository repo; public WeatherService(WeatherRepository repo) { this.repo = repo; } public WeatherPO find(Long id) { return repo.getOne(id); }}For a complete list of all JpaRepository functions, like getOne() used in the code above, checkout out the official documentation here.
So far, weve covered all Java code necessary to access a database. To make everything work, we additionally need the right Maven dependency: Springs spring-boot-starter-data-jpa. There exists a myriad of SQL databases, if we choose to use the simple H2 database, we need one more Maven dependency: com.h2database.h2.
Optionally, we can configure our database (username, password, URL, etc). Note that the H2 database will work out of the box, but for others like an Oracle DB, you would need this additional configuration. Namely, you can force the search of repositories with @EnableJpaRepositories and you can create your own database related beans with the @EnableTransactionManagement annotation.
A fully working example can be found in my Github repo in:
- @Entity, @ Id, @GeneratedValue -> WeatherPO.java
- @Repository -> WeatherRepository.java
- @EnableJpaRepositories, @EnableTransactionManagement -> JpaConfig.java
Annotations for Testing
Covered in this section:
- @SpringBootTest
- @AutoConfigureMockMvc
Spring offers annotations just for testing purposes, a great feature to make your integration tests simpler! Since this post is already a bit longer than originally intended, Ill stop here and refer you to the fully working example in WeatherIntegrationTest.java.
Summary
Congrats, you made it to the finish of this (rather lengthy) post I hope this post has helped you to understand the most important annotations of Spring. If you want to know more details, I encourage you to have a look at my Github repo with a fully working Spring Boot service using all annotations from this post.
Also, if you have a Spring annotation which you consider essential and its not covered here, please leave a comment and I will try to extend this article or creating a new one which includes your annotation.
Finally, please remember to heart this article if you found it useful!
Original Link: https://dev.to/pmgysel/learn-spring-boot-by-annotations-1h0i
Dev To
More About this Source Visit Dev To