
An Interest In:
Web News this Week
- April 24, 2024
- April 23, 2024
- April 22, 2024
- April 21, 2024
- April 20, 2024
- April 19, 2024
- April 18, 2024
Some of Our Sources
- Spoon Graphics
- Vandelay Design
- My Ink Blog
- CSS Globe
- Stylized Web
- Wal You
- Specky Boy
- Design Modo
- Dev To
- The Verge
Help Webnuz
Referal links:
Simple working example of REST Web Service with Spring Boot
In this we will look at a very basic web service which can respond to HTTP requests. This blog is perfect for people who want to get started using Spring Boot.

Why Spring Boot?
So why should you as Java developer care about Spring Boot? Well there are many good reasons! First of all Spring is open source, meaning it is continuously maintained and tested by community and it is free or charge. Second, according to Hotframeworks, it is the most widely used Java web framework of 2019. Third, theres an excellent way to get your Spring application up and running quickly, which is where Spring Boot comes into play: Thanks to Spring Boot, you dont need to worry about a lot of the boiler plate code and configuration. Spring Boot automatically sets a lot of config defaults for you, but you can always overwrite those if needed. For that purpose, Spring Boot is opinionated, meaning the people in the Spring team chose some configs for you, but those are well accepted by the community.
Btw, why should we care about web frameworks at all? Well there are many items which are used over and over in typical web services, such as answering to HTTP request, spanning new threads for each incoming request, security mechanisms like HTTPS and OAUTH2 and so forth. We do not want to reinvent the wheel every time we create a new web service, and for that purpose we can use web frameworks with all those common mechanisms provided. Additional features from web frameworks include data base access, scheduling of tasks, inversion of control etc. All these nice features are included in Spring Boot and thus you have more time for other stuff like drinking a good cappuccino
As a final introductory remark, let me mention that Spring is not only compatible with Java, but also with Kotlin, a language very popular for Android apps.
Prerequisites
We will now create a hello-world web service. All necessary code is given here, and the final solution is also available on my Github repo.
Requisites to follow all the steps:
- Maven
- Java JDK 8 or higher
- Command line
For this blog, we will do all the work from the command line. Alternatively, you can use an IDE like IntelliJ. In fact, I will soon release a post on IntelliJ and cover introductory topics like code completion, searching for a given code snippet in your project, compilation, debugging etc.
Using the Spring initializr
We use Maven as build tool, and Spring Boot offers a great way to create your POM file: Head over to https://start.spring.io/ and enter all the details of our app like below:
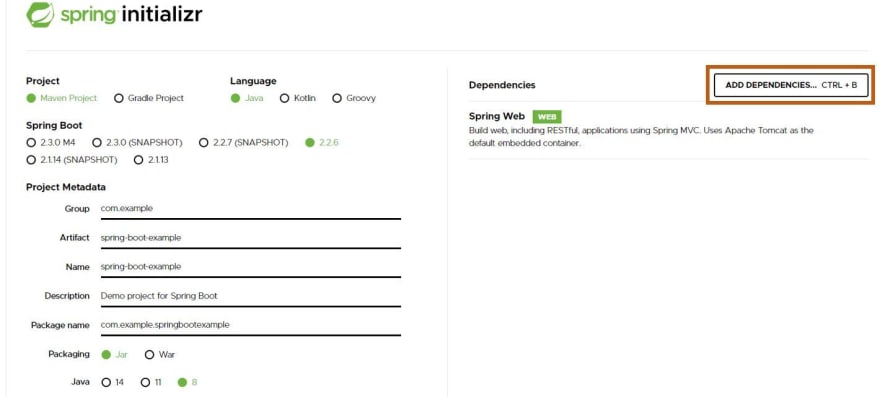
You can use a newer version of Spring Boot and Java of course - if you prefer to. Anyways, remember to add Spring Web as a starter dependency we will use it for our REST endpoints. Once you have filled in all details, use the GENERATE button. This will download a ZIP file with the initial Java project structure, and most importantly, the initial pom.xml file.
Let us have a closer look at the generated POM file. At the top of the POM, you can see we inherit from spring-boot-starter-parent, which contains all necessities for a Spring-Boot app.
<parent> <groupId>org.springframework.boot</groupId> <artifactId>spring-boot-starter-parent</artifactId> <version>2.2.6.RELEASE</version> <relativePath/> <!-- lookup parent from repository --> </parent>Further down in the POM, under dependencies, you can see we will use spring-boot-starter-web:
<dependency> <groupId>org.springframework.boot</groupId> <artifactId>spring-boot-starter-web</artifactId> </dependency>You can find a nice description of this dependency on mvnrepository.com:
Starter for building web, including RESTful, applications using Spring MVC. Uses Tomcat as the default embedded container.
Anyways, so far, we have only looked at one important file: the pom.xml file. Next let us focus on the Main Class, which you can find under src/main/java/com/example/springbootexample/SpringBootExampleApplication.java:
@SpringBootApplicationpublic class SpringBootExampleApplication { public static void main(final String[] args) { SpringApplication.run(SpringBootExampleApplication.class, args); }}What is interesting here is just the annotation at the top: @SpringBootApplication. Among several things, this annotation makes sure our Spring Boot app gets configured with the default Spring Boot properties (like timeouts for HTTP requests and many, many other things).
Hello-World REST endpoint
Since we want to create a REST endpoint later on, we need our Main class to search for Servlets, and therefore we need to add one more annotation to our Main class: @ServletComponentScan (again, if today is your lazy day and you dont want to do any coding, you can look at the completed code in my Github repo).
Next, let us create a REST endpoint. For this purpose, we create a new Java class and call it PingRestController.java (you can use the same folder as for the Main class).
The content of PingRestController.java should look like so:
package com.example.springbootexample;import org.springframework.http.ResponseEntity;import org.springframework.web.bind.annotation.RequestMapping;import org.springframework.web.bind.annotation.RequestMethod;import org.springframework.web.bind.annotation.RestController;@RestControllerpublic class PingRestController { @RequestMapping(method = RequestMethod.GET, path = "/api/ping") public ResponseEntity<String> getPing() { return ResponseEntity.ok("pong"); }}The annotation @RestController signifies that this class contains REST endpoints. Each REST endpoint is a method annotated with @RequestMapping. In this particular case, we have only one such method: getPing. This method is executed every time the corresponding REST call arrives at our server. Let us look more in detail at the @RequestMapping annotation: We specify a method and a path variable. These two variables specify that we want to capture HTTP GET request to the URI /api/ping. Also, note the return type of our getPing method: A ResponseEntity wraps the HTTP answer, and the HTTP body should be just a String. Thus, the response to the HTTP call will always looks as follows:
Headers: Status: 200, ContentType: text/plain;charset=UTF-8Body: "pong"With the modified Main class and the PingRestController class, we have all pieces ready to run our service. In the terminal, type:
mvn clean installjava -jar target/spring-boot-example-0.0.1-SNAPSHOT.jarNow, in your favorite web browser, type:
localhost:8080/api/pingYou should see the pong response!
What happens in the background is that your browser fires a HTTP GET request to localhost, which is handled by your Spring Boot app and responded to with the String pong.
Integration Test
A great way to make sure our REST endpoint really works, is by writing an integration test. This test will run every time we build our application. Why do we use integration tests? First, because we developers want to automate everything and do not like testing manually. Second, because this adds stability to future development: As our web service will be extended, this test will still run with every build, and we can be sure this feature still works.
What is an integration test? Contrary to unit tests which only look at one class, an integration test is for our app as a whole, where all components get integrated together. We typically mock third party systems like data bases, so we can test independent of (sometimes unreliable) surrounding systems. In our case, we want to really boot up our web service, but if we had a data base, then we would just simulate it.
We implement our integration test in src/test/java/com/example/springbootexample/PingIntegrationTest.java:
package com.example.springbootexample;import org.junit.jupiter.api.Test;import org.junit.jupiter.api.extension.ExtendWith;import org.springframework.beans.factory.annotation.Autowired;import org.springframework.boot.test.autoconfigure.web.servlet.AutoConfigureMockMvc;import org.springframework.boot.test.context.SpringBootTest;import org.springframework.test.context.junit.jupiter.SpringExtension;import org.springframework.test.web.servlet.MockMvc;import static org.junit.jupiter.api.Assertions.assertEquals;import static org.springframework.test.web.servlet.request.MockMvcRequestBuilders.get;@ExtendWith(SpringExtension.class)@SpringBootTest@AutoConfigureMockMvcpublic class PingIntegrationTest { @Autowired private MockMvc mvc; @Test public void testHelloWorldEndpoint() throws Exception { String response = mvc .perform(get("/api/ping")) .andReturn().getResponse().getContentAsString(); assertEquals("Hello world", response); }}As you can see, testing a REST endpoint takes slightly more code. For now, let us just focus on the interesting bits, and I will leave it to you to understand every single line of code. So here are the important points:
@SpringBootTest: Start the web server locally and have it ready to answer to test REST callsprivate MockMvc mvc: A MockMvc object allows us to fire test HTTP calls to our web server@Test: Just as with Junit-Tests, each test is implemented in a method annotated with @@test.mvc.perform(get(api/ping)): Here we trigger an HTTP GET request
You can run the test with the following command:
mvn -Dtest=PingIntegrationTest testAaaaand... the integration test fails What happened? Well no need to worry, there is just a tiny error in the above test case. I will leave it up to you to find the error cause and fix it!
Spring Configuration
Spring Boot automatically configures many properties of your service. For example, when we pinged our own service, we had to use port 8080. Now we did not define this anywhere this is just a Spring Boot default. All those default properties can be found in the official docu here. To change this default behavior, all we need to do is create an application.properties file and overwrite the appropriate value. So, go ahead and modify src/main/resources/application.properties:
server: port: 8082Now, when you recompile and restart the service, the REST endpoint will be available on port 8082.
Conclusion
We have covered all code necessary to create a simple REST service. Using Spring Boot, we just needed a total of 23 lines of Java code to create a working REST endpoint! Moreover, there was zero XML configuration needed. Pretty cool!
I hope this post has helped you to get started with Spring Boot, please remember to heart it and leave a comment below!
Original Link: https://dev.to/pmgysel/simple-working-example-of-rest-web-service-with-spring-boot-4plo
Dev To
More About this Source Visit Dev To