
An Interest In:
Web News this Week
- March 21, 2024
- March 20, 2024
- March 19, 2024
- March 18, 2024
- March 17, 2024
- March 16, 2024
- March 15, 2024
Some of Our Sources
- Technology Review
- Simplebits
- Web Designer Wall
- Just Creative
- The Logo Smith
- Web Designer Depot
- FanExtra - PSD
- Specky Boy
- Android Dissected
- Android Headlines
Help Webnuz
Referal links:
Running your first Docker Image on ECS
Working with containers has become a hefty trend in Software Engineering in this past couple of years. Containers can offer several advantages for software development and application deployment, possibly taking away a lot of problems faced by development and devops teams. We'll peek a little bit on the basics and hows of running your first Docker image on Amazon Web Services.
Of the gruesome volume of different services offered by Amazon, the Elastic Container Service (ECS) is the one to go when we commonly need to run and deploy dockerized applications.
For one to fully deploy a application in said service, at least three little things are needed: an configured ECS Cluster, at least one image on ECR, and a Task Definition.
A Cluster is a grouping of tasks and services, whose creation is free of charge by itself. Tasks must be placed inside a cluster to run, so their creation is mandatory. You'll probably want to create different clusters for different applications or execution contexts to keep everything tied up and organized.
A Task Definition is an AWS resource used to describe containers and volume definitions of ECR tasks. There one can define what docker images to use, environment and network configuration, instance requirements for task placement among other configurations. Which lead us to the definition of Task, a Task Definition instance, the running entity executing all the software in the images included, in the way we defined.
Prerequisites
Before we can jump into the Task Definition configuration shenanigans we must first have at least one container image (since a Task Definition can make use of multiple containers at once) on one ECR repository and a already-configured (or empty) Cluster.
Docker images must be built and pushed to another AWS Service, the Elastic Container Registry (ECR). In the pretty straightforward service, each different Docker image must be tagged and pushed to a separate repository so they can be referenced in our task definitions. It's a must.
Amazon is friendly enough to even give us all the necessary commands to do all the basic operations: all you have to do is push that beautiful "View push commands" button, as every needed step is explained in detail over there.

Clusters can be created by clicking on the intuitive "Create Cluster" button on the ECS main page. Make sure to select the correct template for your needs, depending on the OS you'll want to use, but you'll probably want to stick with the "Linux + Networking" one. Do not choose the "Networking only" unless you're really sure on about what you're doing, as you will be dealing with yet another completely different service, AWS Fargate.
We have the option of creating an empty cluster, thus not allocating any kind of on-demand or spot instances, or not doing that. Since creating an empty cluster gives us the hassle of providing running machines in some way so our tasks can actually run (and that's completely out of our scope here), I suggest you to just pick a t2.micro as a ECS Instance Type as it's almost free. Keep in mind that if you want to meddle with Fargate no instances need to be picked as Amazon will take care of machine allocation for you, so you can just create an empty cluster.
The Task Definition
With all the needed configuration at hand, we can finally safely access the "Create new Task Definition" section found no the ECS Task Definition main page.

At first, Amazon will ask you to choose your Task Definition launch type based on where you want run your tasks, giving you two choices: Fargate and ECS. Fargate is an AWS alternate service that allows us to execute tasks without the hassle of explicitly allocating machines to run your containers, whereas ECS is a launch type that requires you to manually configure several execution aspects, a lower level operation. Both launch types work and are billed differently, you can find more detailed information here.

In the following page we will find the more meaningful and deeper configuration:
- Task Definition Name: the name of your Task Definition. Obligatory.
- Requires Compatibilities: is set following the Launch Type chosen in the first configuration page.
- Network Mode: set network mode ECS will use to start our containers. If Fargate is used, we have no other option as to set the awsvpc mode. If you are not really sure what this means, take a look here.
- Task Execution Role: necessary role to be given to each task execution as to allow it to have access and sufficient permissions to run correctly inside the AWS ecosystem. An Execution Role has access to several different permission policies to give specific access to the applications running under it. For instance, a common use case for ECS-executed tasks are to have access to ECR (so we can pull our images) and to have permission to use Cloudwatch (Amazon logging and monitoring service), meaning we would have to attach to our Role policies like: "ecr:BatchGetImage" and "logs:PutLogEvents". Do not confuse this with the Task Role, the Task Execution Role wraps the permissions to be conceded to the ECS agent responsible for placing the tasks, not to the tasks themselves. Detailed information of Task Execution Roles can be found here.
- Task Role: necessary role to be given to the task itself. It follows the same principles listed above, so if your application needs to send messages to a SQS queue, communicate to Redis cluster or save data into a RDS database, you'll need to set all the specific policies into your custom Task Role configuration.
- Task size: a pretty straightforward section, allows you to set specific memory and CPU requirements for running your task. Keep in mind that if you try to run your task on a machine with lower specs than specified here, it won't start at all.
- Container Definitions: the fun part. You'll have to pass through all the steps listed below for each container you want to include inside the same Task Definition. You can set up any number of containers you need.
- Container name: self-explanatory.
- Image: the ECR repository image URL from which you'll pull the application.
- Memory Limits: the definition hard or soft memory limits (Mib) for the container. Link to universal knowledge if you do not know what this means.
- Port mappings: if your application will make use of specific ports for any kind of outgoing communication, you'll probably have to bind the host ports to your container ones. Otherwise, nothing is gonna actually work.
- Healthcheck: sets up a container health check routine in specific timed intervals. Useful to continuously monitor your container health and used by ECS to know when your application actually started running. If you defined a specific route for this in your application, you'll probably have something of the like as your command:
CMD-SHELL,curl -f http://localhost:port/healthcheck || exit 1 - Environment: Lets you set up the amount of CPU units your container is going to use, configure all the environment variables you need so your application runs correctly among other configuration. Also allows you to set the container as essential, meaning in the scenario that if it dies for some reason, the entire task is going to be killed shortly after.
- Startup Dependency Ordering: allows you to control the order the containers are going to start, and when they are going to. Not mandatory.
- Container Timeouts: self-explanatory and not mandatory.
- Network Settings: also self-explanatory. Not really mandatory, unless you have some advanced network shenanigans going on.
- Storage and Logging: Couple of advanced setups. At a basic level you'll probably want to configure the Cloudwatch Log configuration, or simply let Amazon handle everything with the beautiful "Auto-configure CloudWatch Logs" button.
- Security, Resource Limits, and Docker Labels: advanced an context-specific configurations. Not mandatory. We'll not cover them here.
And that's it. There a couple of other options listed in the task definition main page, as Mesh and FireLens integration, but they are very specific and not really needed for your everyday task definitions. You can skip the rest and press the "Create" button.
Running your task
After all this explanation, we want to see if the containerized application will actually run right? So click on your created ECS cluster, hit the bottom "Tasks" tab and click on the "Run new Task" button.
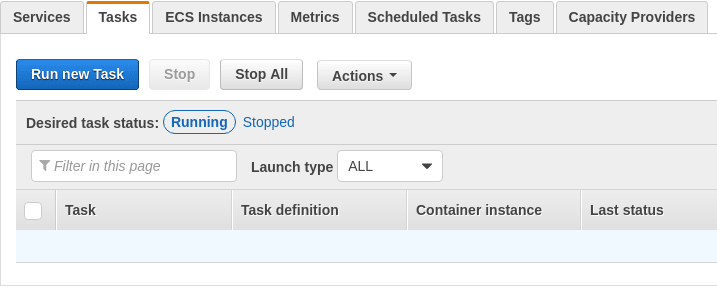
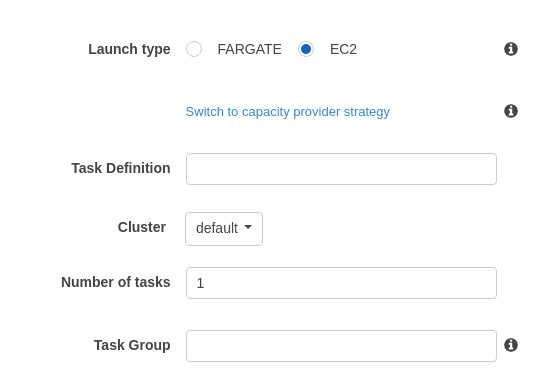
On the new screen, select "EC2" as a Launch Type, fill in your task definition name and the name of the cluster where we'll run it and click on "Run Task". If you had set the t2.micro as we suggested, your application will boot in no time.
You can check all the running information of your task in the "Task" tab of your cluster.
Since we did not enter into the merits of what kind of application you are trying to run, it's up to yourself to check if your application is running as it should. You can check the logs of your application by clicking on the task (inside the aforementioned "Task" tab) and searching for the "View logs in CloudWatch" under the desired configured container.
Wrapping up
Our main objective here was to show the simplest (and somewhat lengthy) path of how one can deploy a containerized application on Amazon Web Services without any kind of context what one could actually run over there.
A lot of deeper points were omitted since they serve no purpose in a introduction, a couple of other complementary ones were also not mentioned now (such as configuring services and making spot fleet requests) but are going to be featured in future following articles. Those additional content will be complementary and crucial for a more consistent understanding of the multitude of ECS services and overall environment.
I invite you all to stay tuned for the next articles. Feel free to use the comments section below to post any questions or commentaries, we'll take a look on them all, promise.
Until next time, happy deploying.
Original Link: https://dev.to/zrp/running-your-first-docker-image-on-ecs-17c4
Dev To
More About this Source Visit Dev To