
An Interest In:
Web News this Week
- April 16, 2024
- April 15, 2024
- April 14, 2024
- April 13, 2024
- April 12, 2024
- April 11, 2024
- April 10, 2024
Some of Our Sources
- Pearsonified
- Smashing Magazine
- Abduzeedo
- Creative Curio
- Crazy Leaf Design
- Web Design Ledger
- CSS Globe
- Line 25
- 24 Ways
- Spyre Studios
Help Webnuz
Referal links:
Implementing soft particles in WebGL and OpenGL ES
Particles are one of the easiest ways of improving the visual appearance of any scene. When we decided to update visuals of our 3D Buddha Live Wallpaper the most obvious way of filling in the empty space around Buddha statue was to add some smoke/fog particles. And we have achieved quite good looking results by using soft particles. In this article we will describe the implementation of soft particles in pure WebGL / OpenGL ES without any 3rd party library or engine used.
The difference between the old and updated app is even better than we expected. Simple smoke particles significantly improve the scene, making it visually more pleasing and rich. Particles add more detail to scene and improve transition from foreground objects to background: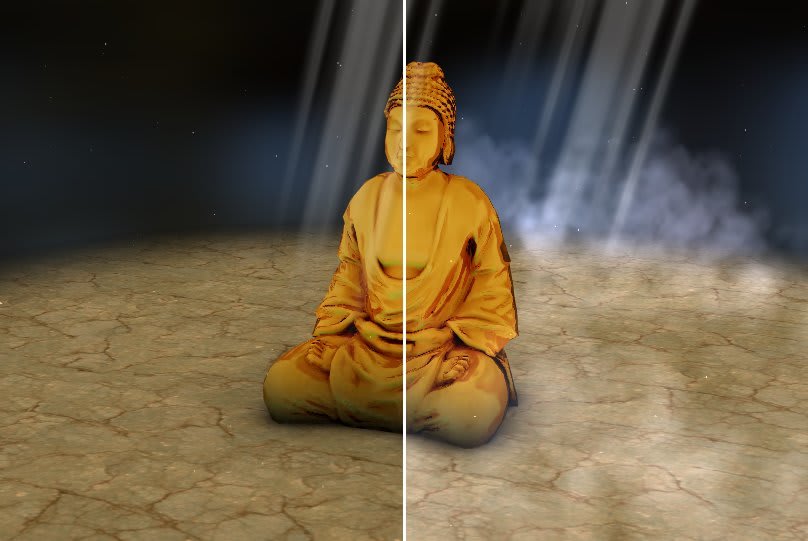
You can see live demo here
Soft Particles
So what are soft particles? You may remember that in most older games (Quake 3 and CS 1.6 times) smoke and explosion effects had clearly visible hard edges at intersections of particles with other geometries. All modern games got rid of this by using particles with soft edges around adjacent geometry.
Rendering
What is needed to make particle edges soft? First, we need to have a scene depth information for particles shader to detect intersections and soften them. Then we will be able to detect exact places where particles intersect with geometry by comparing depth of scene and particle in fragment shader - intersection is where these depth values are equal. Lets go through the rendering pipeline step-by-step. Both Android OpenGL ES and WebGL implementations of rendering are the same, the main difference is in loading resources. WebGL implementation is open-sourced and you can get it here.
Rendering to depth texture
To render scene depth, we first need to create off-screen depth and colors textures and assign them to corresponding FBO. This stuff is done in the initOffscreen() method of BuddhaRenderer.js.
Actual rendering of depth scene objects is done in drawDepthObjects() which draws a Buddha statue and a floor plane. However, theres one trick here. Since we dont need color information but only depth, rendering of color is disabled by gl.colorMask(false, false, false, false) call, and then re-enabled by gl.colorMask(true, true, true, true). glcolorMask() can toggle rendering of red, green, blue, and alpha components individually so to completely skip writing to the color buffer we set all components to false and then re-enable them by setting them to true. Result depth information of the scene can be viewed by uncommenting the call to drawTestDepth() in drawScene() method. Because depth texture is single-channel, it is treated as red-only so green and blue channels have zero values. Result looks like this if visualized:
Rendering particles
Shader used for rendering of soft particles can be found in SoftDiffuseColoredShader.js. Lets take a look at how it works.
The main idea of detecting intersection between particle and scene geometry is by comparing fragment depth with scene depth which is stored in texture.
First thing needed to compare depth is linearization of depth values because original values are exponential. This is done using the calc_depth() function. This technique is described here. To linearize these values we need vec2 uCameraRange uniform which x and y components have near and far planes of camera. Then shader calculates the linear difference between particle geometry and scene depth it is stored in variable a. However, if we apply this coefficient to particle color we will get too dim particles they will linearly fade away from any geometries behind them, and this fade is quite fast. This is how linear depth difference looks when visualized (you can uncomment corresponding line in shader to see it):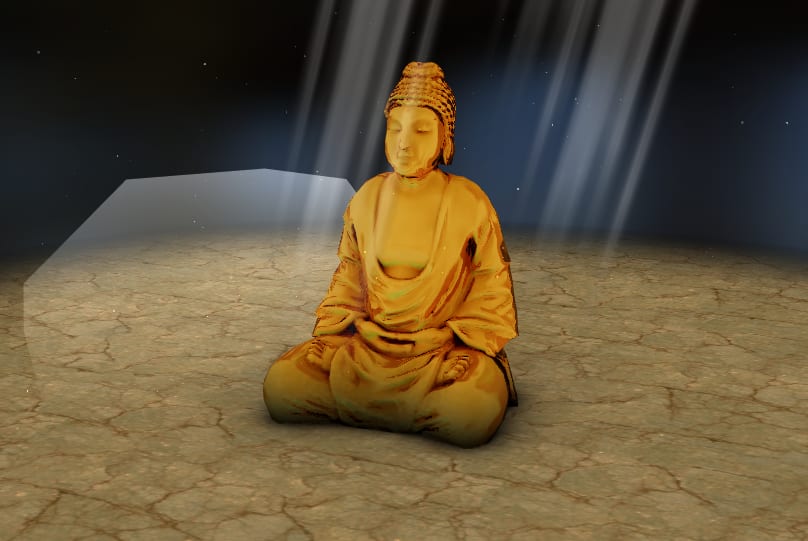
To make particles more transparent only near the intersection edge (which happens at a=0) we apply GLSL smoothstep() function to it with uTransitionSize coefficient which defines the size of a soft edge. If you want to understand how smoothstep() function works and see some more cool examples on how to use it, you should read this great article. This final blending coefficient is stored in a variable simply named b. For blending mode used by our particles we simply multiply a particles diffuse color by this coefficient, in other implementations it may be applied to the alpha channel. If you uncomment line in shader to visualize this coefficient you will see image similar to this one:
Here you can see visual difference between different values of particle softness uniform: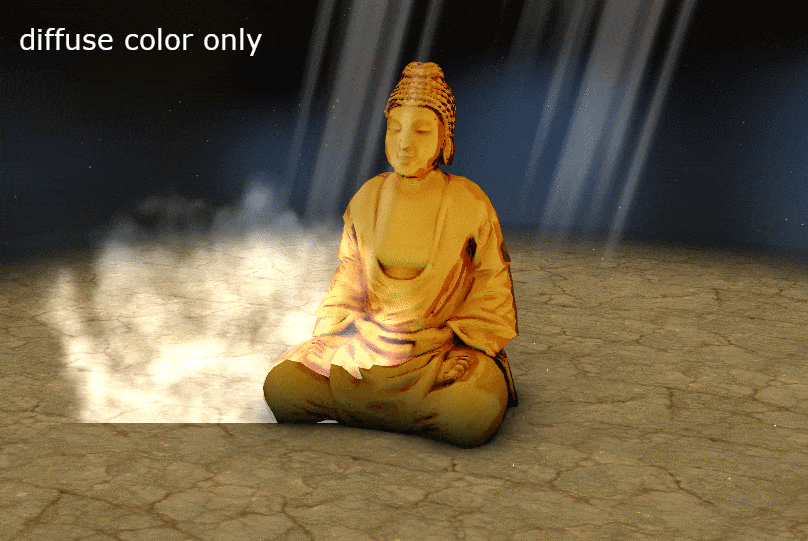
Sprite billboard meshes
Small dust particles are rendered as point sprites (rendering using GL_POINTS). This mode is easy to use because it automatically creates a quad shape in the fragment shader. However, they are a bad choice for large smoke particles. First of all, they are frustum-culled by the point center and thus would disappear abruptly on screen edges. Also, quad shape is not very efficient and can add significant overdraw. We decided to use custom particle mesh with optimized shape - with cut corners where texture is completely transparent: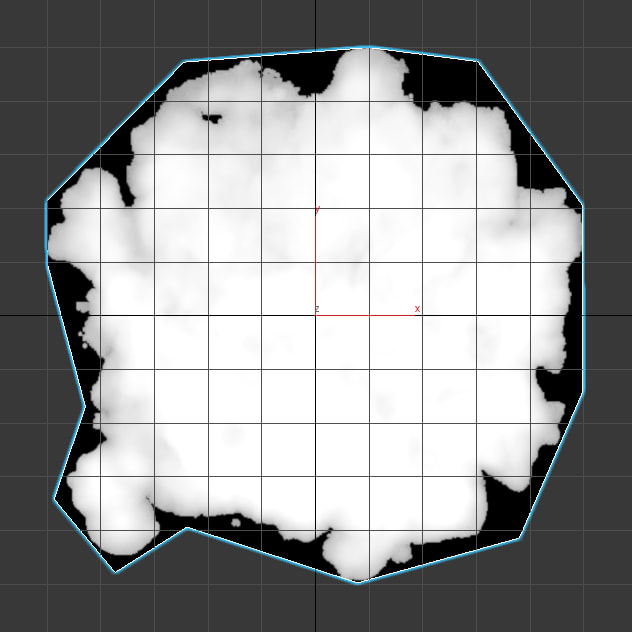
These custom quads cannot be rendered in batches with GL_POINTS, each particle is rendered separately. They have to be positioned at any world coordinates, properly scaled but should be always rotated facing towards the camera. This can be achieved by technique described in this answer on StackOverflow. In BuddhaRenderer.js theres a calculateMVPMatrixForSprite() method which creates MVP matrices for billboard meshes. It performs regular scale and translation of mesh and then uses resetMatrixRotations() to reset rotation of the model-view matrix before it is multiplied with the projection matrix. This results in an MVP matrix which always faces a camera.
Result
You can see the final result here - https://keaukraine.github.io/webgl-buddha/index.html.
Feel free cloning source code and modifying it to your needs from Github - https://github.com/keaukraine/webgl-buddha.
Original Link: https://dev.to/keaukraine/implementing-soft-particles-in-webgl-and-opengl-es-3l6e
Dev To
More About this Source Visit Dev To