
An Interest In:
Web News this Week
- April 1, 2024
- March 31, 2024
- March 30, 2024
- March 29, 2024
- March 28, 2024
- March 27, 2024
- March 26, 2024
Some of Our Sources
- Engadget
- Simplebits
- TutsPlus - Code
- Six Revisions
- Vandelay Design
- Inspiredology
- Noupe
- Crazy Leaf Design
- Stylized Web
- TechPowerUp
Help Webnuz
Referal links:
Creating a deployable Rails 6 app TailwindCSS, Stimulus.js, and a custom font.
This post covers how to set up a new Rails 6 app to use Tailwind CSS, and then set up a custom body font, and get the whole thing actually working when deployed to Heroku.
If you haven't upgraded your Rails skills to 6, be prepared to be shocked: Rails 6 fully works with modern JS frameworks the way they expect to be worked with. While there's still the asset pipeline, it's deprecated for the javascript hotness.
The first and most important step is don't pick the wrong tutorials to follow, or your path will be one of frustration and pain. I initially wanted to run Vue.js from within Rails 6, and I figured that was going to be the most difficult integration. I started by Googling "Rails 6 Vue js" and found this How to Integrate Vue.js with Rails 6
and through trial and much error, integrated Tailwind with it.
So there I was with Rails6, Vue, and Tailwind sitting in a tree. Unfortunately, I kept getting a compile error on Heroku that was not happening on localhost. Damn!
So after several days for fruitlessly trying to debug this issue and rethinking things a bit, I realized I was better off sticking with what I know and coloring within the lines that the people who wrote Rails have laid down: Rails for the main thing, and Stimulus.js to handle the "jQuery-like" simple but essential stuff like triggering dropdowns.
Enough talk, show me the code!
Ok, here we go.
- with the current rails/ruby in your present working directory,
rails new <appname. - The install Stimulus with
rails webpacker:install:stimulus(see this GoRails video: How to use Javascript via webpacker in Rails 6 (and Flatpickr) for an excellent tutorial.) app/javascript/packs/application.js is very much like the old asset pipeline; add this code:
import "controllers"import flatpickr from "flatpickr"require("flatpickr/dist/flatpickr.css")The first line sets up stimulus controllers, then the next lines set up flatpickr. then this code:
document.addEventListener("turbolinks:load", () => { flatpickr("[data-behavior='flatpickr']", { altInput: true, altFormat: "F j, Y", dateFormat: "Y-m-d", })})configures what HTML tags should be inited with flatpickr and what the input and display date formats in flatpickr should be.
And don't forget to add flatpickr to your rails project:yarn add flatpickr.[A small digression: pick either yarn or npm and stick to that. Otherwise, you end up with a
yarn.lockand apackage-lock.jsonfile in contention for control of yourpackage.json. Bad idea. For this project I went with yarn, and recommend this cheatsheet for translating npm into yarn: NPM vs Yarn Cheat Sheet.]Next, it's time to see flatpickr at work in a view. Scaffold a view and then replace a
form.date_selectwith aform.text_field :publish)date, date, { behavior: "flatpickr"}you should now in have a much nicer view working: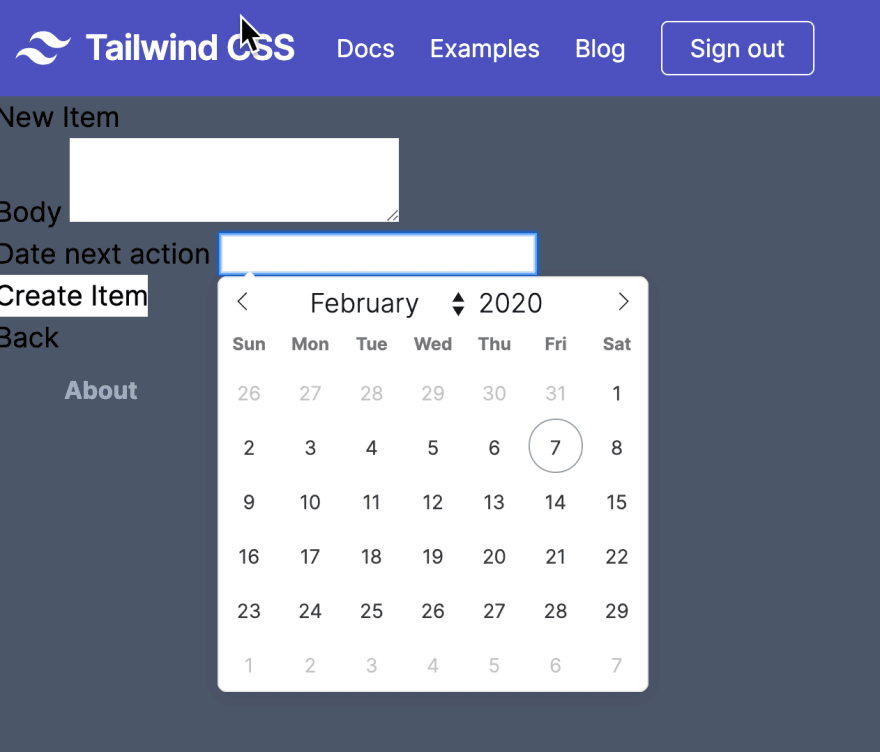
By the way, it seems Rails 6 is using a whole new form syntax: cleaner than the old one, hopefully easier to deal with when it comes time to add Tailwind classes.
Now would be a good time to stick your project up on Heroku. Unless you know you are going to deploy via AWS, Heroku makes it easy to deploy and manage. Read this post, Getting Started on Heroku with Rails 6.x. if you need to brush up.
Implementing TailwindCSS
You'll do a
yarn add tailwindcss@latest. Why latest? Because you want the latest stable build of TailwindCSS. Now you have TailwindCSS in your project, but not yet integrated. You should pull up the Tailwind Install instructions, keeping in mind you need to get Tailwind working in your Rails 6 project. Check out GoRails How to install TailwindCSS 1.0 with Rails 6 if you want the full context, but here are the steps:After doing
yarn add tailwindcss, you need to create a newstylesheetsdirectory in yourjavascriptfolder, and in that directory create anapplication.scssfile to hold Tailwind's configuration:
@import "tailwindcss/base";@import "tailwindcss/components";@import "tailwindcss/utilities";- In
postcss.config.js, you need torequire('tailwindcss')and on the next line,require('authoprefixer'). - One more step: telling webpack about this new
application.scss. Do that inapplication.jswith arequire("stylesheets/application.scss")declaration. - Now you need to employ some tailwindCSS. For an easy way to do this, copy a navbar here and add it to
/layout/application.html.erb. - You should have everything working in your Rails Project: do a quick test by having webpack compile by running from your CLI
bin/webpack, and then try running it in localhost.
Installing a custom font into a Rails 6 app
As the final step I want to capture in this tutorial, here are the steps needed to use a custom font. Gone is declaring a CDN in the <head> tag, or shoehorning a set of fonts into your asset pipeline. There's a much cleaner way, the Javascript way:
- Find the font as an npm module at npmjs.com. most font npm modules are going to start with
interface-so pick one you like Roboto, or Nunito, or the awesome Inter font. Then add it to your project. For exampleyarn add 'typeface-inter'. - Now you need to tell Tailwind about this font in three places. First, edit your
application.jsfile to include the npm module:
require("channels")require('typeface-inter')require("stylesheets/application.scss")- Next, generate a
tailwind.config.jsfile in the root of your project (npx unlike npm does not generate apackage-lock.jsonfile, so use that.) - Modify
tailwind.config.js:
module.exports = { theme: { fontFamily: { body: ['inter'] }, extend: {}, }, variants: {}, plugins: [],}- Finally, go into your application.scss file and apply the font to the html tag, so
fontFamily{body{['inter'}}}gets applied:
@import "tailwindcss/base";html { @apply font-body;}@import "tailwindcss/components";@import "tailwindcss/utilities";(Thanks to Scott Watermasysk and "Using Google Fonts Tailwind CSS" who graciously clarified for me where some of these bits need to go. Thanks Scott! (BTW, check out his How I VSCode project.)
Takeaways
Once again Rails has reinvented itself, this time as an excellent server application and as a container for all the javascript npm modules and frameworks large and small you might want to use.
That means all you Rails developers who know jQuery but are flummoxed by npm modules and all that javascript running loose need to bite the bullet, learn Rails 6, and get on board with it.
Once you make the mental switch to how webpacker works to integrate js into your rails app, it all starts making sense, and you can pretty much forget all those painful little workarounds in the asset pipeline.
A final takeaway: The shelf life of developer information is now even shorter. Any tutorial, video, or post older than 6 months is suspect; older than a year, not trustworthy. That's a huge unmet need looking for a cool SaaS to solve it, in case you want to build the next Big Thing.
Original Link: https://dev.to/bobwalsh47hats/creating-a-deployable-rails-6-app-tailwindcss-stimulus-js-and-a-custom-font-3472
Dev To
More About this Source Visit Dev To