
An Interest In:
Web News this Week
- April 20, 2024
- April 19, 2024
- April 18, 2024
- April 17, 2024
- April 16, 2024
- April 15, 2024
- April 14, 2024
Some of Our Sources
- BoingBoing
- Simplebits
- Just Creative
- Vandelay Design
- Inspiredology
- Web Designer Depot
- Line 25
- Spyre Studios
- Codrops
- Daily Now
Help Webnuz
Referal links:
Moving from Apache2 to Nginx Webserver
Recently at work I had to move our dev, staging and production web servers from Apache2 to Nginx. The reason for this move is that in the rest of the company we are using Nginx for all the backend services but when the web sites were set up for some reason the consultants set up Apache2. This became a problem mostly for management. In this article, I will be going step-by-step through the process. I will be using a vagrant box for all the screenshots but the steps I did were the same for the actual servers.
Server
For my test server I am using vagrant and ubuntu/bionic64. On this server I had apache2.4, php7.2 and mysql5.7 a basic LAMP stack. Which I will be moving to a LEMP stack replacing Apache with Nginx.
This server has a WordPress site running on it, with WordPress 5.2.4 running. We will have achieved our goal once we can see this WordPress site running on Nginx and PHP 7.3. Oh and we have a bunch of envvars set up of the Apache2 instance that will also have to transfer to the Nginx installation.
Installing Nginx
Pretty straight forward. Start off by checking for updates.
sudo apt updatesudo apt upgradeActually install Nginx.
sudo apt install nginxNginx is now installed but is not running, since we have Apache2 already installed and configured on the system, Apache2 will be using port 80 which means that to avoid conflicts we should run Nginx on a different port to test that everything is running well. I choose the port 8080.
Configure Nginx with Port 8080
There is a default website that is set up with Nginx (just like Apache) just to make sure that things work. The config can be seen at.
sudo vim /etc/nginx/sites-available/defaultThis should open up a file that looks like.
On line 22 and 23 we are gonna change 80 to 8080.
listen 8080 default_server;listen [::]:8080 default_server;Let's test the config quickly before we start the Nginx service.
sudo nginx -tIf all is well, let's write a small HTML page that will just let us know that the server is up. Line 41 shows me the root of the server. I changed server root to make sure that am not using the same directory as Apache.
root /srv/www/html;That's the directory I will be adding the index.html file. Now we can start the server.
sudo service nginx startTo test out the new config.
curl http://localhost:8080Which should return the new HTML file that I had created. Moving on to install PHP.
Installing PHP
Right now we have PHP7.2 installed on the system, since there has been a bit of a scare with the whole PHP7.2 and Nginx config, will be moving to PHP7.3.
First off, Ubuntu doesn't know where to get PHP7.3 from so we need to add the repository.
sudo add-apt-repository ppa:ondrej/phpsudo apt updatesudo apt upgradeActually installing PHP7.3 and some extensions. These are just the extensions I need, feel free to add or remove extensions as required.
sudo apt install php7.3sudo apt install php7.3-cli php7.3-fpm php7.3-pdo php7.3-mysql php7.3-zip php7.3-mbstring php7.3-curl php7.3-xml php7.3-bcmath php7.3-jsonOnce all the extensions have been installed, its time to edit the Nginx config file again to tell it that the website we have uses PHP. The config file is below, with all the comments stripped out and comments only on the lines that have been changed.
Test the config to make sure there are no syntax errors.
sudo nginx -tYou will probably get an error because there is no env file at /srv/config/default.nginx.conf. Just add a blank file there, for now, will explain what it does later.
Hopefully, that solved your error. Now let's change the index.html file to index.php and add some basic PHP code to see if things work. Also, be sure to set the appropriate permissions to the index.php file. I like going with.
sudo chmod 755 index.phpRestart the Nginx server
sudo service nginx restartAnd you should see the PHP file you wrote. I printed out the phpinfo() function to make sure configurations are good.
Server Env Variables
I like having some of my app configurations saved in the $_SERVER superglobal. This comes in handy when your moving your app between dev, stage and prod servers and don't want to keep on changing your db passwords or API endpoints.
The file that we touched /srv/config/default.nginx.conf, I will be adding the following lines of code in it.
fastcgi_param APP_ENV dev;fastcgi_param APP_ENDPOINT https://dev.server.com;fastcgi_param DB_HOST localhost;fastcgi_param DB_USER root;fastcgi_param DB_PASS password;The format is usually
fastcgi_param {VAR_NAME} {VAR_VALUE};Feel free to add any other env variables. Once your happy test config and restart Nginx. You should see your new variables in the phpinfo() function output as below.
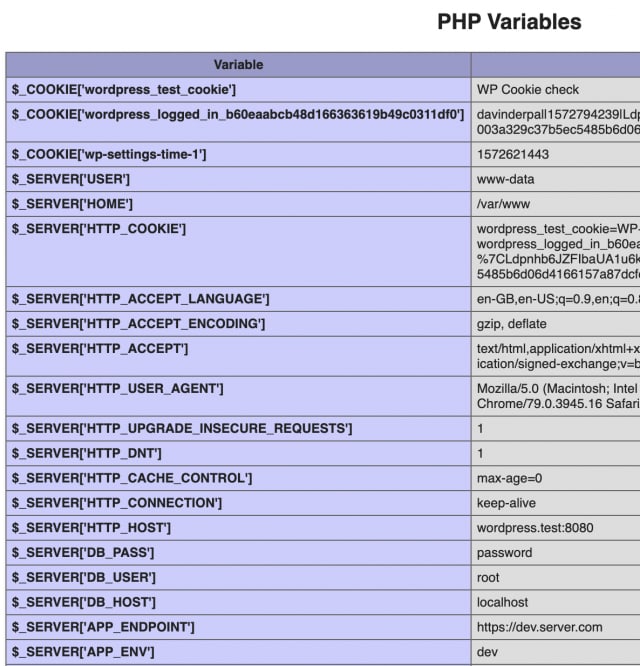
Pay close attention to the last 5 values.
And thats it, just move all your files to the relevant folder to do a final test. When ready you can stop the Apache service.
sudo service apache2 stopChange the port number from 8080 in the Nginx config, to 80 and restart Nginx, and we are done.
Well done!
Original Link: https://dev.to/davinderpalrehal/moving-from-apache2-to-nginx-webserver-2n6a
Dev To
More About this Source Visit Dev To