
An Interest In:
Web News this Week
- March 30, 2024
- March 29, 2024
- March 28, 2024
- March 27, 2024
- March 26, 2024
- March 25, 2024
- March 24, 2024
Some of Our Sources
- Simplebits
- TutsPlus - Code
- Pearsonified
- Abduzeedo
- Crazy Leaf Design
- My Ink Blog
- Line 25
- Wal You
- Android Headlines
- Daily Now
Help Webnuz
Referal links:
How to Deploy your App to Heroku from Raspberry Pi
This article shows how to deploy a Python application to the Heroku Platform from a Raspberry Pi 3 running Raspbian.
The process detailed in this article was confirmed on Raspberry Pi 3 B 1.2 running 09-26-2019 Raspbian Buster Full to deploy Heroku's python-getting-started test app.
Meet the Raspberry Pi
From curiosity to necessity, Raspberry Pi (oft shortened to RPi or simply Pi) fills an undeniable niche in the computing world. Arguably, the posterchild of the "small form factor, low-power, low-cost hardware" scene, RPi are about the size of a deck of cards---And what a deck of cards it is!
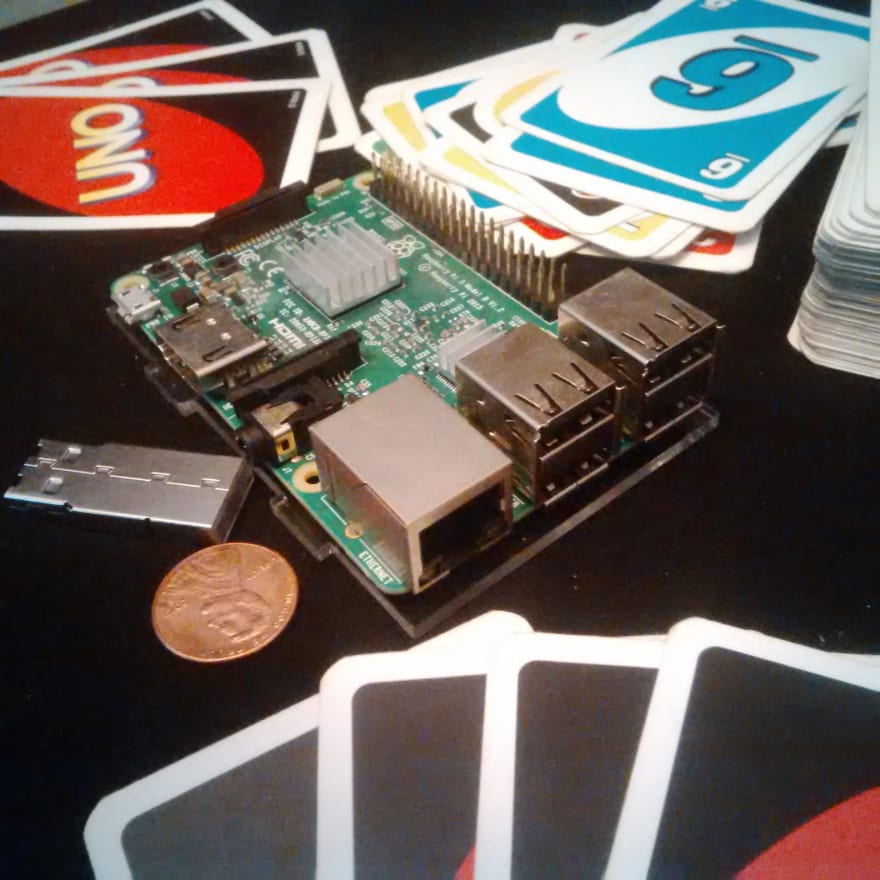
A photo of my Raspberry Pi 3B with some cards for scale.
The Raspberry Pi runs on 12 to 15 Watts of DC supplied through a micro USB cable. With on-board WiFi and Bluetooth adapter, 1-2 HDMI controller(s), a 3v3 and two 5v rails, and 1-5 USB ports, the Pi is ludicrously efficient. Different generations and models of Raspberry Pi feature varying form factors and capabilities.
This philosophy is not without its real-world snags. Sometimes less is just less. The Pi relies on LPDDR RAM, a form of working memory that uses little energy. LPDDR is expensive, so the Pi doesn't have a whole lot of memory to work with. The Pis have an on-die graphics processor also, but it's not anything more than that. It can provide a nice desktop, render some simple graphics, and play videos. The Pi uses a System-on-Chip (SoC). So there's no upgrading a Pi's core hardware, what you see is what you get. Also, the low-power Pi can't rely on common, powerhouse processors from Intel or AMD. Instead, they utilize small, cost-effective ARMv7 processors with "Hard Float" VPF registers.
This basically means that the Pi has special hardware that handles floating point operations: Math using fractional or very large numbers. This does provide a performance boost, but hard float ARMv7 is not typical. Many software projects are not prepared to accommodate. Even the Debian release specifically for ARM architectures doesn't work quite right. Hence, the need for a dedicated Raspberry Pi Debian distribution.
Rasp(berry Pi's own De)bian
Raspbian is a Debian-based GNU/Linux distribution made for Raspberry PI devices. The developers, wanting to see the technology succeed, worked hard getting a large portion of the Debian system working on Raspberry Pi. Raspbian does still differ from Debian, and it's due, for the most part, to the idiosyncrasies of the Pi's hardware touched on above.
Regardless, the full release of Raspbian at the time of writing on a RPi 3B runs like a dream and comes with more than I ever expected it would. This Raspbian comes with BlueJ, Chromium, Green Foot, Mathematica, Node Red, Thonny, libreOffice, VLC, and a tiny, "creative mode" version of Minecraft installed out-of-the-box. Chromium suffers a little graphical strangeness, but there are lightweight browsers (such as Midori or W3M) that work nicely when a mainstream browser isn't necessary.
Do More with Less
Taking into account the growing pressure---both from society and our very own planet---to invest in more energy-efficient and ecological modes of production, low-power and low-cost devices like the RPi appear increasingly attractive to users and developers alike. Of course, the moral or ethical impulse is a strong one, but an often stronger one is the fiscal impulse.
These little guys are sold for 15 to 60 USD. Throwing in case, battery, micro SDHC, heatsinks, fans, and the rest only brings us up to the 30 to 100 USD range. That lowest price points represents the mind-bendingly miniature Pi Zero, and some older model Pis. The priciest is the newest Pi 4 with all the bells and whistles. Right about in the middle is the Pi I'm using in this tutorial.
This tutorial will use the September 26, 2019, release of Raspbian Buster on a version 1.2, model B Raspberry Pi 3. The Pi 4 is awesome, but it's totally overkill for this tutorial. This probably works on earlier Pi's as well.
The Process
This article isn't about developing apps, so let's use a Python application found in one of Heroku's (excellent) tutorials. I show below where you can substitute in your own app.
In general you should be able to run any Python web app on a Raspberry Pi, provided you've got the right set up:
Step 0: Set up
If youre just getting your new Raspberry Pi out of the box and want to get Linux running on it, check out the great raspbian tutorial. My tutorial starts with a Pi already running Raspbian. Start by opening a terminal emulator from the toolbar.

If you have not configured git already, run the commands: git config --global user.name "Your Name" and git config --global user.email "[email protected]", substituting your own name and email address, naturally.
(You may also want to designate an editor with git config --global core.editor vim. By default, git uses Vim to edit commit messages and the like. If you don't know Vim, you absolutely want to change this. I recommend nano.)
I will assume you have a Heroku account already. You have registered a free account with Heroku, right? Why else would you be here?
Step 1: Keeping up to date
Make sure your system is up to date by running sudo apt update and sudo apt upgrade. We will prefix a few of the commands in this tutorial with sudo. This command elevates the privileges of the command that follows it, allowing a user to make changes to their system. Respectively, apt update and apt upgrade discover and install new versions of installed packages.
Many tutorials for Debian-based distributions will begin with updating the system in this way. It's safe to assume that upgrading your system is a precursor to anything you do on Linux.
about those dependencies...
The "full" Raspbian release comes with many packages preinstalled. Should your system be missing any of these packages, you can install them (after updating and upgrading!) with sudo apt install git curl python3.7.
Step 2: Install Heroku CLI
The default Heroku CLI (command line interface) install method uses a universal and auto-updating package manager called Snap. On Raspbian, Snap is available through the package snapd, but it will not install Heroku properly, since it will try to grab a version of the CLI not fully compatible with Raspbian.
Thankfully, Heroku offers several other installation methods. The one we will use here runs an installer directly from the Heroku website to install a standalone binary of the Heroku CLI. It auto-updates just like the Snap version, so you do not need to worry about keeping your Heroku CLI up to date. You can see more about this and other methods at the Heroku Dev Center.
Run sudo curl https://cli-assets.heroku.com/install.sh | sh.

Step 3: Git your app
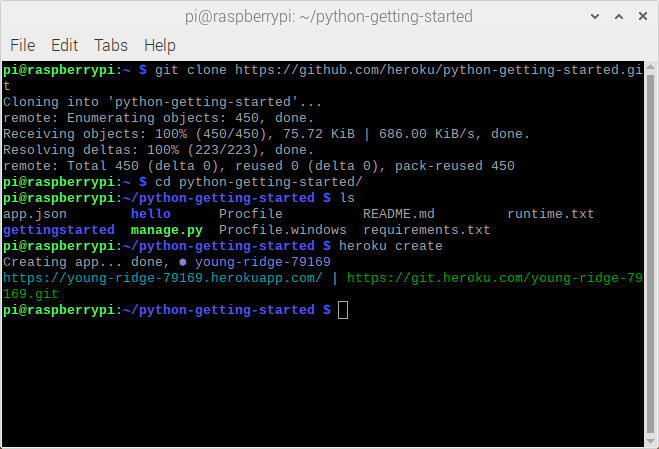
I suggest starting with the following Python application, which works well on Heroku. It's a simple Django app: you will want to navigate to the root directory of your application. Start with git clone https://github.com/heroku/python-getting-started.git and cd python-getting-started.
As soon as you are in your app's root directory, we will be ready to deploy.
if you're struggling to do things like navigating to different directories from the terminal, I recommend taking a moment to check out William Schott's The Linux Command Line
Step 4: Login, Create, Deploy
heroku login
First, we tell Heroku who we are with heroku login. (The pay-off from Step 2.) This command will open your default browser to a login page. Just follow the prompt, enter your credentials there, and return to your terminal.

heroku create
Then we will tell Heroku about our cool new app. This step provides two URLs. One that ends in .git and another that does not. These are the URLs you can use to access your app later.
For instance, when I scale and open the test app later, the first URL will show in the address bar. The second URL lets you access the remote git repository that contains the app.
git push heroku master
In this step, we deploy our app to Heroku with git push heroku master. 
This might take a minute. Heroku has to install all of your app's dependencies in a container called a dyno. Even with straightforward apps this can get a bit heavy. The good news is that this only happens once! Later deploys will be much much faster. See more about deploying to Heroku with git, and more about dynos.
heroku ps:scale web=1
Now we instruct Heroku to scale the number of web dynos up to one with heroku ps:scale web=1. Usually, all you need is a web dynos, but sometimes you might have workers or one-off dynos too. Scale the dynos that you need.
This is one huge benefit to Heroku, it's so easy to scale up your app! This simple command lets you quickly change your autoscaling options, and manually increase the number of dynos. Keep this in mind for when/if your app sees a high volume of traffic!
You can see the heroku ps command's documentation here.

heroku open
Finally, run heroku open to open the browser to the page hosting your app!

You can see Heroku's "Getting Started with Python" app running in the browser tab below.

what have we learned?
It's pretty neat to run a service at full production scale from a $35 piece of hardware.
If you liked this, check out Part 2: "Heroku on the Raspberry Pi Pt. 2: editing and redeploying your app". It'll go up next week!
This article was co-written and would not have been possible without the Linux wizardry of J. S. Rana. If you can believe it, she's looking for work right now! Please, get in touch if you'd like a Python, Linux, or Git genius on your team.
Her email [email protected]
Her github and blog
Original Link: https://dev.to/heroku/how-to-deploy-your-app-to-heroku-from-raspberry-pi-162k
Dev To
More About this Source Visit Dev To