
An Interest In:
Web News this Week
- March 27, 2024
- March 26, 2024
- March 25, 2024
- March 24, 2024
- March 23, 2024
- March 22, 2024
- March 21, 2024
Some of Our Sources
- BoingBoing
- Joshua Blankenship
- Smashing Magazine
- Fuel Your Creativity
- Naldz Graphics
- Line 25
- Android Headlines
- Willems Lab
- Daily Now
- Hashedout
Help Webnuz
Referal links:
How to Create a Travel Gallery Flipbook With the Real3D WordPress Plugin
Whether you are running a blog, business, or any type of website, you will need to attract and keep your audience's attention to be successful. A major part of attracting and keeping users' attention is to display eye-catching photos on your website.
While displaying these images in a gallery is the usual way to present them, there are other creative and interactive ways to not only show these images but other text and documents. One creative way to display your website's content is with flipbooks.
Flipbooks give your audience a fun and interactive way to view your website's content by allowing them to feel like they have a book in front of them. Flipbooks also help you display your content in an organized way that is not possible with the use of a gallery or other ways of displaying your content.

Best WordPress Flipbook Plugins Compared
17 Best WordPress Gallery Plugins

10 Best WordPress Gallery Plugins of 2019

Best Free WordPress Gallery Plugins
In this post, we'll be working with the number one best selling WordPress flipbook plugin on CodeCanyon: Real3D FlipBook. This plugin will help you create a stunning-looking flipbook within minutes and help keep your audience interested in what your website has to offer.
In this article, I am going to show you just how simple it is to create a 3D flipbook with the Real3D FlipBook plugin to grab and keep the attention of your audience.
What We Will Be Building
The flipbook that we will be creating is going to be for our travel blog. In one of our posts in the blog, we are going to add a 3D flipbook created by the Real3D FlipBook plugin to show off the photos that were taken on our last trip to Europe.
We visited four different countries in Europe and are going to show off our top four photos for each country in the flipbook to show our travel blog audience. To make this flipbook visually appealing and easy to navigate we are going to change around the styling of the flipbook, how the actual 3D book flipping functions, add a table of contents, and enable a few other features that will enhance the viewer's experience.

Creating the Flipbook
To create this travel flipbook, you'll need to have the Real 3D Flipbook plugin installed. Select Real 3D Flipbook from the WordPress admin sidebar and click Flipbooks.
This will open up the Flipbook creation page where we will then click the Add New button next to the title, Flipbooks, on the top of your screen. We will label our new flipbook European Travel Flipbook.
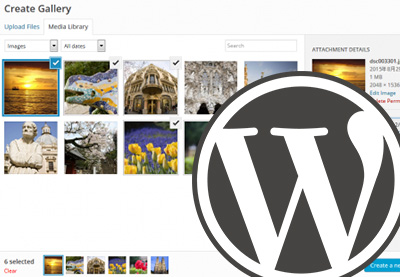
Now it is time to start creating the pages in the flipbook. There are two options to choose from here. We can create our flipbook pages from a PDF or from JPEG images. Seeing as we took these photos and have them in the JPEG format, we will click the Select Images button below JPG Flipbook which will bring up the WordPress media library. From there we are going to select our sixteen images. We are going to have four images for each of the four countries that we visited. Once we have selected our images, click the Send to Flipbook button at the bottom right-hand corner of the media library.

Now that we have all the images that we would like included in our flipbook, we need to create a table of contents so our viewers will know what country each image is from. On the top of the flipbook dashboard, click the Table of Contents tab.
This will bring up the table of contents editor where we can add in as many titles and page numbers as we need. Each grid represents a line of the table of contents. Again, we want to let our audience know where each country's photos begin and end. The first four photos are from Italy, so we will type in Italy in the first field and then the page that it starts on in the next field which is 1. Next, click the Add Item button to add another table of contents line and we will repeat this process for the other three countries. Here is what our final table of contents will look like.

The next step for creating our flipbook is to adjust the general settings. Click the General tab at the top of the Real3D FlipBook dashboard. From here we are going to adjust two different settings, the view mode and the page flip sound. For the view mode, click the webgl setting from the drop-down menu. This will make sure that the flipbook that is displayed contains realistic 3D page-flipping with lights and shadows to create a realistic effect. Moving on to the page flip sound setting, we will simply click the enabled setting to allow the page sound to play. Adjusting these settings ensures that we create as realistic as a flipbook as we possibly can to keep our viewers interested in viewing the flipbook. Here is what our flipbook looks like now.

Our flipbook is really starting to come together, but the styling of the entire flipbook is rather bland and we would like it to be more pleasing to the eye, so we are now going to adjust the user interface in the UI tab on Real3D FlipBook dashboard. Once you click this tab, you will be directed to the UI menu where will change the background color and side navigation bars to really make the flipbook pop out of the screen.
First, click on the Flipbook Background accordion and then click on color. We will choose the default blue color at the bottom right of the color selector. Next, click on the Side Navigation Buttons accordion menu to expand out the menu. To highlight the navigation button, we will change the background color to be red which will contrast nicely with the blue background color.
To make the navigation buttons more appealing to click we are going to change the radius so the button will be a circle instead of a square. We will type 30 into the radius field. The last styling change on the button is going to be the size. Again, we want this navigation button to invite the user to keep navigating, so we will bump up the size to 48. Finally, click the update button at the bottom right-hand corner of the plugin dashboard to save all of the updates that we just made.
The last setting we are going to change is in the Menu Buttons tab. Click on the Menu Buttons tab and head down to the Download PDF accordion menu and click it. We would like our travel blog audience to be able to download this flipbook so they can share it with their friends and view it offline. To allow this, we are going to click Enabled from the drop-down menu next to the Enabled menu item at the top of the Download PDF accordion menu.
There you have it, we have just created a stunning looking flipbook for our European travels to be displayed on our travel blog. You can see this entire flipbook creation process in the video below.
Getting the Most Out of the Plugin
In this article, we looked at how you can use the flipbook plugin to create a virtual book of travel photos. The Real3D FlipBook plugin has countless more uses though. Here are a few ideas for the different types of flipbooks that you can create with the plugin.
Catalogs
The Real3D FlipBook plugin is great for catalogs. They allow you to create a realistic catalog in the digital world that can be downloaded by your customers and potential customers. Having an online catalog is a must for today's internet-driven businesses and adding your products to a catalog created by Real3D Flipbook will give you complete control over how you want to present your products.
Books or Magazines
A book or magazine can easily be created with this plugin. The average attention span of your online audience is continually going down, so creating an eye-catching and interesting book or magazine is necessary. The Real 3D FlipBook gives you complete control over the customization of your book or magazine and makes it much more visually appealing to read your material as opposed to just reading a static looking PDF.
Other Customizations
The Real3D Flipbook plugin is completely customizable. In this article, we only had a chance to go over a few of the features offered by the plugin. Below I have listed three notable functions that can help you get the most out of this plugin.
Bookmarks
If you are creating a catalog, book, magazine, or any flipbook with a large number of pages, chances are your reader won’t finish viewing your flipbook in one sitting. Enabling the bookmark feature in the Menu Buttons tab on the plugin dashboard will allow your viewers to bookmark the exact page they were on so they can come back at another point in time and continue reading.
Camera Angle
When the WebGL display of the flipbook is enabled to show off the book's 3D capabilities, you will be able to edit the angle at which the flipbook is viewed. By changing the camera angle, you can create the illusion that the reader is actually reading a flipbook that is right in front of them. The options to adjust for this are the camera pan angle and the camera tilt angle under the WebGL tab. Adjust these settings to taste to create a realistic reading perspective for your flipbook.
Search
By default, the search function on the flipbook is turned off. If your flipbook contains a lot of information, then having this search function turned on is a must so your reader can find exactly what they are looking for. Enable this function under the Menu Buttons tab.
Conclusion
When displaying any type of content to your website's audience, you need to able to attract and maintain their attention. The use of galleries and other gallery-like displays can present your images to your audience, but don't quite have the appeal of flipbooks.
By using the Real3D FlipBook plugin you can easily create a visually appealing flipbook that gives your audience a fresh new experience when visiting your website.
To give this plugin a try, head over to CodeCanyon and check out the Real3D FlipBook plugin. And while you're here, check out some of the other great WordPress plugins available from CodeCanyon.
- WordPressBest WordPress Flipbook Plugins Compared
- WordPress17 Best WordPress Gallery Plugins
- WordPress Plugins10 Best WordPress Gallery Plugins of 2019
- WordPressBest Free WordPress Gallery Plugins
Original Link: https://code.tutsplus.com/tutorials/how-to-create-a-travel-gallery-flipbook-with-real3d-flipbook--cms-34079
TutsPlus - Code
 Tuts+ is a site aimed at web developers and designers offering tutorials and articles on technologies, skills and techniques to improve how you design and build websites.
More About this Source Visit TutsPlus - Code