
An Interest In:
Web News this Week
- March 30, 2024
- March 29, 2024
- March 28, 2024
- March 27, 2024
- March 26, 2024
- March 25, 2024
- March 24, 2024
Some of Our Sources
- TutsPlus - Code
- Smashing Apps
- Fudge Graphics
- CSS Globe
- 24 Ways
- Wal You
- CSS Tricks
- Dev To
- Hashedout
- TechPowerUp
Help Webnuz
Referal links:
Building jetson-containers for Nvidia devices on Windows 10 with VS Code and WSL v2
In this post, we are going to walk through building Ian Davis's jetson-containers project on Windows 10 using Visual Studio Code and version 2 of the Windows Subsystem for Linux. In a nutshell, the jetson-containers project allows you to build CUDA compatible images for running GPU accelerated applications as containers. The project supports all current Nvidia Jetson devices (Nano, TX2, Xavier etc.) and also supports third party carrier boards like the Orbitty Carrier for Nvidia Jetson TX2/TX2i/TX1.
Containerizing Nvidia CUDA drivers and the necessary runtime dependencies is exciting because it can be coupled with a container orchestrator solution like Azure IoT Edge to create cloud configurable IoT deployments which take advantage of GPU acceleration capabilities on Nvidia Jetson devices. This opens up a realm of possibilities for computer vision, ML processing, and other AI workloads that can now be deployed into edge environments and updated remotely using a cloud-defined configuration. In my opinion, this will open the world up to a new paradigm of AI solutions that will be deployed into areas never before considered and backed by first class software lifecycle support using IoT services available in Microsoft Azure.
Step 1: Installing the Windows Subsystem for Linux on Windows 10
With Windows 10, Microsoft has released a new feature named the Windows Subsystem for Linux (WSL). This feature allows you to run a bash shell directly on Windows in an Ubuntu-based environment. Within this environment you can cross compile images for AARCH64 without the need for a separate Linux VM or server. Note that while WSL can be installed with other Linux variants, such as OpenSUSE, the following instructions have only been tested with Ubuntu.
This feature is not supported in versions of Windows prior to Windows 10. In addition, it is available only for 64-bit versions of
Windows.
Full instructions to install WSL are available at the official Microsoft Docs page for WSL.
To install WSL on Windows 10 with Fall Creators Update installed (version >= 16215.0) do the following:
1). Enable the Windows Subsystem for Linux feature
- Open the Windows Features dialog (
OptionalFeatures.exe) - Enable 'Windows Subsystem for Linux'
- Click 'OK' and restart if necessary
2). Install Ubuntu
- Open Microsoft Store and search for "Ubuntu 18.04" or use this link
- Click Install
3). Complete Installation
- Open a cmd prompt and type "Ubuntu1804"
- Create a new UNIX user account (this is a separate account from your Windows account)
Step 2: Upgrade Windows Subsystem for Linux to v2
WSL 2 is a new version of the architecture that powers the Windows Subsystem for Linux to run ELF64 Linux binaries on Windows. Its primary goals are to increase file system performance, as well as adding full system call compatibility. This new architecture changes how these Linux binaries interact with Windows and your computers hardware, but still provides the same user experience as in WSL 1 (the current widely available version). Individual Linux distros can be run either as a WSL 1 distro, or as a WSL 2 distro, can be upgraded or downgraded at any time, and you can run WSL 1 and WSL 2 distros side by side. WSL 2 uses an entirely new architecture that uses a real Linux kernel.
Support for WSL v2 requires installation of WSL v1 as instructed in the previous section.
Full instructions for upgrading to WSL v2 are available at the official Microsoft Docs page for WSL v2.
To install WSL v2 on Windows 10 (version >= 18917.0) do the following:
1). Enable the Virtual Machine Platform feature
- Open the Windows Features dialog (
OptionalFeatures.exe) - Enable 'Virtual Machine Platform'
- Click 'OK' and restart if necessary
2). Set Ubuntu1804 to be backed by WSL 2
- Open Powershell and run:
wsl --set-version Ubuntu-18.04 23). Verify Ubuntu-18.04 is using WSL v2
- Open Powershell and run:
wsl --list --verbose- Verify that the output looks like this:
NAME STATE VERSION * Ubuntu-18.04 Running 2After confirming that you are running Ubuntu-18.04 using WSL v2, you are ready to begin following the "Cross-Compilation" steps below.
Step 3: Setup Cross-Compilation Environment on Ubuntu using Windows Subsystem for Linux v2
We will use the Ubuntu 18.04 WSL v2 environment to cross-compile AARCH64 compatible jetson-containers images capable of running on Nvidia Jetson hardware.
1). Install the Nvidia SdkManager into the WSL v2 Environment
From your Windows host OS, obtain the .deb installer for the Nvidia SdkManager from developer.nvidia.com
Note: This requires that you have valid registered account @ developer.nvidia.com
Place the downloaded .deb installer into c:\sdkmanager
Open a WSL v2 compatible instance of Ubuntu-18.04
Install the sdkmanger by running the following on the bash prompt of the WSL v2 instance:
sudo apt update sudo apt install -y libcanberra-gtk-module libgconf-2-4 libgtk-3-0 libxss1 libnss3 xvfb sudo dpkg -i /mnt/c/sdkmanager/sdkmanager_*.deb2). Install Cross-Compilation tools for AARCH64 support
- Install the dependencies needed for cross-compilation by running the following on the bash prompt of the WSL v2 instance:
sudo apt install -y build-essential qemu-user-static binfmt-support3). Install Docker
- Install a Linux-native instance of Docker by running the following on the bash prompt of the WSL v2 instance:
sudo apt install -y curl curl -fsSL https://get.docker.io | bash sudo usermod -aG docker $USERStep 4: Building Jetson Containers using Windows Subsystem for Linux and Visual Studio Code
After you have setup the Cross-Compilation environment on Ubuntu using Windows Subsystem for Linux v2, you are now ready to beging building jetson-containers.
1). Configure Visual Studio Code
- Install Visual Studio Code onto the Windows host OS
- Install and enable the Remote WSL extension from the Visual Studio Marketplace

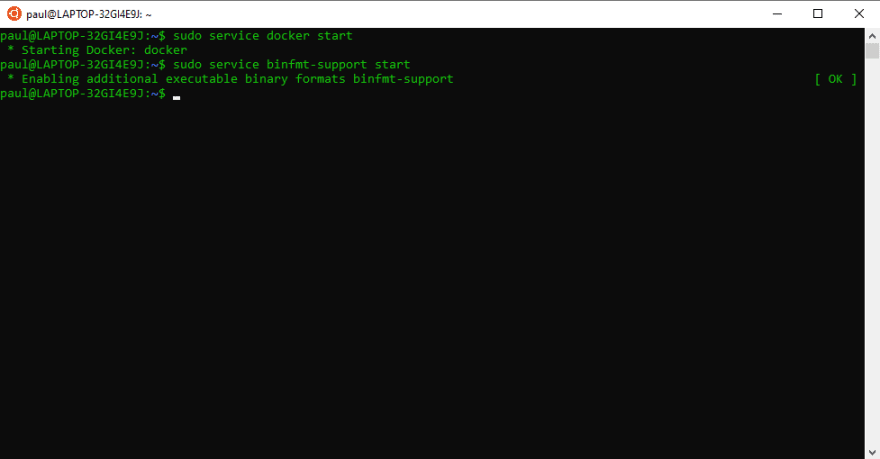
2). Start docker and binfmt-support services
- These services must be manually started each time a new instance of WSL v2 is started on the host machine. To start them, execute the following on the bash prompt of the WSL v2 instance:
sudo service docker start sudo service binfmt-support startNote: You may want to add these lines to your ~/.bashrc file if you wish to start these services automatically when starting a new WSL v2 instance
3). Clone jetson-containers project into WSL v2 environment and Open in VS Code
- Clone the jetson-containers project and open in VS Code by running the following on the bash prompt of the WSL v2 instance:
git clone https://github.com/idavis/jetson-containers.git cd jetson-containers code .4). Run build tasks in VS Code to create jetson-containers images
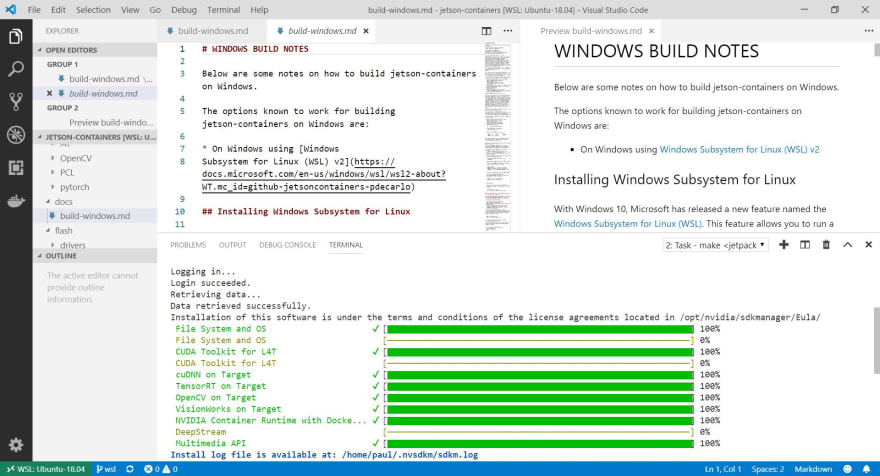
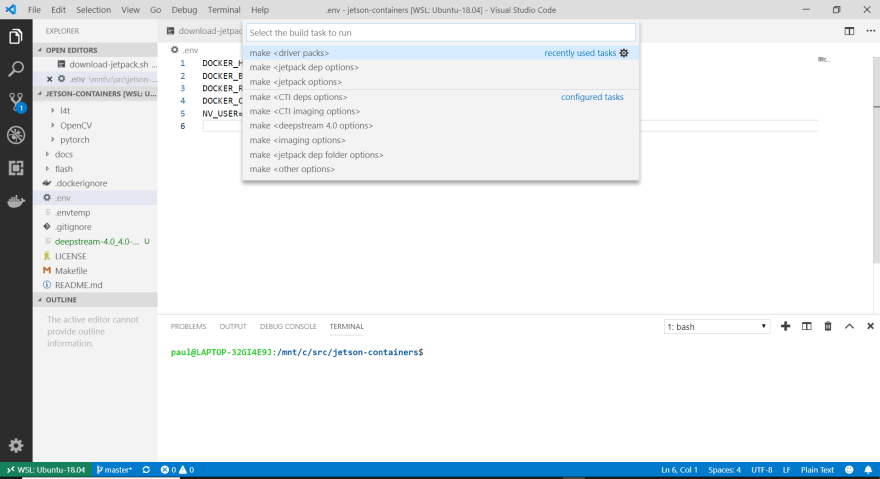
- In the previous step, a new Visual Studio Code instance should have opened. If not, open a new instance of VS Code on the host OS. Copy the include .envtemp to .env and supply appropriate values according to the included README.md. Next, while inside of the VS Code instance, press "CTRL+SHIFT+B" to bring up a list of available build tasks and select one to begin building the associated jetson-containers image(s)
Note: It is required to build one of the before building subsequent containers. This will require that you have an active account from https://developer.nvidia.com and that you have specified that user as the value of NV_USER in the .env file you created. Please be aware that you will be prompted for the account password during the retrieval of the sdks during the build process for any of the tasks.
Conclusion
It is amazing to see that the Windows Subsystem for Linux v2 is capable of building native AARCH64 compatible containers with CUDA support from Visual Studio Code. WSL v2 brings a fully-compatible Linux Subsystem with 100% Linux syscall compatibility, allowing to build basically anything that you can build in a native Linux environment. When coupled with the Remote WSL extension , we can perform builds against the Linux Subsystem from Windows 10 allowing for a truly cross-platform development experience.
What is also amazing is that Ian Davis has curated every currently available Jetson platform into his jetson-containers project, allowing us to build containers for a completely foreign architecture (ARM64) that are compatible with Nvidia GPU accelerated hardware. Since WSL v2 can allow us to build pretty much anything that Linux can, we can now bring this ability to develop GPU accelerated container solutions to developers on Windows using VS Code with WSL v2.
As development of jetson-containers progresses, you can expect to see more details on how to use it in my upcoming articles. For a look at related content on dev.to, check out Supercharge your containerized IoT workloads with GPU Acceleration on Nvidia Jetson devices, Getting Started with IoT Edge Development on Nvidia Jetson Devices, Getting started with DevOps CI / CD Pipelines on Nvidia ARM64 Devices, and Using Cognitive Services Containers with Azure IoT Edge
Until next time, Happy Hacking!
Original Link: https://dev.to/azure/building-jetson-containers-for-nvidia-devices-on-windows-10-with-vs-code-and-wsl-v2-1ao
Dev To
More About this Source Visit Dev To