
An Interest In:
Web News this Week
- April 19, 2024
- April 18, 2024
- April 17, 2024
- April 16, 2024
- April 15, 2024
- April 14, 2024
- April 13, 2024
Some of Our Sources
- Mashable
- Smashing Magazine
- Fuel Your Creativity
- Inspiredology
- Web Designer Depot
- My Ink Blog
- Wal You
- Daily Now
- Dev To
- The Verge
Help Webnuz
Referal links:
Spring Boot - Crash course
The goal of this post is to enable you to run your first Spring Boot Application as most of my posts here will require you to start from there.
Spring boot is a framework that applies a lot of opinionated configurations by default, which makes it a very simple framework to start developing within the Java ecosystem, it also has great support for testing, also provides good support for Kotlin although I would recommend caution and would wait before using heavily on the server side to run Kotlin projects in production, for Android development its another story, Kotlin is currently the recommended language to use.
With Spring Boot no XML configuration is needed, which makes it very easy to create and run Spring/Java applications, the downside is that you need to understand it's conventions to know exactly what's going on, especially when troubleshooting issues.
It's really great that it also provides many nice features required in real projects including non-functionals which is very useful and time saving.
To create a Spring Boot application the easiest way is using a plugin integrated with your favorite IDE or go to the Spring Boot Initializer website and create your initial application setup there. It's quite easy to use and offers an enormous amount of possible combinations from the Spring ecosystem.
Let's create our first Spring Boot Application and run it, if you don't have java 8 or java 11 installed check out my previous post where you will find directions on all you'll need to set up in order to run the sample projects from my blog posts, including this one. Now, open the Spring Initializr website and follow the steps below:
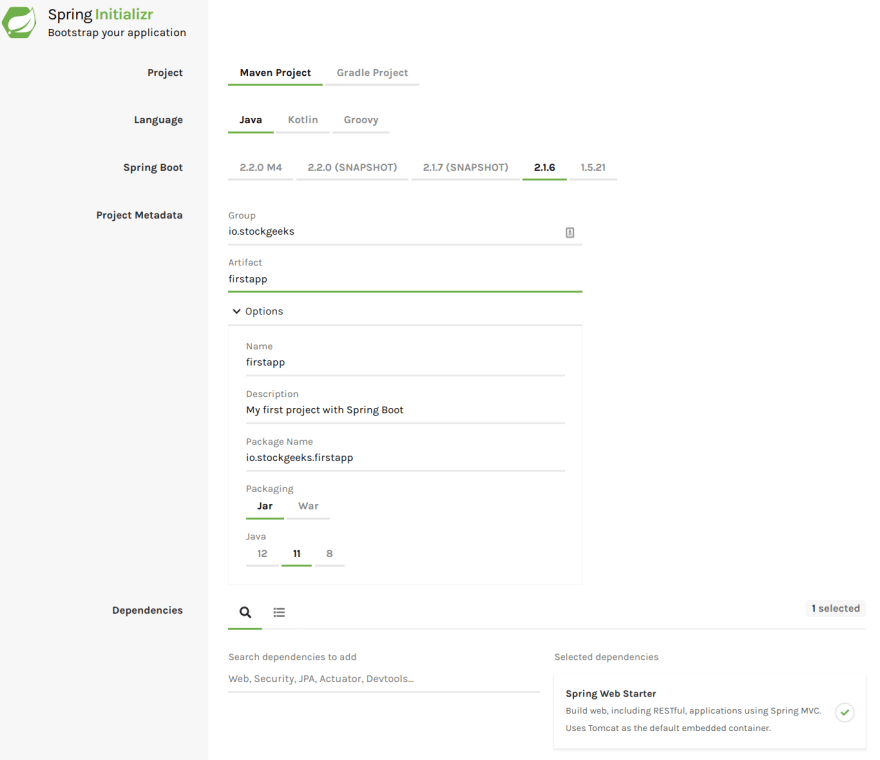
Project:MavenLanguage:JavaSpring Boot:Pick the latest release currently it's2.1.6- Project Metadata
Group:io.stockgeeksArtifact:firstapp- Options
Name:firstappDescription:My first project with Spring BootPackage Name:io.stockgeeks.firstappPackaging:JarJava:11
Dependencies:Search and addSpring Web Starter, make sure it's under Selected dependencies.
Click Generate the Project big green button and download the zip file, save it to your preferred location. Extract the zip file with your preferred compression tool.
Now let's run it. Make sure you have Java 11 and maven installed.
Navigate to the folder where you extracted the zip file and check the files in there, you should have a pom.xml file which is the maven parent pom for your project. If you're using an IDE you can now load this folder in it and it should recognize it as a maven project, but for now, we're going to run the application using the command line.
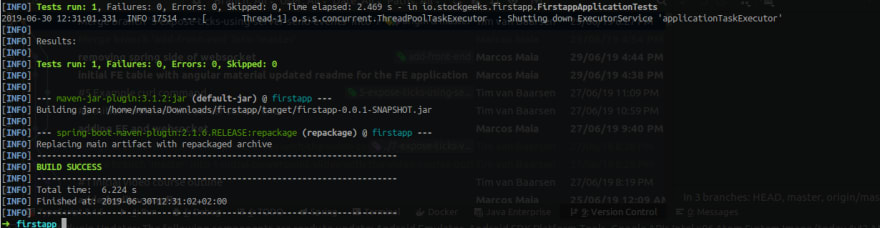
Download the dependencies, compile it and generate an executable jar file using maven:
mvn clean package
You should see a BUILD SUCCESS message like the screenshot below:
Now you'll have a target folder created, this folder is completely generated during the build process and you can remove it at any time. Make sure to have it added to your .gitignore file as you don't want to commit this folder's contents at all, this folder is where you will also find all compiled and packaged structure generated by the build and packaging process.
If you list the contents of the target folder you should see a file with the name firstapp-0.0.1-SNAPSHOT.jar, this is the file containing your executable application, it has an embedded java enabled Web Server, which by default is Apache Tomcat but you can also pick others.
using maven and spring boot plugin:
mvn spring-boot:run
or using java to run the generated jar file:
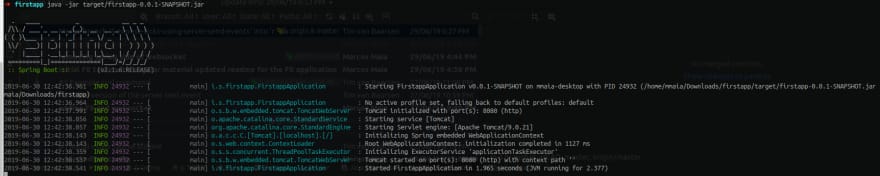
java -jar target/firstapp-0.0.1-SNAPSHOT.jar
Once you see the message: Tomcat started on port(s): 8080 (http) you have your Spring Boot Application Running.
To finish with something more useful let's add a REST endpoint and a static HTML page.
Add an endpoint and default static page
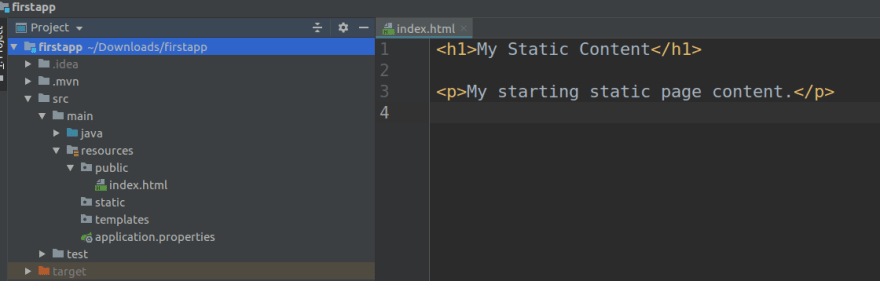
index.html
Create a folder public and add an index.html page with any content you want /src/main/resources/public. Spring Boot automatically add the public folder content to be served.
Rest Endpoint
Let's now create the simplest possible REST endpoint, create a java class on the same package level where you have the FirstappAplication.java definition, in my case package io.stockgeeks.firstapp , call it: HelloSpringRest.java
Add the following content:
package io.stockgeeks.firstapp;import org.springframework.stereotype.Controller;import org.springframework.web.bind.annotation.GetMapping;import javax.websocket.server.PathParam;@Controller@RequestMapping("/api")public class HelloSpringRest { @GetMapping("/hello") public String hello(@PathParam("name") String name) { return "Hello, " + name; }}All it takes to create REST endpoints with spring is some annotations and few lines of java code. The @Controller annotation sinalizes to spring boot that this is a spring managed component, the @RequestMapping("api") prepares the REST endpoint root context for endpoints added to this class mapped as "/api", the @GetMapping("/hello") registers the context "/hello" GET endpoint and finally the @PathParam("name") registers a query string for the GET call with the key "name".
Build and run
As before anytime you want to run from the command line you can build and run: mvn clean package && mvn spring-boot:run.
Now navigate to: http://localhost:8080 and you should see the static index.html page that was just created.
To test the REST endpoint you can point the browser to http://locahost:8080/api/hello or use curl: curl -X GET http://locahost:8080/api/hello?name=Spock
Done
You have created a Spring Boot Application and a static page and REST endpoint. The goal of this post was to enable you to easily create Spring Boot Applications and I will refer back to this in my future posts because most of the posts here will require having a Spring Boot Application as a starting point.
References
Original Link: https://dev.to/thegroo/spring-boot-crash-course-21nm
Dev To
More About this Source Visit Dev To