
An Interest In:
Web News this Week
- March 30, 2024
- March 29, 2024
- March 28, 2024
- March 27, 2024
- March 26, 2024
- March 25, 2024
- March 24, 2024
Some of Our Sources
- Joshua Blankenship
- Smashing Apps
- TutsPlus - Design
- Web Designer Depot
- FanExtra - PSD
- Fudge Graphics
- Wal You
- Specky Boy
- Codrops
- Daily Now
Help Webnuz
Referal links:
Microsoft Azure For Spoiled People 3: Migrate A Database
So far in this series, I've talked about how to get set up on Azure as a web app with hosting on azurewebsites.net and how to set up continuous integration using Azure pipelines. If you've been following along, you'll know by now how to scaffold a Vue web site and have it solidly hosted on Azure. Check parts 1 and 2 of this series to learn more. As a sneak peek: here's what I built by following the steps I list below.

Now we return to the premise of the series, which is the idea that, at some point, you might need to move off of services such as Firebase, with its intuitive real-time database service, and onto a service like Microsoft Azure. But so far, I haven't really talked about the database part of the equation.
Get ready, friends, because it's DATABASE TIME!
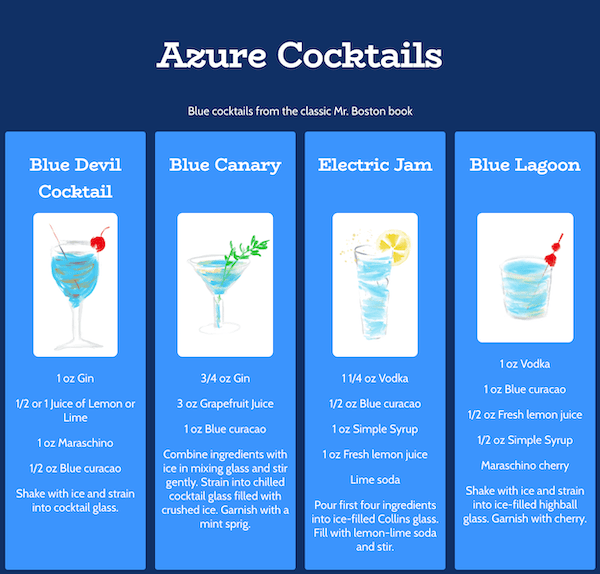
The web site that I have wanted to build makes use of the same dataset that I created for my MixoLogy demo app. Learn more about that project in this video. It involved repurposing data from the Old Mr. Boston Bartender's Guide*, a classic book of over 1000 cocktails originally published in 1935 (and now reprinted for your enjoyment after having undergone many revisions).
After a lot of data cleaning, my dataset contains 990 recipes which you can peruse on Kaggle, for data science purposes. These recipes also reside in Firebase, and are even now used in my MixoLogy mobile app: click on an image of a bottle and get recipes that use that particular spirit, among other things.
For my new website, built for this series, I wanted to create a web site reflecting something Azure-colored, so I decided to create a listing of the cocktails that would naturally be colored blue, due to the presence of blue curacao liqueur in the recipe. In essence, I need:
- to import my dataset into one of Azure's database offerings
- to use that dataset in my Azure-Cocktails Vue app
- to build a nice UI around the experience
So, back to Azure Portal! Originally, I had thought I'd need to jump to Cosmos DB, but my database needs are very minimal for this app; just one collection,a simple data structure, and a very basic use case. So Cosmos DB is a little too much for this project.
You might want to use Cosmos DB for databases that require global distribution and that need to scale. For my little app, it wasn't necessary to have such a robust solution.
Instead, after consulting with my colleagues Simona Cotin and Suz Hinton, I decided to use Azure Tables, a part of Azure Storage, to store my basic cocktail data.

Step 1: Export your Firebase data
The first step for me was to download my data from Firebase and upload it to Azure. Downloading is easy enough; find your database in the Firebase console and export it as JSON to your local.

Next, you're going to want to convert this data to a .csv format. Do it using a tool such as this one: json to csv.
To upload this data to Azure Table Storage, first visit the Azure Portal and create a database. Click the + at the top left to create a resource. It will be a Storage Account, and can be a general purpose v1 storage account for Locally-redundant storage (LRS).

Once the deployment of this account is complete, you will see several elements of your storage account listed. The one of interest to us is the Table Storage. Here's where you will create a table to store your exported data. Click on the 'Tables' link:
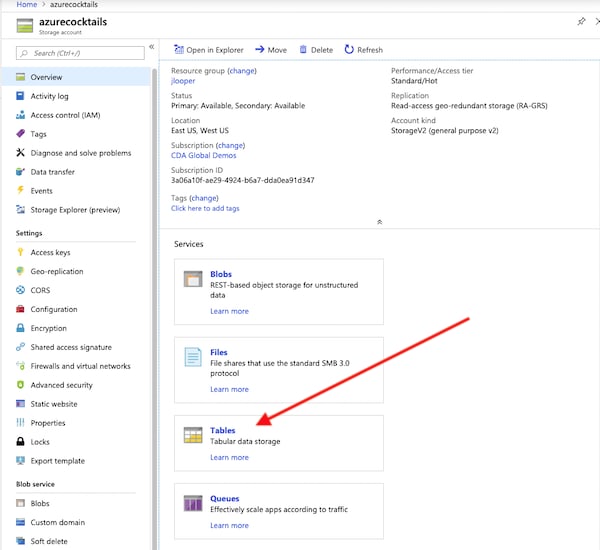
At this point, you want to find some way to import the data. But hey, there's no link or any easy way to do it via the web portal! Oh noes!
Thanks to Suz's super secret tip, there's a 'backdoor' to do this: the Azure Storage Explorer desktop tool.
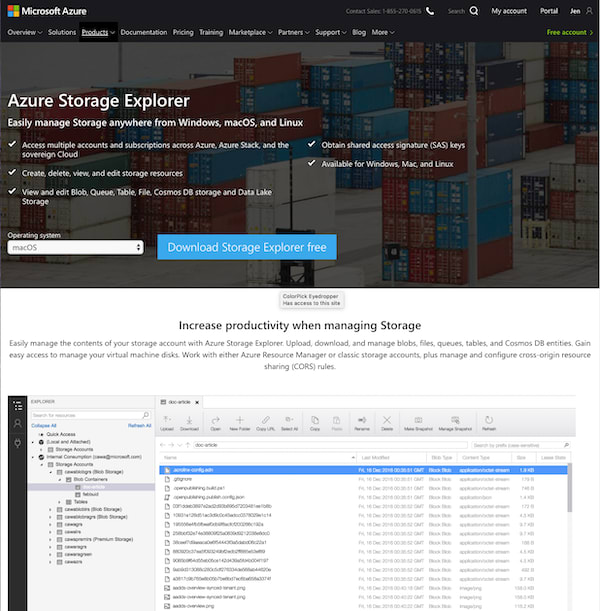
Step 2: Upload your data to Azure Storage
Go to the Storage Explorer web site and download this free tool. After it's installed, login using your Azure credentials.
Now, when you fire up the tool, you can navigate to your storage account's tables and upload your data from .csv. Use the toolbar at the top of the table to import.

Note, Table Storage is picky about column names, and you may need to rename yours in pascal-case or camel-case.
If all goes well, you should have your data safely in an Azure Table! Now you can start using it in your app.

Step 3: Connect your app to Azure Tables
To connect your Vue app to the Storage service you created in Azure, you need to use the Azure-Storage npm package, which is Azure's Storage SDK for Node.js. Install it in your app (npm i azure-storage). You'll need it when you query the database.
As is normal in an app that connects to the cloud, a connection string is needed to make the handshake between a service and an app. Find the right connection string in the Azure portal under the Storage Account's 'Access Keys' section. I added mine to a config.js file that I placed in the app root:
export default { DB_KEY: 'DefaultEndpointsProtocol=https;AccountName=azurecocktails921b;AccountKey=blablabla==;EndpointSuffix=core.windows.net',};Once the key is in place, you can reference DB_KEY in the app.
Step 4: Query the data
The moment has arrived to use your data, finally! In this app, I want to show only cocktails that are blue in color because, you know, Azure. I figure, if the recipe has any dosage of blue curaao, it will be at least a little blue. So I created a Vuex store where all my database functions will reside.
To fetch the list of cocktails, I added a query:
fetchCocktails({ commit }) { var azure = require('azure-storage'); var tableService = azure.createTableService(config.DB_KEY); var query = new azure.TableQuery() .top(100) .where('ingredient1 eq ?', 'Blue curacao') .or('ingredient2 eq ?', 'Blue curacao') .or('ingredient3 eq ?', 'Blue curacao') .or('ingredient4 eq ?', 'Blue curacao') .or('ingredient5 eq ?', 'Blue curacao') .or('ingredient6 eq ?', 'Blue curacao'); tableService.queryEntities('cocktails', query, null, function(error, result, response) { if (!error) { commit('setCocktails', response.body.value); } else { //throw error alert('Oh noes! No cocktails found.'); } }); },In this query, there are several things going on:
- use the azure-storage npm package
- create a reference to the storage service from that package, invoking the
db_keyin the config file - create a new query with several conditionals
- call the query on the service
- commit the results to the Vuex store where it can be reused
Now, you can get the filtered list of cocktails in the created() lifecycle hook in your Home.vue component, preparing the returned data for use in the recipe cards via a computed property:
computed: { ...mapState(["cocktails"])},created() { this.$store.dispatch("fetchCocktails");}And ... voila! Now you have data you can view in your app ... or at least you should.
Step 5: Fix CORS
Beware! You might be unpleasantly surprised to see that your data isn't yet showing up! That's because you may have run into a CORS issue. Go back into your Storage account in the portal and ensure that CORS is set properly, giving access to your web site via the appropriate headers. Learn more about CORS in the docs. Once CORS is fixed, you should see your app running locally and also you can post it up to Azure following the instructions in the first two articles in this series.
Cheers!
If you like blue curaao, you're in luck! I've built a nice-looking, simple database-driven web site for your summer enjoyment. By the way, I hand drew all the cocktails, based on their descriptions, using Procreate and an Apple Pencil.

In this post, I discussed how to get a very basic database set up to query in your Vue app. In my next post, I'll talk more about how to use it more like a Firebase database, using realtime functionality to enhance the app's UI. Stay tuned!
*The Mr. Boston brand name is now the owned by the Sazerac company which retains the rights to the brand but graciously allows for noncommercial use of the content.
Useful Links:
Cosmos DB
Azure Storage Explorer
Azure Storage for Node.js
Original Link: https://dev.to/azure/microsoft-azure-for-spoiled-people-3-migrate-a-database-1f7o
Dev To
More About this Source Visit Dev To