
An Interest In:
Web News this Week
- March 30, 2024
- March 29, 2024
- March 28, 2024
- March 27, 2024
- March 26, 2024
- March 25, 2024
- March 24, 2024
Some of Our Sources
- BoingBoing
- Technology Review
- Just Creative
- Six Revisions
- Noupe
- Reencoded
- Line 25
- Freelance Switch
- Android Dissected
- Hashedout
Help Webnuz
Referal links:
Reactive Canvas with Rust/WebAssembly and web-sys
Or How I Learned To Stop Worrying And Love Macros
It's been a little while since I built a resizable dot with a slider in some esoteric stack. Time for Chapter 3! I guess it's a series now.
The last two demos used languages that transpile the whole app to regular ol' JavaScript to be interpreted. This time around, we're going to be compiling our app to WebAssembly first, and then having JavaScript load that.
As per usual with these dot demos, this is overkill for this app. This one perhaps especially so. Roll up your sleeves, we're gonna scrob us some DOM.
The Pipeline
This section is largely copped straight outta the RustWasm Book. If you plan to do further work with Rust and WebAssembly, head straight there next (or now). You'll need a Rust toolchain and Node/NPM to follow along.
First, create a new library-type crate:
$ cargo new wasm-dot --lib$ cd wasm-dotWe need to add wasm-bindgen. This crate auto-generates all the JS <-> Rust FFI glue for us, and is much of the reason Rust is such a phenomenal choice for writing WebAssembly. Open up Cargo.toml in the crate root and make it look like this:
[package]name = "wasm-dot"description = "Demo canvas wasm app"license = "MIT"version = "0.1.0"authors = ["You <[email protected]>"]edition = "2018"[lib]crate-type = ["cdylib"][dependencies]wasm-bindgen = "0.2"The cdylib crate type will produce a dynamic system library for loading into another language. Now open up src/lib.rs and make it look like this:
use wasm_bindgen::prelude::*;#[wasm_bindgen]extern { // import the alert() js function pub fn alert(s: &str);}// export a Rust function that uses the imported JS function#[wasm_bindgen]pub fn say_hi() { alert("Hi from Rust/Wasm!");}We're importing the JavaScript alert() function and exporting our own say_hi() Rust function that calls it. That's all we need to do, wasm_bindgen is taking care of the details. This will just ensure both directions work as intended.
The rustwasm team also provides a tool called wasm-pack to automate WebAssembly packaging and integration with npm. You'll need to install it once with cargo install wasm-pack and then you can use it to build your package:
$ wasm-pack build[INFO]: Checking for the Wasm target...[INFO]: Compiling to Wasm... Finished release [optimized] target(s) in 0.00s[INFO]: :-) Done in 0.05s[INFO]: :-) Your wasm pkg is ready to publish at ./pkg.Inside pkg/ you'll find everything you need to deploy, ready to be imported into any npm project. All we need now is a project in which to use it! Because the rustwasm group thought of everything, there's a template ready to go - use it to create a new project:
$ npm init wasm-app wwwThis www folder now contains a webpage with all the machinery set up to load your wasm library and call it from index.js:
import * as wasm from "hello-wasm-pack";wasm.greet();There's a stub included so that it will run as is, but we don't want to import from hello-wasm-pack, we want to use the app we're developing. To point it in the right direction, open up www/package.json and add a dependencies key, pointing directly at the pkg output dir from wasm-pack:
// .. "dependencies": { "wasm-dot": "file:../pkg" }Now we can point www/index.js there:
import * as wasm from "wasm-dot";wasm.say_hi();Let's see if it does the thing:
$ npm install // because we added a dependency - us!$ npm run startYou should see the requested alert:

Huzzah! Now we can iterate. I recommend opening a second terminal at this point. In one, run npm run start and keep it open, and in the other invoke wasm-pack build whenever you make a change to the Rust.
The Layout
To deal with the JavaScript universe, the wasm-bindgen project provides two important crates: web-sys provides bindings for all the Web APIS (!!) and js-sys provides all the ECMAScript stuff like Array and Date (!!). Yeah, they already did the hard work. It's pretty cool, you don't need to manually define a Document.createElement extern or anything. Instead, just pull in what we need from web-sys in Cargo.toml:
[dependencies]wasm-bindgen = "0.2"[dependencies.web-sys]version = "0.3"features = [ "Attr", "CanvasRenderingContext2d", "Document", "Element", "Event", "EventTarget", "HtmlCanvasElement", "HtmlElement", "HtmlInputElement", "Node", "Text", "Window"]It's a huge crate, so each interface is feature-gated. You only use what you need. If you're trying to call a function and it's telling you it doesn't exist, double check the API docs. It always tells you which features a given method needs:

To make sure it's all groovy, we're going to build a DOM node ourselves, JS-style but, like, also Rust-style. Remove the alert() test in src/lib.rs and add:
#[wasm_bindgen]pub fn run() { // get window/document/body let window = web_sys::window().expect("Could not get window"); let document = window.document().expect("Could not get document"); let body = document.body().expect("Could not get body"); mount_app(&document, &body);}fn mount_app(document: &Document, body: &HtmlElement) { mount_title(&document, &body);}// Create a titlefn mount_title(document: &Document, body: &HtmlElement) { // create title element let title = document .create_element("h1") .expect("Could not create element"); let title_text = document.create_text_node("DOT"); // always succeeds title .append_child(&title_text) .expect("Could not append child to title"); // append to body body.append_child(&title) .expect("Could not append title to body");}Using web_sys calls, this code manually builds a DOM node for the title and mounts it to the body of the page.
Now instead of say_hi() we'll need to call run() in www/index.js:
import * as wasm from "wasm-dot";wasm.run();See if it works by running wasm-pack build and reloading localhost:8080:
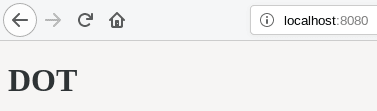
Whoa. Did you see how blazing-fast and WASM-infused that title was?!
No, you didn't, but still. Neat. Before moving on, let's address the error handling situation. All of these web-sys calls will return a Result<T, JsValue>. We're not going to deal with other types of errors in this tiny demo, so just alias that:
type Result<T> = std::result::Result<T, JsValue>;Now we can have our functions return a Result<()> and get to use the ? operator instead of sprinkling expect() everywhere. Refactor main() to leverage this:
fn get_document() -> Result<Document> { let window = web_sys::window().unwrap(); Ok(window.document().unwrap())}#[wasm_bindgen]pub fn run() -> Result<()> { let document = get_document()?; let body = document.body().unwrap(); mount_app(&document, &body)?; Ok(())}Pulling get_document() out will help us define the event listener later. First, though, we need to define the DOM tree we want. Here's what we're aiming for in HTML:
<div id="rxcanvas"> <span id="size-output"></span> <input id="size" type="range" min="1" max="100" step="5"> <label for="size">- Size</label> <p> <canvas id="dot-canvas"></canvas> </p> </div>If you've ever manipulated the DOM via JavaScript, you're pretty much good to go. In Rust, though, this is so verbose. Look how big the function to create a simple <h1>DOT</h1> element was! I promised up above there would be macros - here we go.
For the uninitiated, a macro is a bit of code that expands into other Rust code before everything is evaluated. In Rust, they look like function calls but with an exclamation point at the end. They aren't function calls at all though - when the compiler comes through your module, it expands all of these anywhere they find them into the full Rust code you (or a library) defined. It's a mechanism for automatic code generation!
This syntax is the only place in Rust you'll see that thing { () => {} } bracket pattern. It's it's own special syntax. The parameters are prefixed with a $ and placed in the parens, and are copied in to the Rust code in the curly braces during expansion, right in place in your code.
Rust actually has another type of macro called a procedural macro that's even more powerful and arcane but for now macro_rules! will do us just fine.
Here's a macro to append an arbitrary number of attributes to a DOM element, passed as 2-tuples:
macro_rules! append_attrs { ($document:ident, $el:ident, $( $attr:expr ),* ) => { $( let attr = $document.create_attribute($attr.0)?; attr.set_value($attr.1); $el.set_attribute_node(&attr)?; )* }}Each parameter to expand is tagged with a token type - an ident will allow us to pass a Rust name though and an expr takes any Rust expression (in this case, a 2-tuple). When called, each one will just paste this block of Rust into our function in place, using what we pass in.
This macro is variadic, meaning it can accept a variable number of arguments. The $( $name:expr ),* syntax means that it will carry out this block for zero or more arguments given, pasting a copy of the code in the curly braces for each arg passed here. Each time through, the arg we're processing gets the name $attr.
You can call it like this, with as many trailing tuple arguments as needed for each attribute:
append_attrs!(document, label, ("for", "size"));We can do better, though - macros can call other macros! We can boil everything down to the bare minimum by defining a few more helpers:
macro_rules! append_text_child { ($document:ident, $el:ident, $text:expr ) => { let text = $document.create_text_node($text); $el.append_child(&text)?; };}macro_rules! create_element_attrs { ($document:ident, $type:expr, $( $attr:expr ),* ) => {{ let el = $document.create_element($type)?; append_attrs!($document, el, $( $attr ),*); el} }}macro_rules! append_element_attrs { ($document:ident, $parent:ident, $type:expr, $( $attr:expr ),* ) => { let el = create_element_attrs!($document, $type, $( $attr ),* ); $parent.append_child(&el)?; }}macro_rules! append_text_element_attrs { ($document:ident, $parent:ident, $type:expr, $text:expr, $( $attr:expr ),*) => { let el = create_element_attrs!($document, $type, $( $attr ),* ); append_text_child!($document, el, $text); $parent.append_child(&el)?; }}There are two "top-level" macros, append_element_attrs and append_text_element_attrs. The former will append a childless element with the given attributes to the parent provided and the latter will include a text node child. Note that to pass the variadic trailing arguments down you just use the same syntax inside the curly brace expansion but omit the expr type:
let el = create_element_attrs!($document, $type, $( $attr ),* );Now we can replace the entirety of that mount_title() function with a single macro invocation:
fn mount_app(document: &Document, body: &HtmlElement) -> Result<()> { append_text_element_attrs!(document, body, "h1", "DOT",); Ok(())}I've also added our new return type, and as a result we now return a simple Ok(()) at the end to signify success. This macro expansion contains ? operators, which will now work as expected!
Note the trailing comma after "DOT" is mandatory - that's the "zero or more" attributes this macro accepts. That's so much boilerplate we've avoided though. The initial function is what the compiler sees when building the binary, we just saved ourselves the hassle of typing it all. Thanks, macros! Thacros.
Here's the whole f#@%!g owl:
fn mount_canvas(document: &Document, parent: &Element) -> Result<()> { let p = create_element_attrs!(document, "p",); append_element_attrs!(document, p, "canvas", ("id", "dot-canvas")); parent.append_child(&p)?; Ok(())}fn mount_controls(document: &Document, parent: &HtmlElement) -> Result<()> { // containing div let div = create_element_attrs!(document, "div", ("id", "rxcanvas")); // span append_text_element_attrs!( document, div, "span", &format!("{}", STARTING_SIZE), ("id", "size-output") ); // input append_element_attrs!( document, div, "input", ("id", "size"), ("type", "range"), ("min", "5"), ("max", "100"), ("step", "5") ); // label append_text_element_attrs!(document, div, "label", "- Size", ("for", "size")); // canvas mount_canvas(&document, &div)?; parent.append_child(&div)?; Ok(())}fn mount_app(document: &Document, body: &HtmlElement) -> Result<()> { append_text_element_attrs!(document, body, "h1", "DOT",); mount_controls(&document, &body)?; Ok(())}The astute will notice a reference to STARTING_SIZE - add that constant to the top of your file, this is where the slider will start when the page renders:
const STARTING_SIZE: u32 = 5;All the web_sys calls look very familiar if you're coming from JavaScript. If you want a Web API function, just try looking for it in the web-sys API docs. Each listing will conveniently link to the corresponding MDN page, too! Leveraging crates or writing your own abstractions to make this smoother is both quite possible and left as an exercise for the reader.
Rebuild with wasm-pack build, and if you have webpack-dev-server running (via npm run start) you can reload localhost:8080:
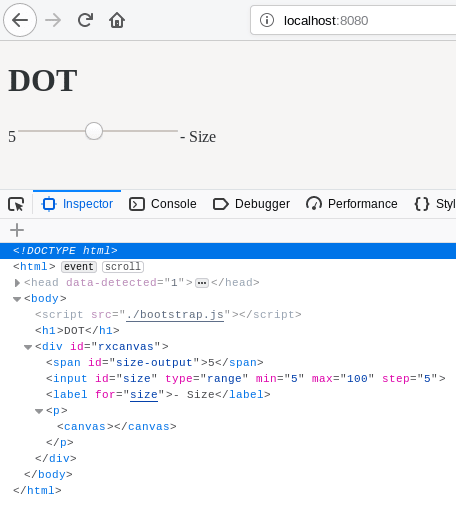
Good stuff.
The Action
This doesn't do anything, though. There's nary a dot in sight, let alone a resizable one. The next order of business is to draw the dot to the canvas:
// draw dotfn update_canvas(document: &Document, size: u32) -> Result<()> { // grab canvas let canvas = document .get_element_by_id("dot-canvas") .unwrap() .dyn_into::<web_sys::HtmlCanvasElement>()?; // resize canvas to size * 2 let canvas_dim = size * 2; canvas.set_width(canvas_dim); canvas.set_height(canvas_dim); let context = canvas .get_context("2d")? .unwrap() .dyn_into::<web_sys::CanvasRenderingContext2d>()?; // draw context.clear_rect(0.0, 0.0, canvas.width().into(), canvas.height().into()); // create shape of radius 'size' around center point (size, size) context.begin_path(); context.arc( size.into(), size.into(), size.into(), 0.0, 2.0 * std::f64::consts::PI, )?; context.fill(); context.stroke(); Ok(())}This is also not too foreign if you've done this in JavaScript. One unfamiliar element is those dyn_into calls. To get this working, you need another import at the top of the file:
use wasm_bindgen::JsCast;When you grab an element with Document::get_element_by_id(&str) it returns an Element type. A plain Element doesn't have a width or a height, though - this is specifically a canvas element. The HtmlCanvasElement object does have these fields, so we can attempt to cast with dyn_into(). If we did indeed grab the correct element this cast will succeed. Now we can use things like set_height() and get_context(). Note that all methods use snake_case instead of camelCase, and you can't directly modify a field with canvas.height = 10;, you must use a method: canvas.set_height(10);. Otherwise this is a translation of equivalent JavaScript to resize the canvas to the bounding box of the circle with the given radius and then draw that circle.
Cool. We'll also need to update the <span> we have dedicated to showing the current size:
// update the size-output spanfn update_span(document: &Document, new_size: u32) -> Result<()> { let span = document.get_element_by_id("size-output").unwrap(); span.set_text_content(Some(&format!("{}", new_size))); Ok(())}This isn't too surprising, set_text_content is a setter for Node.textContent. Let's bundle up these two updates:
// given a new size, sets all relevant DOM elementsfn update_all() -> Result<()> { // get new size let document = get_document()?; let new_size = document .get_element_by_id("size") .unwrap() .dyn_into::<web_sys::HtmlInputElement>()? .value() .parse::<u32>() .expect("Could not parse slider value"); update_canvas(&document, new_size)?; update_span(&document, new_size)?; Ok(())}This is going to be our onChange handler for the slider input, called inside this special FFI-interop-y Closure:
fn attach_listener(document: &Document) -> Result<()> { // listen for size change events update_all()?; // call once for initial render before any changes let callback = Closure::wrap(Box::new(move |_evt: web_sys::Event| { update_all().expect("Could not update"); }) as Box<dyn Fn(_)>); document .get_element_by_id("size") .unwrap() .dyn_into::<web_sys::HtmlInputElement>()? .set_onchange(Some(callback.as_ref().unchecked_ref())); callback.forget(); Ok(())}This uses a web_sys::Closure. This allows you to pass Rust-defined closures through to JS to be used as event listener callbacks. This has some definite weirdness, I'm going to direct you to the book for a better run though of why this looks like it does. That as_ref().unchecked_ref() chain lets you extract the &Function that set_onchange expects from teh web_sys::Closure.
Now we just need to call this after we mount the app:
#[wasm_bindgen]pub fn run() -> Result<()> { let document = get_document()?; let body = document.body().unwrap(); mount_app(&document, &body)?; attach_listener(&document)?; Ok(())}And that's it! Recompile, reload, and rejoice as you resize. Aww yisss.

The full code can be found here.
Photo by Leo Rivas on Unsplash
Original Link: https://dev.to/deciduously/reactive-canvas-with-rust-webassembly-and-web-sys-2hg2
Dev To
More About this Source Visit Dev To