
An Interest In:
Web News this Week
- March 21, 2024
- March 20, 2024
- March 19, 2024
- March 18, 2024
- March 17, 2024
- March 16, 2024
- March 15, 2024
Some of Our Sources
- Smashing Apps
- Abduzeedo
- You The Designer
- Creative Curio
- Crazy Leaf Design
- Web Design Ledger
- Design Modo
- Web Resource Source
- Android Dissected
- Android Headlines
Help Webnuz
Referal links:
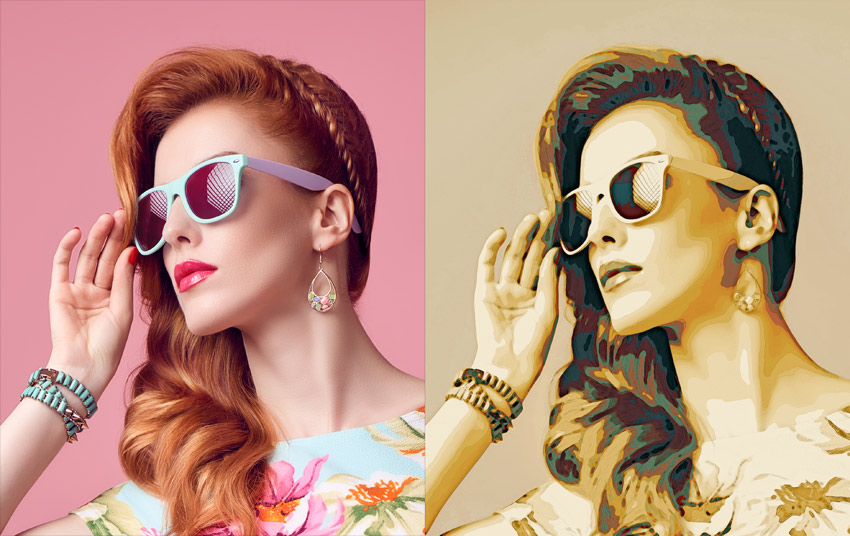
How to Make a Retro Comic Book Portrait Effect Action in Photoshop

Photoshop actions can work like advanced filters, giving you nice effects with a single click. In this tutorial, I'll show you how to create a cartoon effect action in Photoshop, so that you can add cool photo effects to your portraits. After this short lesson, you'll be able to create your own Photoshop filters and effects!
If you're interested in Photoshop portrait actions, filters, and effects, you'll love this gigantic list of resources:

Follow along on our Envato Tuts+ YouTube Channel:
What You Will Need
You will need the following resources in order to complete this project:
How to Make a Retro Comic Book Portrait Effect Action in Photoshop
Step 1
Open your photo (I used this one). Make sure it's on the Background layer. If not, go to Layer > New > Background From Layer.
Create a New Layer. Use a simple selection tool to select the outline of the model. Ignore the details, and focus on the main silhouette. Then use the Paint Bucket Tool (G) to fill the outline with any color. Name this layer mask.

Step 2
Click somewhere under the layers to deselect them. Open the Actions panel and create a New Action. Give it a name. From now on, all your actions will be recorded.

Step 3
Press D to reset the swatches. Go to Image > Image Size and round the top value to define the width for every photo that this action will be applied to. This will guarantee consistent results.

Step 4
Hide the mask. Hold Control key and click the thumbnail of the mask to create a selection. Then go to the background layer and use the shortcut Control-J to duplicate the selection. Then duplicate it once more.

Step 5
Double click the upper copy to open its Layer Style panel. Check Stroke and make it pretty thick by changing its Size.

Step 6
Duplicate the layer. Double click the lower one, and this time use an even thicker white stroke.

Step 7
Create a New Layer right over the Background. Go to Edit > Fill to fill it with any color. Then double click it and check Pattern Overlay. Select a pattern that will complement the retro style of the portrait. I've downloaded mine from Envato Elements. If you can't find anything nice on your list, remember that you can always stop the recording to download and add a pattern to your library, and click Record when you want to continue.

Step 8
Select Color Overlay and add a semi-transparent color that will make the pattern subtler.

Step 9
Duplicate layer 1 and bring it to the top. Go to Filter > Sharpen > Smart Sharpen. Adjust the settings to make the image cleaner. This will help us find the edges later.

Step 10
Go to Filter > Blur > Surface Blur. Remove the details in the photo with these settings. Name this layer blur.

Step 11
Duplicate layer blur. Go to Image > Adjustments > Desaturate.

Step 12
Then go to Filter > Other > High Pass. Drag the Radius to show mainly the outlines, not the shades.

Step 13
Now go to Filter > Filter gallery. Open Artistic tab and select Poster Edges. Adjust the settings to get nice thin lines.

Step 14
Go to Filter Gallery again. This time, select Cutout. With this option, you can remove even more details and bring focus to the lines.

Step 15
Add a Threshold adjustment. Drag the marker to show only clean outlines.


Step 16
Select the adjustment and the layer below, and right click > Merge Layers. Change the Blend Mode to Multiply.

Step 17
If you find these lines too harsh, there's a way to make them subtler. Double click the layer to open its Layer Style panel. Hold Alt and drag the lower white marker to the left. This will make the lines brighter when there's something bright under them.

Step 18
Let's add some cel shading now. Click layer blur and add a Posterize adjustment. Adjust the Levels and change the Blend Mode to Soft Light. You can lower the opacity to change the intensity of the effect.


Step 19
Finally, let's add a halftone texture. Duplicate the layer blur and drag it to the top. Go to Filter > Filter gallery and open the Sketch tab. Select Halftone Pattern.

Step 20
Change the Blend Mode to Overlay. To keep this layer from being too bright, open its Blending Options and drag both white markers to the left.

Step 21
If you're happy with the result, simply click Stop Recording to save the action.

Step 22
There's one more thing we need to do, though. Finding outlines in a photo is very tricky, and each photo requires a slightly different treatment. Because of this, it's good to include an option to add a variable to the action. To do this, find the position that you want to modify, and click the empty square next to it. Now the action will stop here to ask the user for the specific threshold value, and continue after it gets what it needs.

Now, if you want to apply the same effect to other photos, you only need to prepare the mask and click Play. All your actions will be repeated automatically by Photoshop, and you just have to wait for the end result to appear.


Photoshop Actions with Effects for Pictures
Photoshop Vector Art Effect Action
Photoshop actions are very powerful, but it takes a lot of time to create interesting effects. If you want to save time, you can use actions created by professionals on Envato Elements. For example, with this Photoshop action, you can turn your photo into a poster with beautiful line work. This Photoshop action is customizable, and it gives you some hints on how to adjust the settings for the best results.

Photoshop Art Effect Action
This Photoshop action turns your photo into an artwork. Not only is it given a painterly look, but also its edges are converted to splashes of color. With this Photoshop filter, you can turn a photo into a poster or an illustration with a single click!

Photoshop Cartoon Effect Action
This Photoshop action adds cel shading to your photo, turning it into a simple illustration in a limited color palette. You can achieve this unique style in seconds just by downloading this action and playing it on your chosen photo.
Photoshop Double Exposure Action
This cool Photoshop action adds a trendy double exposure effect to your photo, but it doesn't stop at this—it also adds a fun style to the photo, turning the whole picture into a work of art. And because it's an action, all you have to do is choose what photos you want to use!

Good Job!
Now you know how to create a cartoon Photoshop action. If you're interested in Photoshop actions and photo effects, you may also like these tutorials:
 Photoshop ActionsHow to Turn a Photo Into Art by Creating a Painting Photoshop Action
 Photoshop ActionsHow to Make a Photoshop Action to Add a Dramatic Effect to Photos
 Adobe PhotoshopHow to Customize a Photoshop Action
 Photo EffectsHow to Make a Photoshop Action to Create a Photo Art Effect
 Photoshop ActionsHow to Create a Fun Filter Photo Effect Action in Photoshop

Original Link: https://design.tutsplus.com/tutorials/how-to-make-a-retro-comic-book-portrait-effect-action-in-photoshop--cms-32819
TutsPlus - Design
More About this Source Visit TutsPlus - Design