
An Interest In:
Web News this Week
- March 29, 2024
- March 28, 2024
- March 27, 2024
- March 26, 2024
- March 25, 2024
- March 24, 2024
- March 23, 2024
Some of Our Sources
- Engadget
- Techcrunch
- Just Creative
- Smashing Magazine
- Inspiredology
- FanExtra - PSD
- Reencoded
- CSS Globe
- Stylized Web
- Design Modo
Help Webnuz
Referal links:
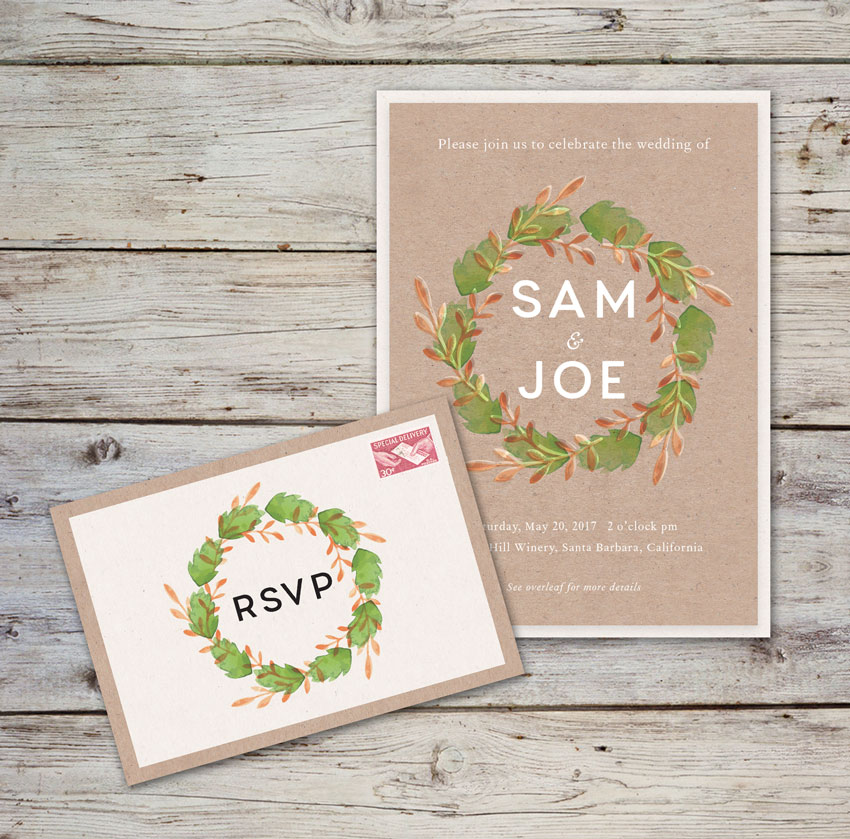
How to Create a Rustic Wedding Invitation Template in Adobe InDesign

We’re celebrating all things love-themed this week, and with wedding season just around the corner, there’s no better time to create a gorgeous rustic-style wedding invite template.
If you or a friend are getting married this year, creating your own invitations is not only fun but super simple too. I’ll take you through the process of creating this on-trend invite and RSVP card in Adobe InDesign. If you’re a relative beginner to InDesign, you’ll find this tutorial to be a great introduction to some of the basic techniques for creating print designs using the software.
Still on the hunt for your dream invitation design? You might discover ‘the one’ over on GraphicRiver, where you’ll find a selection of easy-to-edit invite and wedding stationery templates.
Ready for romance? Fantastic! Let’s get started...
Looking for invitation templates? Check out our recommendations:

What You’ll Need for This Tutorial
We’ll be using Adobe InDesign to set up the main layout, but you’ll also need access to Adobe Illustrator to open up and edit some of the graphics we’ll be using in the design.
You’ll also need to download the following stock images and fonts:
- Watercolor Wreaths
- Brown Paper Texture
Charlevoix Pro Font
Fournier MT Font (you can substitute this for another traditional serif font if you prefer)
Download the graphics and install the fonts onto your system. Once that’s done, you’re ready to dive in to designing your invitation...
1. How to Set Up the Invitation in InDesign
We’ll set up the invitation card at 4.5 by 6.25 inches, a size which fits nicely into standard-size envelopes. We’ll set up the RSVP card to be a little smaller—you can include this with the invite inside the envelope.
Step 1
Open up Adobe InDesign. Go to File > New > Document.
Set the Intent to Print, Number of Pages to 3 and deselect Facing Pages.
Set the Width to 4.5 in (114.3 mm) and Height to 6.25 in (158.75 mm).

Step 2
Set the Width of the Margins on all sides to 4 mm. Add a Bleed of 5 mm around all the edges of the page.

Then click OK to create your new document.

Step 3
Expand the Layers panel (Window > Layers).
Double-click on the Layer 1 name in the panel to open the Layer Options window. Rename the layer Cream Background and click OK.

Click on the Create New Layer button at the bottom of the panel to create another layer above the first. Double-click to rename it Brown Paper Background.
Create a further two new layers, naming the first Wreath, and the second Typography.

Then click in the blank space to the left of each layer’s name to lock all layers, except the bottom layer, Cream Background.

2. How to Design a Rustic Backdrop for Your Invite
Step 1
With the Cream Background layer activated, select the Rectangle Frame Tool (F). Drag onto the page to create an image frame that extends across the whole page, up to the edges of the bleed on all sides.
Go to File > Place, navigate to the Brown Paper Texture image you downloaded earlier, and click Open. Allow the image to fill the frame completely.

Step 2
Select the Rectangle Tool (M) and drag onto the page, creating a second rectangle that extends across the whole page. From the Swatches panel (Window > Color > Swatches), set the Fill to [Paper].

With the white shape selected, go to Object > Effects > Transparency. Set the Mode to Overlay, and reduce the Opacity to 82%. This will bring through some of the papery texture below. Click OK.

Step 3
Return to the Layers panel and lock the Cream Background layer. Unlock the layer above, Brown Paper Background.

Select the Rectangle Frame Tool (F) and create an image frame that extends up to the edges of the margin on all sides.

File > Place, and once again choose the Brown Paper Texture image; click Open.

With the brown paper image frame selected, head up to Object > Effects > Drop Shadow.
Choose Multiply from the Mode drop-down menu and pull the Opacity down to 13%. Tweak the other settings until you’re happy with the result. You want the shadow to be very subtle. When you’re happy, click OK.

Step 4
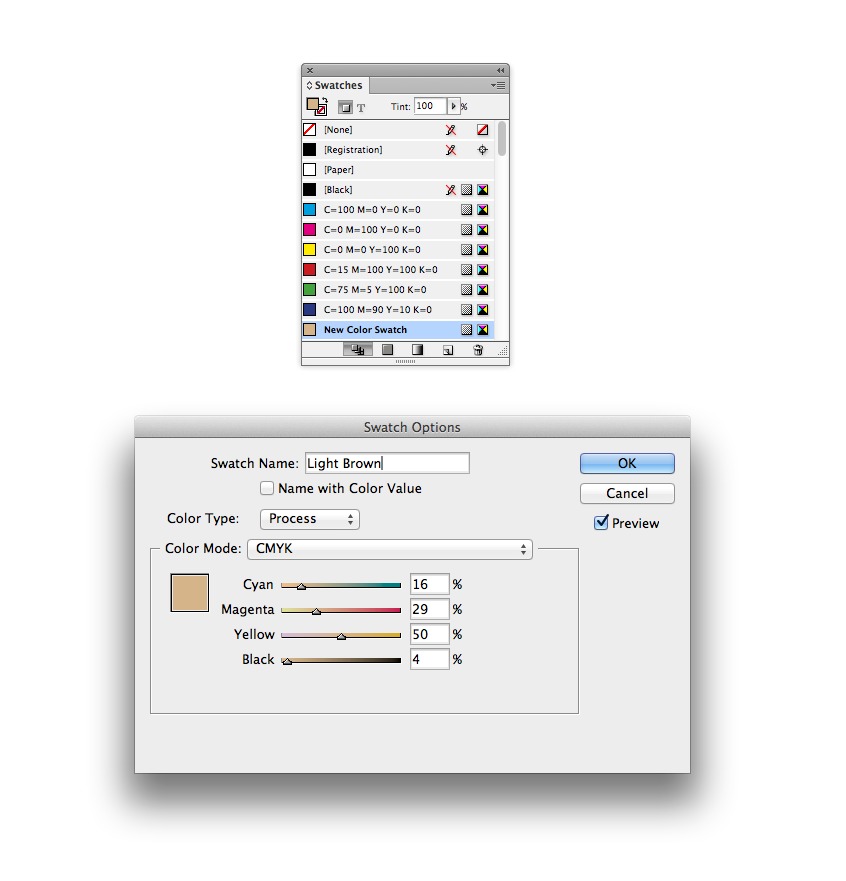
Head back to the Swatches panel and click on the New Swatch button at the bottom-right of the panel.
Set the Type to Process and Mode to CMYK. Set the CMYK values to C=16 M=29 Y=50 K=4, rename the swatch Light Brown, and click OK.
Select the Rectangle Tool (M) and create a new rectangle shape that matches the dimensions of the brown paper image frame below. Center it on the page, and set the Fill to Light Brown.

Then head up to Object > Effects > Gradient Feather. Under Type choose Radial, and then click OK.

Click on Transparency at the top of the left-hand menu in the panel. Set the Mode to Luminosity and reduce the Opacity to about 43%. Click OK.


3. How to Create a Floral Wreath Graphic on the Layout
Step 1
Open up the Watercolor Wreaths vector file in Adobe Illustrator.

Select the wreath design at the bottom center of the image, and then head up to Edit > Copy. Minimize the Illustrator window.

Step 2
Return to your InDesign document and lock the Brown Paper Background layer. Unlock the next layer up, Wreath.
Edit > Paste the wreath graphic directly into InDesign. The program will alert you to the fact that the graphic will be pasted in as an EPS file.
Resize the wreath using Shift to maintain the proportions, and position it just above the halfway point of the page, as shown below.

Step 3
Select the wreath and head up to Object > Effects > Transparency. Set the Mode to Darken and bring the Opacity down slightly, to 95%. Click OK.

Step 4
Head back to the Illustrator image. Click to select the wreath design at the bottom-right corner of the artboard, and then Edit > Copy, as before.

Return to your InDesign document, and Edit > Paste. Resize the wreath so that it fits snugly over the top of the green wreath below.

With the new wreath still selected, go to Object > Effects > Transparency. Set the Mode to Luminosity and click OK.

Step 5
Go to Edit > Paste again to paste a second copy of the wreath onto the page. Resize it to match the dimensions of the wreath below, and then shift its position very slightly down and left to give a sort of screen-printed effect.
Go to Object > Effects > Transparency, and select Multiply from the Mode drop-down menu. Click OK.

Step 6
Select all three wreaths on the page, and Right-Click (Windows) or Control-Click (Mac) > Group. You can now resize them together as a whole if you want to tweak the result.

4. How to Format Elegant Typography on the Invite
Step 1
Head back to the Layers panel and lock the Wreath layer. Unlock the top layer, Typography.
Use the Type Tool (T) to create a text frame inside the top half of the wreath.
Type in ‘Name 1’ and, from either the Character Formatting Controls panel at the top of the workspace or the Character panel (Window > Type > Character), set the Font to Charlevoix Pro, Size 43 pt, All Caps, Align Center and increase the Tracking (space between all letters) to 100. Set the Font Color (from the Swatches panel) to [Paper].
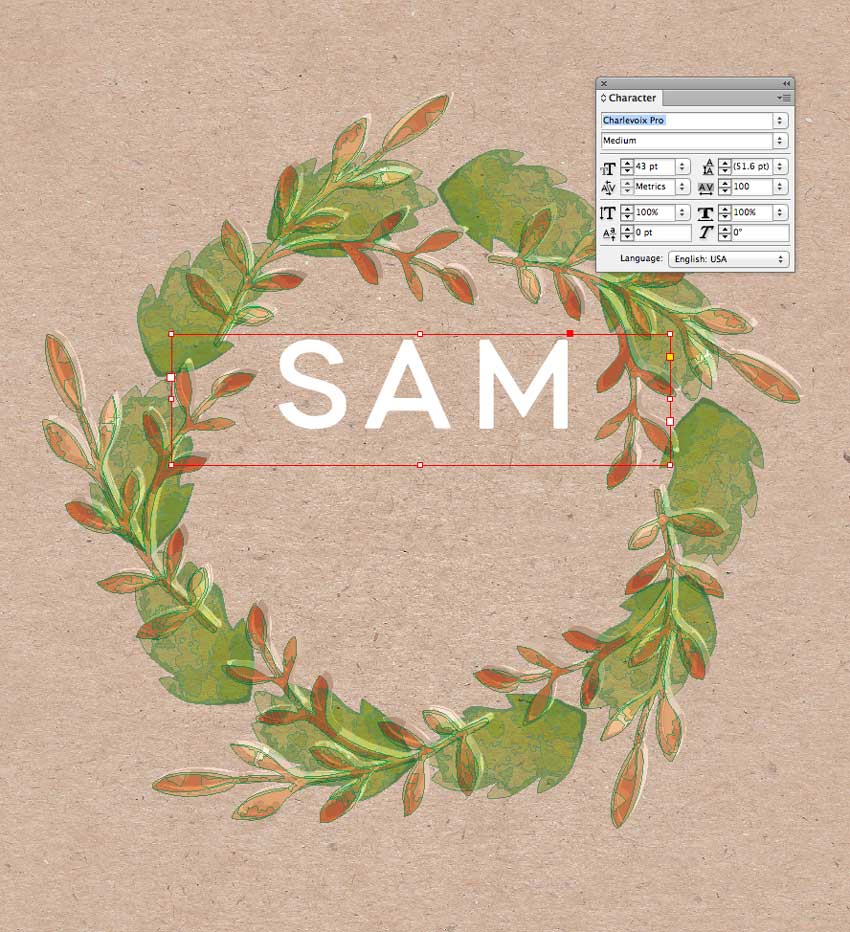
Select the text frame and Edit > Copy, Edit > Paste, moving the second frame to the bottom half of the wreath. Adjust the text to ‘Name 2’.

Step 2
Create a new text frame using the Type Tool (T), setting it between the two name frames, centrally inside the wreath. Type in an ampersand (‘&’) symbol and set the Font to Fournier MT Italic, Size 24 pt, Align Center and [Paper] Font Color.

Step 3
Move up to the top of the page. Create another text frame and type in introductory text, like ‘Please join us to celebrate the wedding of’. Set the Font to Fournier Std Regular, Size 13 pt, Tracking 50 and [Paper] Font Color.

Step 4
Copy and Paste the text frame, moving it to the bottom of the page. Adjust the text to read the date and time of the event, and reduce the Font Size a little, to about 10 pt.
Copy and Paste this frame below, editing the text to read the venue name and location.
Finally paste another text frame at the very bottom of the invite, adjusting the text to Italic, and reading ‘See overleaf for more details’.

5. How to Design the Reverse of Your Invite
Step 1
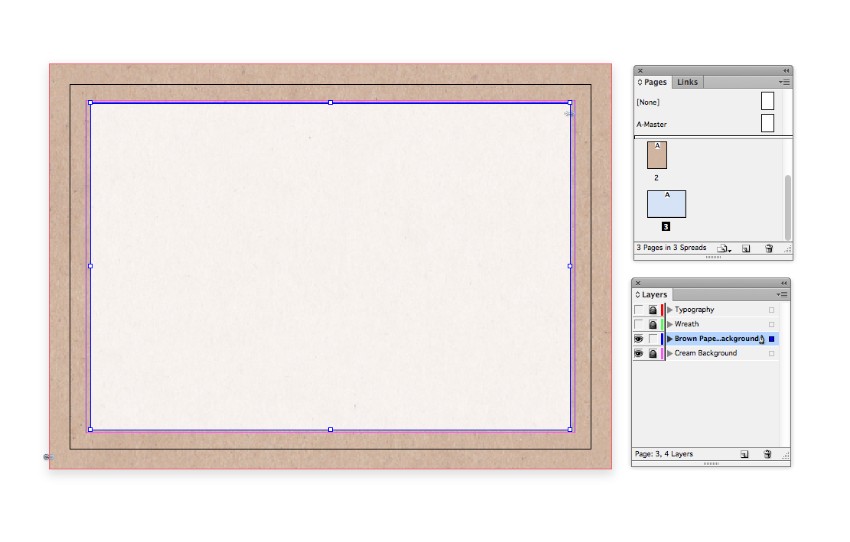
Head back to the Layers panel and lock all layers except the Brown Paper Background layer. Drag your mouse over Page 1 to select both elements sitting on this layer, and Edit > Copy.

Scroll down to Page 2 of your document and Edit > Paste. Drag the edges of the shapes outwards to the edge of the bleed on all sides, so that the brown paper effect fills the whole page.

Step 2
Scroll back up to Page 1 and lock the Brown Paper Background layer. Unlock the Wreath layer above. Select the grouped wreath and Edit > Copy.
Scroll back down to Page 2 and Edit > Paste. Holding Shift, resize the wreath, making it much larger. Allow just the bottom edge of the wreath to skim the top part of the page.

Select the large wreath and Edit > Copy, Edit > Paste. Position the new copy in a mirrored way, at the bottom of the page.

Step 3
Lock the Wreath layer and unlock the top Typography layer.
Create a new text frame, editing the text to read ‘Details’, and set the Font to Charlevoix Pro, Size 25 pt, Tracking 100, [Paper] Font Color and Align Center.
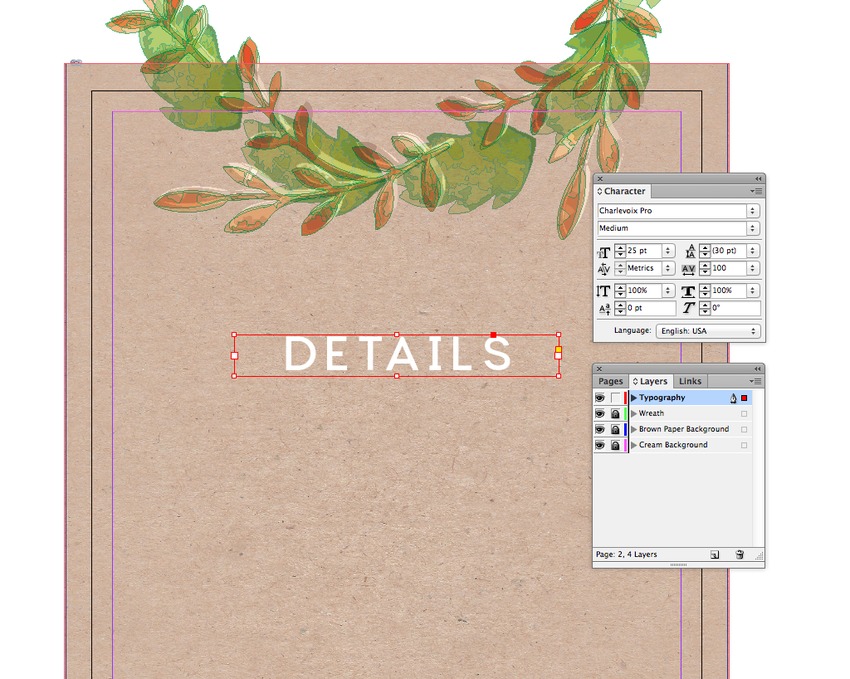
On this side of the invite, you can list more details about the event. Set the text in Fournier Std MT.
Need more space? You can refer your guests to visit a specially made website or blog for even more details about the event.


6. How to Create an RSVP Card
RSVP cards are a convenient way for your guests to let you know if they can attend the wedding. We’ll set up the card at a smaller size than the invite, so it can be discreetly placed inside the envelope alongside it.
Step 1
Scroll down to Page 3 of the InDesign document.
Take the Page Tool (Shift-P) and click once onto the page to select it. From the top of the workspace, set the Width of the page to 5 in (127 mm) and Height to 3.5 in (88.9 mm). The page will reduce in size.


Step 2
Scroll up to Page 2 of your document and lock all layers except the Brown Paper Background layer. Drag your mouse across the page, and Edit > Copy.

Head back down to Page 3, and Edit > Paste. Resize the rectangles to fit the page.

Step 3
Scroll up to Page 1 of the document and lock the Brown Paper Background layer. Unlock the layer below, Cream Background. Drag your mouse across the page to select all elements on this layer, and Edit > Copy.

Head back down to Page 3 and Edit > Paste.
We want to move the cream rectangles in front of the brown paper ones. To do this, first unlock the Brown Paper Background layer. Then expand the Cream Background layer in the Layers panel by clicking the small arrow to the left of the layer name. Hold Shift and select both elements sitting inside the layer.

Drag them up, dropping them onto the Brown Paper Background layer above.

Resize the cream rectangles so the edges sit along the margin edge of the page.
Step 4
Lock the bottom two layers, and unlock the Wreath layer above. Scroll up to Page 1 of the layout, select the grouped wreath image, and Edit > Copy.
Scroll back down to Page 3, and Edit > Paste. Resize the wreath to fit inside the cream area of the page, and center.

Step 5
Lock the Wreath layer and unlock the layer above, Typography.
Take the Type Tool (T) and create a new text frame in the center of the wreath. Type in ‘RSVP’ and set the Font to Charlevoix Pro, tweaking the formatting options to size the text just right.
You can create an area for applying a stamp, transforming the RSVP card into an easy-to-mail postcard, too. Simply use the Rectangle Tool (M) to create a small rectangle at top-right, and place a text frame reading ‘STAMP’ over the top. Your guests can provide their own stamp, or you can include it inside the envelope.

Step 6
For the reverse of the RSVP card, we need to create a duplicate of this smaller page size.
To do this, grab the Page 3 icon in the Pages panel and drag it down onto the Create New Page button at the bottom of the panel, to create Page 4.

Right-Click (Windows) or Control-Click (Mac) onto the Page 4 icon and choose Page Attributes > Rotate Spread View > 90 Degrees CW.

Step 7
Unlock all the layers and then select and delete all elements on the page. Lock all layers except the Wreath layer.
Edit > Paste to drop a copy of the wreath graphic onto the page. Resize the wreath so that it’s nice and large, with just the bottom edge overlapping the top edge of the page, as shown below.

Then Edit > Copy, Edit > Paste the wreath, and move this second graphic into a mirrored position at the bottom of the page.

Step 8
Lock all layers except the Typography layer at the top, and now you can build up the typography on the reverse of your RSVP card.
Set a ‘PLEASE RSVP’ text frame at the top in Charlevoix Pro, followed by a date text frame in Fournier MT Italic, and ‘Yes, I’ll be there!’ and ‘Sadly, I can’t attend’ text frames below, in Fournier MT.

Step 9
Use the Rectangle Tool (M) to create two small square checkboxes to the right of the ‘Yes’ and ‘No’ text frames, with a [Black] stroke color.
Add dietary requirements below these, set in Fournier MT Italic.
Create more checkboxes for the dietary options, and use the Line Tool (\) to create a line next to ‘Other dietary requirements’. Use the Stroke panel (Window > Stroke) to set the Stroke Type to Dotted.


And you’re done! Both your invitation and RSVP card are finished and they’re looking fantastic. Great work!

All that’s left to do is export them, ready for sending off to print. Read on to find out how...
7. How to Export Your Invitation Cards for Print
Step 1
First, make sure to File > Save your artwork.
Then go to File > Export. Choose Adobe PDF (Print) from the Format drop-down menu, give the file a suitable name like ‘Wedding Invite and RSVP Card_For Print.pdf’, and click Save.
Step 2
In the window that opens, choose [Press Quality] from the Adobe PDF Preset menu at the top of the window.

Step 3
Click on the Marks and Bleeds option on the left side of the window. Check the All Printer’s Marks and Use Document Bleed Settings checkboxes, and then click Export.

Ta-dah! Your cards are ready for sending off straight to print. Awesome work.


Awesome Work, You're Done!
In this tutorial we’ve walked through the steps of creating your very own wedding invitations and matching RSVP cards in Adobe InDesign. There’s nothing quite as satisfying as producing your own stationery designs, and I hope you're really pleased with the results.
Let’s take a quick recap of the skills and techniques we’ve covered in this tutorial. You now know...
- How to set up an invitation template in Adobe InDesign
- How to build up textures and color on the layout
- How to bring in beautiful graphics and add effects to them to make them work even better on your design
- How to format elegant, beautiful typography
- How to resize pages to create a custom RSVP card
- How to use layers to organize your artwork and create an ultra-professional design
- How to export your artwork for professional printing
You better start addressing your envelopes and getting those invites mailed out. Your guests are going to delighted with them!
If you’re still looking for that elusive, perfect invitation design, you might find ‘the one’ over on GraphicRiver, where you’ll find a huge range of easy-to-edit, stylish invite and wedding stationery templates.
Original Link: https://design.tutsplus.com/tutorials/create-a-rustic-wedding-invitation-in-adobe-indesign--cms-27905
TutsPlus - Design
More About this Source Visit TutsPlus - Design