
An Interest In:
Web News this Week
- March 27, 2024
- March 26, 2024
- March 25, 2024
- March 24, 2024
- March 23, 2024
- March 22, 2024
- March 21, 2024
Some of Our Sources
- Engadget
- Mashable
- Web Designer Wall
- Fuel Your Creativity
- Inspiredology
- FanExtra - PSD
- Fudge Graphics
- Web Design Ledger
- CSS Globe
- Android Headlines
Help Webnuz
Referal links:
What's New With Git Support in Xcode 9
Apple’s latest IDE version, Xcode 9, is being released along with iOS 11 this September. And it's a huge update! Fans of Git for source control management (SCM) are big winners in this upcoming release.
Previous versions of Xcode had support for SCM, but it was never considered a first-class citizen. Xcode's Git support was buggy and lackluster, paling in comparison to specialist tools such as SourceTree, which meant that developers had to jump between tools to be able to do advanced Git repository management tasks.
All this has changed in Xcode 9. Apple no longer sees SCM as secondary, but instead has opted for tight integration with GitHub, and has collaborated with GitHub closely for Xcode 9.
The net result is that you can now log in to your GitHub account right from Xcode, in order to browse, navigate and clone your GitHub repos. You can also search for other repositories without having to switch to a browser window. Inversely, if you have a GitHub repo open in your browser, you can click the clone button and have Xcode automatically clone and open up the project.
As Apple puts it, “Support for Git is now front and center”, and Apple has introduced a new source control navigator, so you don't have to open up a new window that is visually detached from the rest of Xcode. Developers can now view branches, tags, and remotes through a clear and intuitive timeline, they can inspect commits more granularly, and they can see a more elegant and attractive comparison of changes.
Objectives of This Tutorial
In this tutorial, I'll walk you through the list of new SCM features that were introduced with Xcode 9. We'll look at three major areas:
- commits
- branches
- tags
Assumed Knowledge
To follow along with this tutorial, you should have some previous experience with Xcode and some working knowledge of source control management through Git.
Get Started With Xcode 9 SCM
Setting Up Your Environment
In order to make use of Xcode's new SCM features, you will need to:
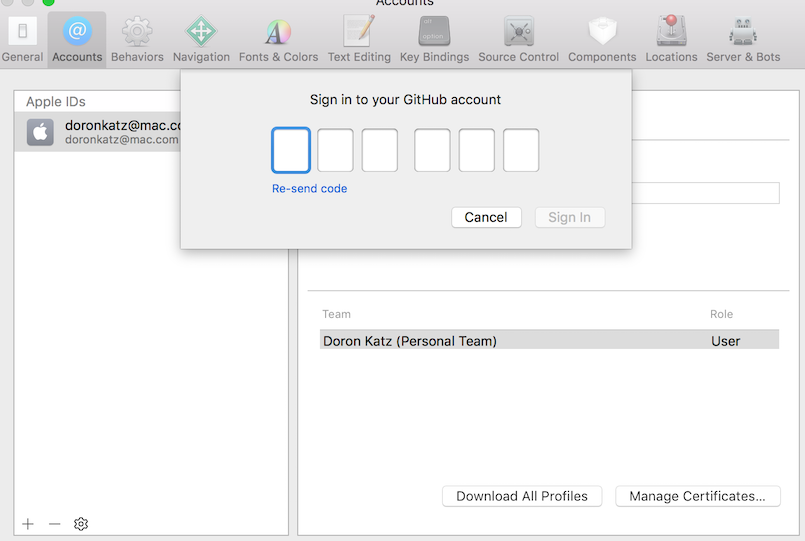
Once you have downloaded and installed the latest Xcode build, and have a current GitHub account, you are ready to connect your GitHub account to Xcode 9. Launch Xcode and go to Preferences > Accounts. Then, select the + button at the bottom-left to add a new account.

Select GitHub from the modal window, and enter your GitHub credentials. If you are using two-factor authentication, Xcode will prompt you to enter your code.
Browsing and Searching GitHub Repositories
Let' see how seamlessly you can browse existing public GitHub repositories, right from within Xcode. Open up the Xcode welcome screen if it isn’t already showing by going to Window > Welcome to Xcode.

Then select Clone an existing project, which will bring up the list of repositories on GitHub you currently own, work on, or have starred.

Besides the list that it has presented, you can also search for a public repo (or private repo you have access to) by name or by entering its GitHub URL. For our tutorial, type RealmDo and click Clone, and then select a local directory to clone the project into.

It will then ask you for a directory to check the project out into:

Rather than pulling the project repo from Xcode, another really nifty feature is that you can open a GitHub repo in your browser and select Clone or download and you will see a new button labeled Open in Xcode.

That’s right: if you click on it, it will automatically open up the project in Xcode, to be cloned and downloaded.
Back to our project. Since we are using CocoaPods to manage dependencies, we will need to jump back into the command terminal and run pod install:
19:06 $ pod install Analyzing dependencies Downloading dependencies Using Realm (2.7.0) Using RealmSwift (2.7.0) Generating Pods project Integrating client project Sending stats Pod installation complete! There is 1 dependency from the Podfile and 2 total pods installed.
Our project should now be set up locally, and your .xcworkspace should be open in Xcode with all the files in your project.
Xcode SCM Preferences
By navigating to Xcode's preferences and then selecting Source Control, you can change various aspects of its behavior right from the preferences pane, including the Git author's name and email, and interestingly, even update your .gitignore settings as well.
Associating a New Project With GitHub
On the other hand, if you've created a new Xcode project and haven't created the project on GitHub yet, you can create a new GitHub project directly from Xcode. Right-click on Remotes and then select Create "RealmDo" Remote on GitHub.

Xcode will then ask you to give the repository a name and select an account for it to be associated with.

Exploring the New SCM Interface
Let's explore each of the sections of the new interface.

- The left-hand pane has your familiar list of icons to access properties of the project. The second tab is brand new: it is the Source Control Navigator.
- The Commit History pane is the most prominent part of the navigator, showing you a historical list of commits for the project and branch.
- The right-hand pane presents you with extra contextual information about the branch and selected commits.
- Alongside the contextual branch and commit information, this sub-section on the right-hand side shows you which files have been part of the selected commit.
- The left-hand pane gives you a hierarchical view of your project from an SCM perspective, showing you the current branch, any other branches whether local or remote, and tags. It also signals whether there are new commits to be pushed or pulled, as you'll see later on.
The Source Control Navigator
One of the first things we will explore in Xcode 9 is the Source Control Navigator, brand new to Xcode 9. No longer is the source view a second-class citizen—it is now fully baked into Xcode. Select the second icon on the left-pane as indicated by (1) in the screenshot above to open up the Source Control Navigator.
Commit History
Let’s take a look at the Commit History perspective, which shows the list of commits for the project, including commit author name, date, description as well as the author's avatar from GitHub, making up the project history.
This is a very clear and beautifully organized perspective. While this example project is rather sparse as far as history goes (though we will change that shortly), this pane is deceptively powerful.
Beyond being able to easily scroll and get useful historical information, you are also able to intuitively filter and search by revision, message or author. In fact, you can chain or join multiple filters, to search not only by the author but also by revision. You can also search using the Scope bar, by specific date periods, such as the Last 24 Hours, Last 7 Days, or Last 30 Days.

Selecting a specific commit brings up some extra information on the right-hand pane. Alongside the branch information, you get commit information, the full SHA, author, message, and date. You also see the list of files made during that commit, which is extremely useful in helping you pinpoint the commit which caused a problem during debugging.

Double-clicking on a commit brings up a list of the files that have changed in that commit on the left-hand pane, and a version comparison will be displayed front-and-center. This is the familiar diff perspective, but much improved this time around.

Selecting the Assistant Editor on the upper right-hand side can access a really great diff view, which allows you to not only view a diff of the file, but also traverse through previous commits easily, and see the commit information as well as the actual file changes.

By right-clicking on a commit, you can also see a menu that allows you to contact the author, copy the commit information, branch from that commit, or even open the commit on GitHub in the browser.

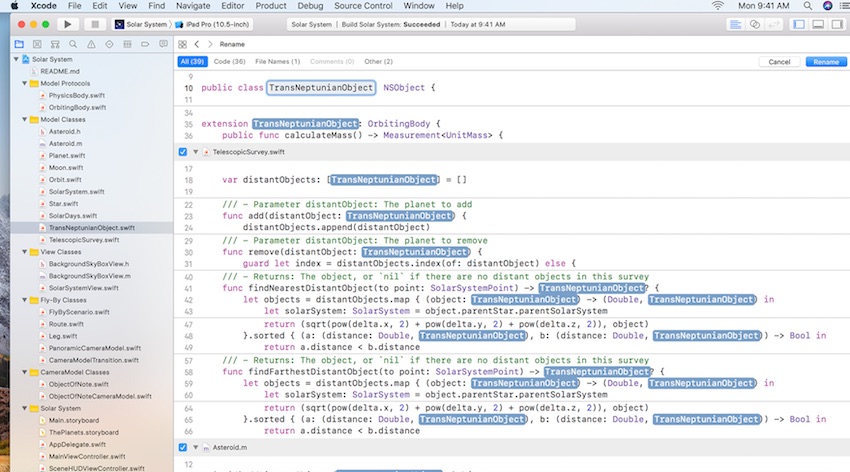
You can also create a tag, which is what we are going to do. Select the Tag button on the first commit, and name it release/0.1.

Naming your tags in this format, by setting a parent group (release, beta, etc.), serves an interesting purpose, which we will find out shortly. For now, since we’ve tagged a commit, we'll segue into our next topic: branching.
Branching
We are currently developing on the master branch, but during normal development workflow we would usually work on a separate branch. We'd make a branch to develop and test a feature, and then merge it back to the master branch when it is working correctly. Let’s create a new branch by right clicking master and selecting Branch from master. Call the new branch readme_changes.

I want to demonstrate how merging works, so in the new branch, let’s commit our changes by selecting Source Control > Commit. This brings us back to the comparison view, giving us the opportunity to confirm all the changes we've made in this commit, with the ability to compare our changes line by line.
When you've checked over the changes, enter a commit message similar to the following. And be sure to check the Push to remote box.

When our feature branch is complete, we want to merge it back to the master branch. Right click on the master branch and select the second merge option: Merge from "readme_changes" into "master".

Xcode will then merge and automatically switch you back to the master branch. Switching back to the master branch, you'll notice a small up arrow with the numeral 1 to the right of the current branch.

This lets us know that we have a commit that needs to be pushed to the remote repository. If the count was 2, we would be two commits ahead of the remote master.
Inversely, if there are new updates in the master which you haven't pulled yet, Xcode will let you know. Xcode will fetch from the remote and notify you with a down arrow and count that you are behind the remote master.
Tagging
Earlier on, we created a tag on one of the earlier commits. Observing the primary pane, you can see another commit which has been tagged. The left-hand pane makes it easy to view a concise list of all the tags, below branches.
Remember the naming convention we used for our tag, release/0.1. We did that for a reason. Creating tags with a hierarchical parent allows Xcode to group tags together.

In our case, we have two tags that belong to the release parent tag. We can create multiple logical groups for our tags for different reasons, and Xcode makes it easy to organize our tags.
By selecting a specific tag, our commit history will only show commits that are related to that tag, meaning we have a complete coding manifest of all changes introduced during a release. This will help us narrow down any problematic code specific to that release.
Conclusion
Xcode 9 is a huge release, and one of the biggest new features is that Apple has finally integrated SCM as a first-class citizen of the IDE. This resolves a long-standing gripe many developers have voiced about how Xcode managed collaborative development and versioning.
In Xcode 9, not only is GitHub seamlessly blended into the platform, but developers are now rewarded with a beautiful code management interface in a new SCM tab. Developers get a definitive view of the code history, commits, merges, tagging, and branching, as well as advanced perspectives for debugging and identifying commits that have introduced bugs. Git lovers and SCM aficionados will truly appreciate Apple's initiative to consolidate a truly powerful Git management tool, all within the IDE.
While you're here, check out some of our other posts on Xcode, Swift, and iOS app development!
 SwiftWhat's New in Swift 4
 iOS SDKFaster Logins With Password AutoFill in iOS 11
 iOS SDKRealm Mobile Database for iOS
 Mobile DevelopmentHow to Submit an iOS App to the App Store
 iOS SDK3 Terrible Mistakes of iOS Developers
Original Link:
TutsPlus - Code
 Tuts+ is a site aimed at web developers and designers offering tutorials and articles on technologies, skills and techniques to improve how you design and build websites.
More About this Source Visit TutsPlus - Code