
An Interest In:
Web News this Week
- March 27, 2024
- March 26, 2024
- March 25, 2024
- March 24, 2024
- March 23, 2024
- March 22, 2024
- March 21, 2024
Some of Our Sources
- Simplebits
- Just Creative
- Joshua Blankenship
- Smashing Apps
- Six Revisions
- You The Designer
- FanExtra - PSD
- Noupe
- Specky Boy
- Web Resource Source
Help Webnuz
Referal links:
Common React Native App Layouts: Login Page
In this series, you'll learn how to use React Native to create page layouts commonly used in mobile apps. The layouts you'll be creating won't be functional—instead, the main focus of this series is to get your hands dirty in laying out content in your React Native apps.
If you're new to laying out React Native apps or styling in general, check out my previous tutorial:
To follow along with this series, I challenge you to try recreating each screen by yourself first, before you read my step-by-step instructions in the tutorial. You won't really benefit much from this tutorial just by reading it! Try first before looking up the answers here. If you succeed in making it look like the original screen, compare your implementation to mine. Then decide for yourself which one is better!
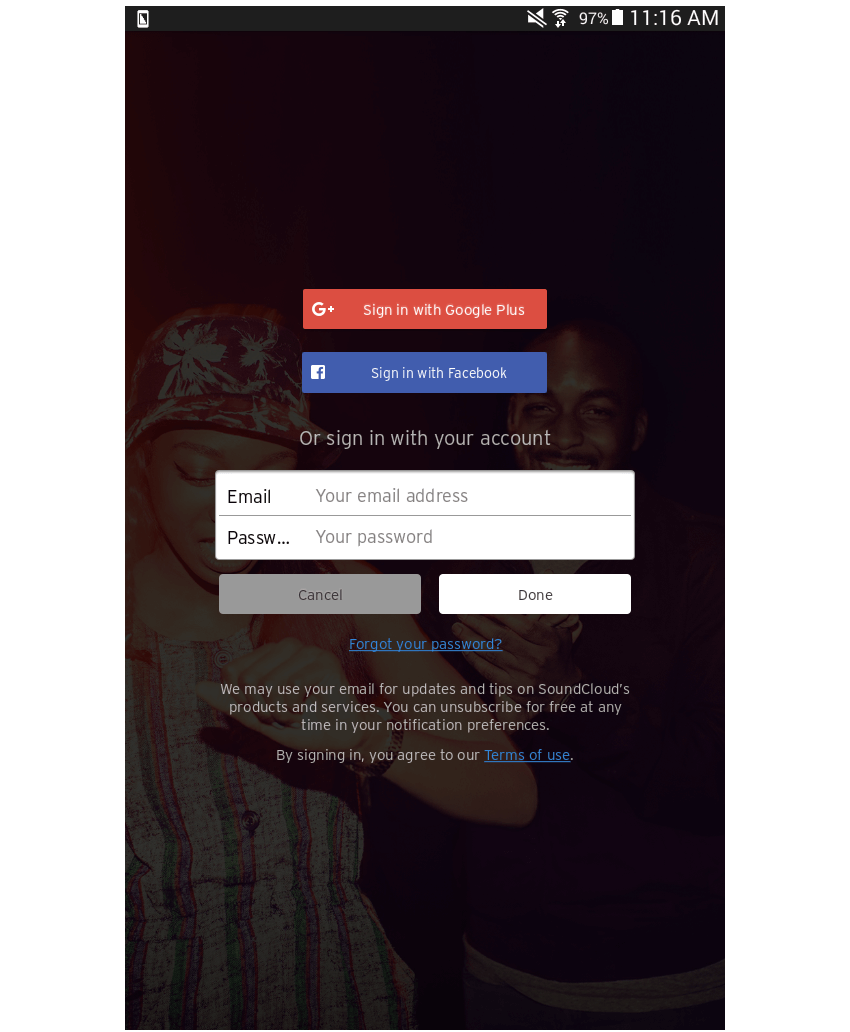
In this first part of the series, you'll create the following login page:

The login page is commonly used as the initial page for apps that require users to have an account.
Here are a couple of examples of this type of layout in the wild:

Project Setup
The first step, of course, is to set up a new React Native project:
react-native init react-native-common-screens
Once the project is set up, open the index.android.js file and replace the default code with the following:
import React, { Component } from 'react';
import {
  AppRegistry
} from 'react-native';

import Login from './src/pages/Login';

export default class ReactNativeCommonScreens extends Component {

  render() {
    return (
      <Login />
    );
  }

}

AppRegistry.registerComponent('ReactNativeCommonScreens', () => ReactNativeCommonScreens);
Create a src/pages folder and create a Login.js file inside it.
You'll also need the react-native-vector-icons package. This is specifically used to render the Facebook icon for the Facebook login button.
npm install --save react-native-vector-icons
Open the android/app/build.gradle file and add a reference to the package:
dependencies {
    //rest of the dependencies are here at the top
    compile project(':react-native-vector-icons') //add this
}
Do the same with the android/settings.gradle file by adding the following at the bottom:
include ':react-native-vector-icons'
project(':react-native-vector-icons').projectDir = new File(rootProject.projectDir, '../node_modules/react-native-vector-icons/android')
Open android/app/src/main/java/com/react-native-common-screens/MainApplication.java and import the package:
import java.util.Arrays;
import java.util.List;

import com.oblador.vectoricons.VectorIconsPackage; //add this
Lastly, initialize the package:
@Override
protected List<ReactPackage> getPackages() {
  return Arrays.<ReactPackage>asList(
      new MainReactPackage(),
      new VectorIconsPackage() //add this
  );
}
Creating the Login Page
Okay, now that you've tried to code the layout yourself (no cheating, right?), I'll show you how I built my implementation. Open the src/pages/Login.js file and import the things that you'll need:
import React, { Component } from 'react';

import {
  StyleSheet,
  Text,
  View,
  TextInput,
  ScrollView
} from 'react-native';

import Icon from 'react-native-vector-icons/FontAwesome';
Aside from the default React components and the react-native-vector-icons package, you'll also need to include three custom components:
import Container from '../components/Container';
import Button from '../components/Button';
import Label from '../components/Label';
The first one is the Container (src/components/Container.js), whose job is to add a bottom margin to whatever it wraps. It sounds trivial, and yes, you can actually just use View and add the same styles every time you want to use it. The advantage this offers is that you don't have to apply the same styles to a View multiple times, and it also allows you to reuse the component every time you need to add a bottom margin to something.
import React, { Component } from 'react';

import {
  StyleSheet,
  View
} from 'react-native';

const Container = (props) => {
    return (
<View style={styles.labelContainer}>
{ props.children }
</View>
);
}

const styles = StyleSheet.create({
labelContainer: {
marginBottom: 20
}
});

export default Container;
The Button component (src/components/Button.js), as the name suggests, is used to create buttons. If present, this spits out any child component that's added inside it. Otherwise, it outputs a Text component which shows the text inside the button. A default style is also added, but it won't be used if noDefaultStyles is present in the props. Unique button styles passed from the props are also optional.
import React, { Component } from 'react';

import {
  StyleSheet,
  Text,
  TouchableHighlight,
} from 'react-native';

const Button = (props) => {

function getContent(){
if(props.children){
return props.children;
}
return <Text style={props.styles.label}>{props.label}</Text>
}

return (
<TouchableHighlight
underlayColor="#ccc"
onPress={props.onPress}
style={[
props.noDefaultStyles ? '' : styles.button,
props.styles ? props.styles.button : '']}
>
    { getContent() }
</TouchableHighlight>
);
}

const styles = StyleSheet.create({
button: {
        alignItems: 'center',
        justifyContent: 'center',
        padding: 20
    },
});

export default Button;
Lastly, there's the Label component (src/components/Label.js), which is basically just a Text component with some predefined styling.
import React, { Component } from 'react';

import {
  StyleSheet,
  Text,
} from 'react-native';

const Label = (props) => {
    return (
<Text
style={props.styles && props.styles.textLabel ? props.styles.textLabel : styles.textLabel}
>
{props.text}
</Text>
);
}

const styles = StyleSheet.create({
textLabel: {
fontSize: 20,
fontWeight: 'bold',
fontFamily: 'Verdana',
marginBottom: 10,
color: '#595856'
}
});

export default Label;
Now you can move on to the actual login page. Inside the render() method, wrap everything in a ScrollView component. This is very important if you want your app to be able to cater to all sorts of device dimensions and screen orientations.
More often than not, no matter how little height you think your content is going to consume, there will always be a device that won't be able to display it completely. Thus the need for scroll bars for scrolling the content.
export default class Login extends Component {
  render() {
    return (
        <ScrollView style={styles.scroll}>
        ...
        </ScrollView>
    );
  }
}
Next, initialize the styles:
const styles = StyleSheet.create({

});
Apply the following styles to the ScrollView. flexDirection is optional, but it's a good practice to explicitly define it so that future developers will know exactly how the main content of the app is laid out just by glancing at the code.
scroll: {
    backgroundColor: '#E1D7D8',
    padding: 30,
    flexDirection: 'column'
},
Looking at the screenshot from earlier, the first piece of content that you want to add is the one at the very top, and that is the forgot password button. Note that the onPress props is supplied because the underlayColor won't actually be applied if there is no function supplied for when the button is pressed.
<Container>
    <Button
        label="Forgot Login/Pass"
        styles={{button: styles.alignRight, label: styles.label}}
        onPress={this.press.bind(this)} />
</Container>
The styles used for it are pretty self-explanatory except for the alignSelf: 'flex-end'. This tells React Native to position the element at the very end of the current line. alignSelf is the equivalent of alignItems for specifying the alignment of the element itself and not its children. Using flex-end allows you to achieve an effect similar to that of float: right in CSS.
label: {
    color: '#0d8898',
    fontSize: 20
},
alignRight: {
    alignSelf: 'flex-end'
},
Next are the two text fields along with their labels.
<Container>
    <Label text="Username or Email" />
    <TextInput
        style={styles.textInput}
    />
</Container>
<Container>
    <Label text="Password" />
    <TextInput
        secureTextEntry={true}
        style={styles.textInput}
    />
</Container>
At this point, the page should now look like this:

Here's the styling for the textInput:
textInput: {
    height: 80,
    fontSize: 30,
    backgroundColor: '#FFF'
},
Now you may have started to notice why the Container component is important. It allows you to encapsulate default styles so you won't end up re-declaring them in every file. This is a basic principle of React: you should always strive for component reuse every time you see an opportunity.
The button for logging in to Facebook is a bit different from the buttons that you created earlier. This time it has some content inside it which displays an icon along with some text. These are added in place of the label props in order to customize the content of the button further.
<Container>
    <Button
        styles={{button: styles.transparentButton}}
        onPress={this.press.bind(this)}
    >
        <View style={styles.inline}>
            <Icon name="facebook-official" size={30} color="#3B5699" />
            <Text style={[styles.buttonBlueText, styles.buttonBigText]}>  Connect </Text>
            <Text style={styles.buttonBlueText}>with Facebook</Text>
        </View>
    </Button>
</Container>
Once that has been added, the page should now look like this:

Add the styles for the Facebook login button:
transparentButton: {
    marginTop: 30,
    borderColor: '#3B5699',
    borderWidth: 2
},
buttonBlueText: {
    fontSize: 20,
    color: '#3B5699'
},
buttonBigText: {
    fontSize: 20,
    fontWeight: 'bold'
},
inline: {
    flexDirection: 'row'
},
There's really nothing worth noting here except for styles.inline, which is used as a helper class to horizontally stack all the elements inside of it. This achieves a similar effect to that of using <span> in HTML to wrap text that you want to display inline. In CSS, this can be achieved using either display: inline or display: inline-block.

The last elements on this screen are the Sign In and Cancel buttons. They need more space above them than the other elements, so it's best to wrap them in a container (footer) and apply marginTop to it. This makes more sense than declaring a new style just for these buttons.
<View style={styles.footer}>
    <Container>
        <Button
            label="Sign In"
            styles={{button: styles.primaryButton, label: styles.buttonWhiteText}}
            onPress={this.press.bind(this)} />
    </Container>
    <Container>
        <Button
            label="CANCEL"
            styles={{label: styles.buttonBlackText}}
            onPress={this.press.bind(this)} />
    </Container>
</View>
Finally, add the styling for the Sign In and Cancel buttons:
buttonWhiteText: {
    fontSize: 20,
    color: '#FFF',
},
buttonBlackText: {
    fontSize: 20,
    color: '#595856'
},
primaryButton: {
    backgroundColor: '#34A853'
},
footer: {
   marginTop: 100
}
Finally, don't forget to define the code that will be executed when any of the buttons are pressed!
press() {
  //execute any code here
}
Conclusion
That's it! In this tutorial you've successfully created a login page using your Flexbox knowledge. Along the way, you also learned how to use a third-party library called React Native Vector Icons to easily add icons in your app. How did my solution compare to your own? Let us know in the discussion forum below.
In the next tutorial in this series, you'll learn how to create a calendar screen. In the meantime, check out some of our other tutorials on React Native and Flexbox.

An Introduction to the CSS Flexbox Module

Get Started With React Native Layouts

Build a Social App With React Native

How to Build a Striped Navigation With Flexbox

Animate Your React Native App

How to Create a Face Detection App With React Native
Original Link:
TutsPlus - Code
 Tuts+ is a site aimed at web developers and designers offering tutorials and articles on technologies, skills and techniques to improve how you design and build websites.
More About this Source Visit TutsPlus - Code