
An Interest In:
Web News this Week
- March 26, 2024
- March 25, 2024
- March 24, 2024
- March 23, 2024
- March 22, 2024
- March 21, 2024
- March 20, 2024
Some of Our Sources
- Team Treehouse
- Six Revisions
- Abduzeedo
- You The Designer
- Creative Curio
- FanExtra - PSD
- Fudge Graphics
- Stylized Web
- Spyre Studios
- Hashedout
Help Webnuz
Referal links:
How to Program With Yii2: Uploading Files

If you're asking, "What's Yii?" check out my earlier tutorial: Introduction to the Yii Framework, which reviews the benefits of Yii and includes an overview of what's new in Yii 2.0, released in October 2014.
In this How to Program With Yii2 series, I'm guiding readers in use of the Yii2 Framework for PHP. In this tutorial, I'll guide you through the basics of uploading files and images in Yii2.
For these examples, we'll continue to imagine we're building a framework for posting simple status updates, e.g. our own mini-Twitter. The image above demonstrates writing a short update while uploading a picture I took of the Taj Mahal.
Just a reminder, I do participate in the comment threads below. I'm especially interested if you have different approaches, additional ideas or want to suggest topics for future tutorials. If you have a question or topic suggestion, please post below. You can also reach me on Twitter @reifman directly.
File Upload Plugins
There are two file upload plugins for Yii2 that seem the most robust:
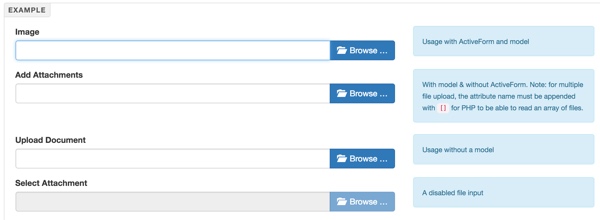
The FileInput Widget by Kartik Visweswaran (shown above)
The 2Amigos BlueImp File Uploader (a wrapper for the BlueImp JQuery File Uploader)
For this tutorial, I decided to continue with Kartik's plugin. I found it easier to use and better documented than the 2Amigos plugin. However, the BlueImp File Uploader has some intriguing user experience features that you may want to explore (shown below):

Working With the FileInput Plugin
Let's begin to install and make use of the file uploader and integrate it into our Twitter-like status creation applet. Again, we'll use the Yii2 Hello application tree which you can download with the GitHub button link beside or below.
Installing the Plugin
First, we can use composer to add kartik-v/yii2-widget-fileinput to our application:
$ composer require kartik-v/yii2-widget-fileinput "*"
./composer.json has been updated
Loading composer repositories with package information
Updating dependencies (including require-dev)
  - Updating kartik-v/yii2-widget-fileinput (dev-master 36f9f49 => v1.0.4)
    Checking out 36f9f493c2d814529f2a195422a8af2e020fc80c

Writing lock file
Generating autoload files
Expanding the Status Table
Next, we need to add fields for the file we're going to upload to our Status table. In this example, we'll let the user upload an image to go along with their status update.
The fields we'll add are for the uploaded files' original filename as well as a unique filename which will be stored on our server for display:
- image_src_filename
- image_web_filename
Create a new migration for adding these fields to the Status table:
$ ./yii migrate/create extend_status_table_for_image
Yii Migration Tool (based on Yii v2.0.6)

Create new migration '/Users/Jeff/Sites/hello/migrations/m160316_201654_extend_status_table_for_image.php'? (yes|no) [no]:yes
New migration created successfully.
Here's the customized migration to add the two fields as strings:
<?php

use yii\db\Schema;
use yii\db\Migration;

class m160316_201654_extend_status_table_for_image extends Migration
{
    public function up()
    {
      $tableOptions = null;
      if ($this->db->driverName === 'mysql') {
          $tableOptions = 'CHARACTER SET utf8 COLLATE utf8_unicode_ci ENGINE=InnoDB';
      }
      $this->addColumn('{{%status}}','image_src_filename',Schema::TYPE_STRING.' NOT NULL');
      $this->addColumn('{{%status}}','image_web_filename',Schema::TYPE_STRING.' NOT NULL');
    }

    public function down()
    {
        $this->dropColumn('{{%status}}','image_src_filename');
        $this->dropColumn('{{%status}}','image_web_filename');
        return false;
    }

}
Then, run the migration:
$ ./yii migrate/up
Yii Migration Tool (based on Yii v2.0.6)

Total 1 new migration to be applied:
    m160316_201654_extend_status_table_for_image

Apply the above migration? (yes|no) [no]:yes
*** applying m160316_201654_extend_status_table_for_image
    > add column image_src_filename string NOT NULL to table {{%status}} ... done (time: 0.044s)
    > add column image_web_filename string NOT NULL to table {{%status}} ... done (time: 0.011s)
*** applied m160316_201654_extend_status_table_for_image (time: 0.071s)


Migrated up successfully.
Since Yii2 is built with a Model View Controller (MVC) architecture, there are three other coding areas which we need to implement for the file uploader:
- The Status Model
- The Status View and Form
- The Status Controller
Enhancing the Model Functionality
Now, we'll make changes to the /models/Status.php file. Primarily, we need to provide attributes and validation rules for the new image fields as well as the temporary $image variable the widget will use to upload the file.
Below, we add comments for the two new $image_xxx_filename variables and create a public temporary variable called $image:
/**
 * This is the model class for table "status".
 *
 * @property integer $id
 * @property string $message
 * @property integer $permissions
 * @property string $image_src_filename
 * @property string $image_web_filename
 * @property integer $created_at
 * @property integer $updated_at
 * @property integer $created_by
 *
 * @property User $createdBy
 */
class Status extends \yii\db\ActiveRecord
{
      const PERMISSIONS_PRIVATE = 10;
      const PERMISSIONS_PUBLIC = 20;
      public $image;
Next, we'll add validation rules for our image such as file type and maximum size:
public function rules()
    {
        return [
            [['message'], 'required'],
            [['message'], 'string'],
            [['permissions', 'created_at', 'updated_at','created_by'], 'integer'],
            [['image'], 'safe'],
            [['image'], 'file', 'extensions'=>'jpg, gif, png'],
            [['image'], 'file', 'maxSize'=>'100000'],
             [['image_src_filename', 'image_web_filename'], 'string', 'max' => 255],        ];
    }
And new attribute labels for views:
    public function attributeLabels()
    {
        return [
          'id' => Yii::t('app', 'ID'),
          'message' => Yii::t('app', 'Message'),
          'permissions' => Yii::t('app', 'Permissions'),
          'image_src_filename' => Yii::t('app', 'Filename'),
          'image_web_filename' => Yii::t('app', 'Pathname'),
          'created_by' => Yii::t('app', 'Created By'),
          'created_at' => Yii::t('app', 'Created At'),
          'updated_at' => Yii::t('app', 'Updated At'),        ];
    }
Now we can move on to the View changes within the ActiveModel Form.
Adding Our View and Form Functionality
Integrating Image Upload to the Status Creation Form

To enable the form integration of image uploading to Status updates (shown above), we need to make changes to the /views/status/_form.php file.
First, we include the kartik\file\FileInput widget near the top and update the form to become multipart, which supports posting files:
<?php

use yii\helpers\Html;
use yii\widgets\ActiveForm;
use app\assets\StatusAsset;
use kartik\file\FileInput;

StatusAsset::register($this);

/* @var $this yii\web\View */
/* @var $model app\models\Status */
/* @var $form yii\widgets\ActiveForm */
?>

<div class="status-form">
  <?php
      $form = ActiveForm::begin([
          'options'=>['enctype'=>'multipart/form-data']]); // important
           ?>
Then, between the Permissions field and Submit buttons, we add the FileInput widget:
<?=
        $form->field($model, 'permissions')->dropDownList($model->getPermissions(),
                 ['prompt'=>Yii::t('app','- Choose Your Permissions -')]) ?>
               </div>
    </div>
    <div class="row">
      <?= $form->field($model, 'image')->widget(FileInput::classname(), [
              'options' => ['accept' => 'image/*'],
               'pluginOptions'=>['allowedFileExtensions'=>['jpg','gif','png'],'showUpload' => false,],
          ]);   ?>
  </div>
    <div class="row">

    <div class="form-group">
 <?= Html::submitButton($model->isNewRecord ? Yii::t('app', 'Create') : Yii::t('app', 'Update'), ['class' => $model->isNewRecord ? 'btn btn-success' : 'btn btn-primary']) ?>
     </div>
   </div>
In the pluginOptions line, we restrict file types to common image formats such as jpg.
When complete, it will look something like this, waiting for the user to add an image:

Displaying the Image
I'm also going to add code to display the uploaded image for later (after we finish the controller support).
First, I'll add it to the Status view page (/views/status/view.php), which is very basic. However, I'll display the image below the item details:
<?= DetailView::widget([
        'model' => $model,
        'attributes' => [
            'id',
            'createdBy.email',
            'message:ntext',
            'permissions',
            'image_web_filename',
            'image_src_filename',
            'created_at',
            'updated_at',
        ],
    ]) ?>

    <?php
       if ($model->image_web_filename!='') {
         echo '<br /><p><img src="'.Yii::$app->homeUrl. '/uploads/status/'.$model->image_web_filename.'"></p>';
       }
    ?>
It will look something like this:

We'll also add a small thumbnail view to our Status index page (/views/status/index.php). I've added a custom column attribute to Yii2's GridView widget:
<?= GridView::widget([
           'dataProvider' => $dataProvider,
           'filterModel' => $searchModel,
           'columns' => [
               ['class' => 'yii\grid\SerialColumn'],
               'id',
               'message:ntext',
               'permissions',
               'created_at',
               [
                     'attribute' => 'Image',
                     'format' => 'raw',
                     'value' => function ($model) {
                        if ($model->image_web_filename!='')
                          return '<img src="'.Yii::$app->homeUrl. '/uploads/status/'.$model->image_web_filename.'" width="50px" height="auto">'; else return 'no image';
                     },
                   ],
                 ['class' => 'yii\grid\ActionColumn',
         'template'=>'{view} {update} {delete}',
       'buttons'=>[
                   'view' => function ($url, $model) {
                     return Html::a('<span class="glyphicon glyphicon-eye-open"></span>', 'status/'.$model->slug, ['title' => Yii::t('yii', 'View'),]);
         }
   ],
         ],
           ],
       ]); ?>
Ultimately, it will look like this:

Building the Controller Support
To make all of the above possible, we need to finish the controller integration.
At the top of /controllers/StatusController.php, we have to include yii\web\UploadedFile:
<?php
namespace app\controllers;
use Yii;
use app\models\Status;
use app\models\StatusSearch;
use app\models\User;
use app\components\AccessRule;
use yii\web\Controller;
use yii\web\NotFoundHttpException;
use yii\filters\VerbFilter;
use yii\filters\AccessControl;
use yii\web\UploadedFile;
Then we have to update the actionCreate function:
public function actionCreate()
    {
        $model = new Status();

        if ($model->load(Yii::$app->request->post())) {
          $image = UploadedFile::getInstance($model, 'image');
           if (!is_null($image)) {
             $model->image_src_filename = $image->name;
             $ext = end((explode(".", $image->name)));
              // generate a unique file name to prevent duplicate filenames
              $model->image_web_filename = Yii::$app->security->generateRandomString().".{$ext}";
              // the path to save file, you can set an uploadPath
              // in Yii::$app->params (as used in example below)
              Yii::$app->params['uploadPath'] = Yii::$app->basePath . '/web/uploads/status/';
              $path = Yii::$app->params['uploadPath'] . $model->image_web_filename;
               $image->saveAs($path);
            }
            if ($model->save()) {
                return $this->redirect(['view', 'id' => $model->id]);
            }  else {
                var_dump ($model->getErrors()); die();
             }
              }
              return $this->render('create', [
                  'model' => $model,
              ]);
    }
Essentially, this performs the following operations:
- We capture the original filename from the uploaded file's form information (
image_src_filename). - We generate a unique filename for our server (
image_web_filename). - We save the file to our upload directory (
/web/uploads/status/). - We save the model.
- We redirect to the enhanced view page.
You can see the final results with the image above, which includes a picture of the Taj Mahal.
Kartik's File Input Widget also offers more advanced configurations which he documents fairly well, such as Drag and Drop:

Check more of these out on the following pages:
- FileInput Widget Demo
- Upload file in Yii 2 using FileInput widget
Advanced upload using Yii2 FileInput widget
What's Next?
I hope this helps you with the basics of file uploading in your Yii2 application. If you'd like to see another similar walk-through of this kind of functionality, check out Building Your Startup With PHP: User Settings, Profile Images and Contact Details. That tutorial offers a slightly different integration than this tutorial, using tabs, updating user profiles and scaling the images.

Watch for upcoming tutorials in my How to Program With Yii2 series as I continue diving into different aspects of the framework. You may also want to check out my Building Your Startup With PHP series, which is using Yii2's advanced template as I build a real-world application.
If you'd like to know when the next Yii2 tutorial arrives, follow me @reifman on Twitter or check my instructor page. My instructor page will include all the articles from this series as soon as they are published.
Related Links
Here are a variety of links that I used to research and write this tutorial:
Yii2 Developer Exchange, my Yii2 resource site- FileInput Widget Demo by - Kartik
- Upload file in Yii 2 using FileInput widget - Kartik
- Code for kartik-v/yii2-widget-fileinput (GitHub)
- BlueImp JQuery File Upload Demo
Code for 2amigos/yii2-file-upload-widget: BlueImp File Upload Widget (Github)- Uploading Files - The Definitive Guide to Yii 2.0
Original Link:
TutsPlus - Code
 Tuts+ is a site aimed at web developers and designers offering tutorials and articles on technologies, skills and techniques to improve how you design and build websites.
More About this Source Visit TutsPlus - Code