
An Interest In:
Web News this Week
- March 27, 2024
- March 26, 2024
- March 25, 2024
- March 24, 2024
- March 23, 2024
- March 22, 2024
- March 21, 2024
Some of Our Sources
- Slashdot
- Mashable
- Team Treehouse
- Smashing Apps
- Abduzeedo
- TutsPlus - Design
- Inspiredology
- My Ink Blog
- CSS Tricks
- TechPowerUp
Help Webnuz
Referal links:
How to Work With Geofences on Android
Location aware resources allow your application to interact with the physical world and they are ideal for increasing user engagement. Although many mobile apps use them, the topic of this tutorial is a feature that is often overlooked, geofencing.
A geofence is a virtual perimeter set on a real geographic area. Combining a user position with a geofence perimeter, it is possible to know if the user is inside or outside the geofence or even if he is exiting or entering the area.

Imagine a university app that can tell you which colleagues and professors are currently on campus. Or an app for a mall that rewards regular customers. There are many other interesting possibilities that you can explore.
In this tutorial, you learn how to use geofences on Android by creating an application that shows the user a notification when they enter or exit a geofence. It helps if you have previous knowledge of Google Play Services, the Google Maps Android API, or IntentService. If you don't, then you can still follow along, but you may want to do some research about these topics after reading this tutorial.
1. Geofences on Android
On Android, there are several ways to work with geofences. You could even create your own implementation to work with geofences, but it is easier to use Google's GeofencingApi.
This APIs is part of Google's Location APIs. It includes Geofence, GeofencingRequest, GeofenceApi, GeofencingEvent, and GeofenceStatusCodes. In this tutorial, we use these classes to create and work with geofences.
Geofence Interface
Geofence is an interface that represents a geographical area that should be monitored. It is created by using the Geofence.Builder. During its creation, you set the monitored region, the geofence's expiration date, responsiveness, an identifier, and the kind of transitions that it should be looking for.
To keep power consumption to a minimum, it is recommended to use a geofence with a radius of at least 100 meters for most situations. If geofences are located in the countryside, you should increase the radius to 500 meters or higher to make sure the geofences are effective.
Geofence geofence = new Geofence.Builder()
    .setRequestId(GEOFENCE_REQ_ID) // Geofence ID
    .setCircularRegion( LATITUDE, LONGITUDE, RADIUS) // defining fence region
    .setExpirationDuration( DURANTION ) // expiring date
    // Transition types that it should look for
    .setTransitionTypes( Geofence.GEOFENCE_TRANSITION_ENTER | Geofence.GEOFENCE_TRANSITION_EXIT )
    .build();
Geofence Transitions
GEOFENCE_TRANSITION_DWELLindicates that the user entered the area and spent some time there. It is useful to avoid multiple alerts when the user is entering and exiting the area too fast. You can configure the dwelling time using thesetLoiteringDelayparameter.GEOFENCE_TRANSITION_ENTERindicates when the user enters the monitored region.GEOFENCE_TRANSITION_EXITindicates when the user exits the region.
GeofenceRequest
The GeofencingRequest class receives the geofences that should be monitored. You can create an instance by using a Builder, passing a Geofence or a List<Geofence>, and the kind of notification to trigger when the geofence(s) is created.
GeofencingRequest request = new GeofencingRequest.Builder()
    // Notification to trigger when the Geofence is created
    .setInitialTrigger( GeofencingRequest.INITIAL_TRIGGER_ENTER )
    .addGeofence( geofence ) // add a Geofence
    .build();
GeofencingApi
The GeofencingApi class is the entry point for all interactions with Google's geofencing API. It is part of the Location APIs and it depends on a GoogleApiClient to work. You will use the GeofencingApi to add and remove geofences.
To add a geofence, you call the addGeofence() method. It monitors the given area using the settings passed to the GeofencingRequest and shoots a PendingIntent when a geofence transition, entering or exiting the area, takes place.
PendingResult<Status> addGeofences (GoogleApiClient client,
    GeofencingRequest geofencingRequest,
    PendingIntent pendingIntent)
To remove the geofence, you call removeGeofences(). You can either remove the geofence using its request identifier or its pending intent.
PendingResult<Status> removeGeofences(GoogleApiClient client,
    List<String> geofenceRequestIds)
 PendingResult<Status> removeGeofences (GoogleApiClient client,
    PendingIntent pendingIntent)
2. Creating a Geofencing App
In this tutorial, we create a simple application that monitors the user location and posts a notification when the user enters or exits a geofenced area. The app consists of only one Activity and an IntentService. We also take a quick look at GoogleMap, GoogleApiClient, and FusedLocationProviderApi, and we explore some caveats of the geofence API.
Step 1: Project Setup
GeofencingApi is part of Google Play Services. To access it, you need to correctly set up your development environment and create an instance of the GoogleApiClient. Create a new project with a blank Activity, edit the project's build.gradle file as shown below, and synchronize your project.
Step 2: Permissions
We need to set the correct permissions to create and use geofences. Add the following permission to the project's manifest:
<uses-permission android:name="android.permission.ACCESS_FINE_LOCATION"/>
Starting with Android 6.0, the app asks for permission at run time and not during the installation. We address this later in the tutorial.
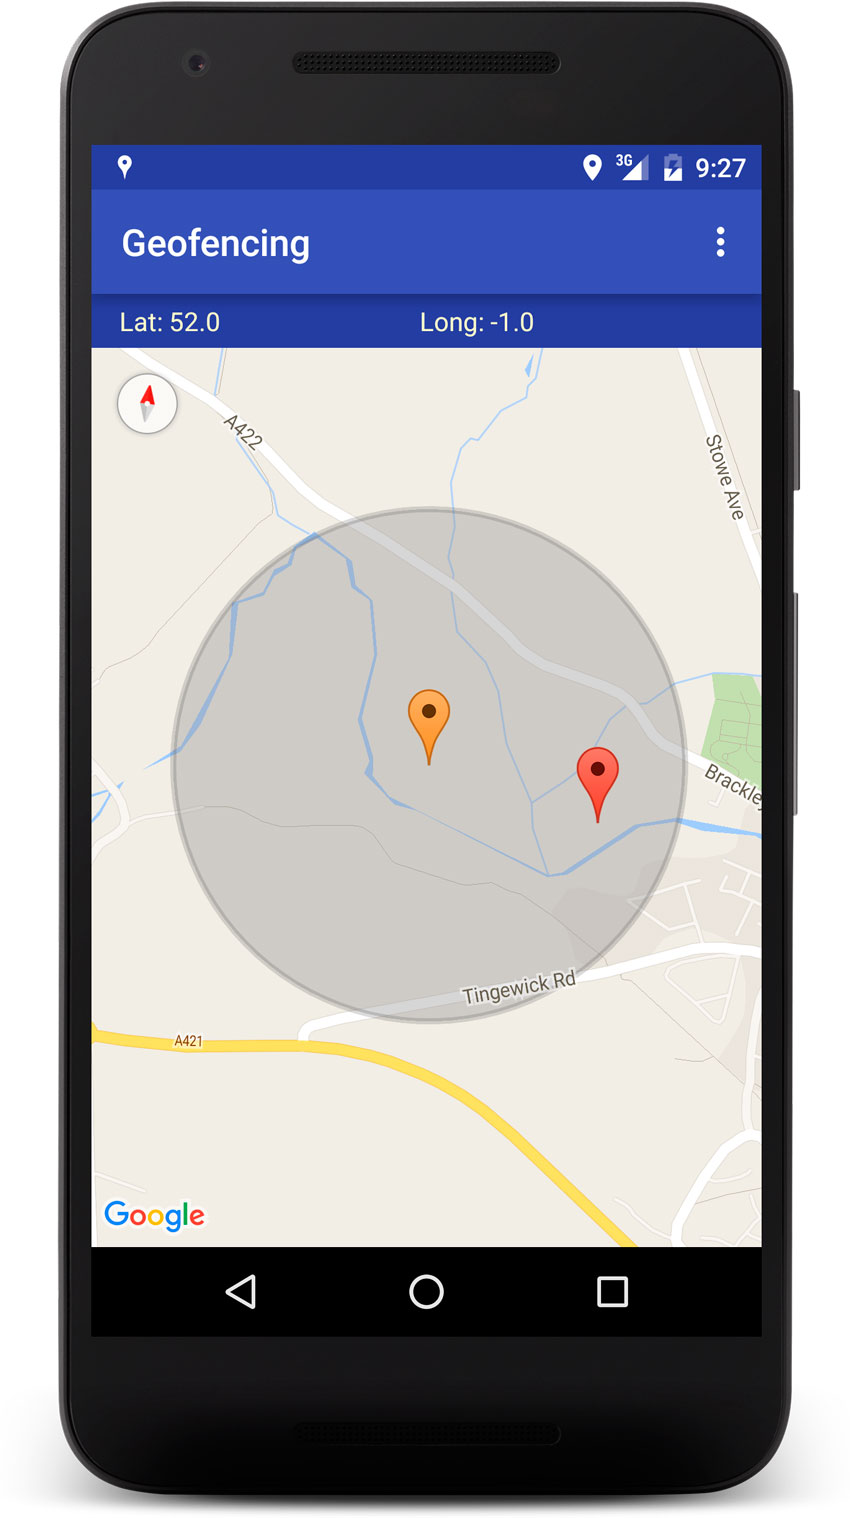
Step 3: Creating the Layout
The project consists of one layout, the MainActity layout. It contains the device's current latitude and longitude, and a GoogleMap fragment that displays the geofences and the user's position.
Since activity_main.xml is pretty straightforward, I want to concentrate only on the MapFragment element. You can take a look at the completed layout in the source files of this tutorial.
<!--GoogleMap fragment-->
<fragment xmlns:android="https://schemas.android.com/apk/res/android"
    android:name="com.google.android.gms.maps.MapFragment"
    android:id="@+id/map"
    android:layout_width="match_parent"
    android:layout_height="match_parent"/>
Step 4: Google Maps API Key
Since we are using a MapFragment, we need to set up and initialize a GoogleMap instance. First, you need to obtain an API key. Once you have an API key, add it to the project's manifest.
<meta-data
   android:name="com.google.android.geo.API_KEY"
   android:value="YOUR_API_KEY"/>
Let's begin with the GoogleMap instance. Implement GoogleMap.OnMapReadyCallback, GoogleMap.OnMapClickListener, and GoogleMap.OnMarkerClickListener in the Activity class and initialize the map.
public class MainActivity extends AppCompatActivity
    implements
OnMapReadyCallback,
GoogleMap.OnMapClickListener,
            GoogleMap.OnMarkerClickListener
    {

    private static final String TAG = MainActivity.class.getSimpleName();

    private TextView textLat, textLong;
    private MapFragment mapFragment;
    private GoogleMap map;

    @Override
    protected void onCreate(Bundle savedInstanceState) {
        super.onCreate(savedInstanceState);
        setContentView(R.layout.activity_main);
        textLat = (TextView) findViewById(R.id.lat);
        textLong = (TextView) findViewById(R.id.lon);

        // initialize GoogleMaps
        initGMaps();
    }

    // Initialize GoogleMaps
    private void initGMaps(){
        mapFragment = (MapFragment) getFragmentManager().findFragmentById(R.id.map);
        mapFragment.getMapAsync(this);
    }

    // Callback called when Map is ready
    @Override
    public void onMapReady(GoogleMap googleMap) {
        Log.d(TAG, "onMapReady()");
        map = googleMap;
        map.setOnMapClickListener(this);
        map.setOnMarkerClickListener(this);
    }

// Callback called when Map is touched
    @Override
    public void onMapClick(LatLng latLng) {
        Log.d(TAG, "onMapClick("+latLng +")");
    }

// Callback called when Marker is touched
    @Override
    public boolean onMarkerClick(Marker marker) {
        Log.d(TAG, "onMarkerClickListener: " + marker.getPosition() );
        return false;
    }
}
Step 5: GoogleApiClient
To use the GeofencingApi interface, we need a GoogleApiClient entry point. Let's implement a GoogleApiClient.ConnectionCallbacks and a GoogleApiClient.OnConnectionFailedListener in the Activity as shown below.
public class MainActivity extends AppCompatActivity
        implements
            GoogleApiClient.ConnectionCallbacks,
            GoogleApiClient.OnConnectionFailedListener,
            OnMapReadyCallback,
            GoogleMap.OnMapClickListener,
            GoogleMap.OnMarkerClickListener {

    // ...
    private GoogleApiClient googleApiClient;

    @Override
    protected void onCreate(Bundle savedInstanceState) {

        // ...

        // create GoogleApiClient
        createGoogleApi();
    }

    // Create GoogleApiClient instance
    private void createGoogleApi() {
        Log.d(TAG, "createGoogleApi()");
        if ( googleApiClient == null ) {
            googleApiClient = new GoogleApiClient.Builder( this )
                    .addConnectionCallbacks( this )
                    .addOnConnectionFailedListener( this )
                    .addApi( LocationServices.API )
                    .build();
        }
    }

    @Override
    protected void onStart() {
        super.onStart();

        // Call GoogleApiClient connection when starting the Activity
        googleApiClient.connect();
    }

    @Override
    protected void onStop() {
        super.onStop();

        // Disconnect GoogleApiClient when stopping Activity
        googleApiClient.disconnect();
    }

    // GoogleApiClient.ConnectionCallbacks connected
    @Override
    public void onConnected(@Nullable Bundle bundle) {
        Log.i(TAG, "onConnected()");
    }

    // GoogleApiClient.ConnectionCallbacks suspended
    @Override
    public void onConnectionSuspended(int i) {
        Log.w(TAG, "onConnectionSuspended()");
    }

    // GoogleApiClient.OnConnectionFailedListener fail
    @Override
    public void onConnectionFailed(@NonNull ConnectionResult connectionResult) {
        Log.w(TAG, "onConnectionFailed()");
    }
}
Step 6: FusedLocationProviderApi
We also need to access the user's current location. The FusedLocationProviderApi interface gives us this information and allows a great level of control of the location request. This is very important, considering that location requests have a direct effect over the device's battery consumption.
Now, let's implement a LocationListener. Check if the user gave the application the appropriate permissions by creating the Location request and display their the current location on the screen.
public class MainActivity extends AppCompatActivity
        implements
            // ....
            LocationListener
            {

    private Location lastLocation;
    //...

    // GoogleApiClient.ConnectionCallbacks connected
    @Override
    public void onConnected(@Nullable Bundle bundle) {
        Log.i(TAG, "onConnected()");
        getLastKnownLocation();
    }

    // Get last known location
    private void getLastKnownLocation() {
        Log.d(TAG, "getLastKnownLocation()");
        if ( checkPermission() ) {
            lastLocation = LocationServices.FusedLocationApi.getLastLocation(googleApiClient);
            if ( lastLocation != null ) {
                Log.i(TAG, "LasKnown location. " +
                        "Long: " + lastLocation.getLongitude() +
                        " | Lat: " + lastLocation.getLatitude());
                writeLastLocation();
                startLocationUpdates();
            } else {
                Log.w(TAG, "No location retrieved yet");
                startLocationUpdates();
            }
        }
        else askPermission();
    }

    private LocationRequest locationRequest;
    // Defined in mili seconds.
    // This number in extremely low, and should be used only for debug
    private final int UPDATE_INTERVAL =  1000;
    private final int FASTEST_INTERVAL = 900;

    // Start location Updates
    private void startLocationUpdates(){
        Log.i(TAG, "startLocationUpdates()");
        locationRequest = LocationRequest.create()
                .setPriority(LocationRequest.PRIORITY_HIGH_ACCURACY)
                .setInterval(UPDATE_INTERVAL)
                .setFastestInterval(FASTEST_INTERVAL);

        if ( checkPermission() )
            LocationServices.FusedLocationApi.requestLocationUpdates(googleApiClient, locationRequest, this);
    }

    @Override
    public void onLocationChanged(Location location) {
        Log.d(TAG, "onLocationChanged ["+location+"]");
        lastLocation = location;
        writeActualLocation(location);
    }

    // Write location coordinates on UI
    private void writeActualLocation(Location location) {
        textLat.setText( "Lat: " + location.getLatitude() );
        textLong.setText( "Long: " + location.getLongitude() );
    }

    private void writeLastLocation() {
        writeActualLocation(lastLocation);
    }

    // Check for permission to access Location
    private boolean checkPermission() {
        Log.d(TAG, "checkPermission()");
        // Ask for permission if it wasn't granted yet
        return (ContextCompat.checkSelfPermission(this, Manifest.permission.ACCESS_FINE_LOCATION)
                == PackageManager.PERMISSION_GRANTED );
    }

    // Asks for permission
    private void askPermission() {
        Log.d(TAG, "askPermission()");
        ActivityCompat.requestPermissions(
                this,
                new String[] { Manifest.permission.ACCESS_FINE_LOCATION },
                REQ_PERMISSION
        );
    }

    // Verify user's response of the permission requested
    @Override
    public void onRequestPermissionsResult(int requestCode, @NonNull String[] permissions, @NonNull int[] grantResults) {
        Log.d(TAG, "onRequestPermissionsResult()");
        super.onRequestPermissionsResult(requestCode, permissions, grantResults);
        switch ( requestCode ) {
            case REQ_PERMISSION: {
                if ( grantResults.length > 0
                        && grantResults[0] == PackageManager.PERMISSION_GRANTED ){
                    // Permission granted
                    getLastKnownLocation();

                } else {
                    // Permission denied
                    permissionsDenied();
                }
                break;
            }
        }
    }

    // App cannot work without the permissions
    private void permissionsDenied() {
        Log.w(TAG, "permissionsDenied()");
    }
}
It is important to address that the LocationRequest created above isn't optimized for a production environment. The UPDATE_INTERVAL is too short and would consume too much battery power. A more realistic configuration for production could be:
private final int UPDATE_INTERVAL =  3 * 60 * 1000; // 3 minutes
private final int FASTEST_INTERVAL = 30 * 1000;  // 30 secs
private void startLocationUpdates(){
        Log.i(TAG, "startLocationUpdates()");
        locationRequest = LocationRequest.create()
                .setPriority(LocationRequest.PRIORITY_HIGH_ACCURACY)
                .setInterval(UPDATE_INTERVAL)
                .setFastestInterval(FASTEST_INTERVAL);

        if ( checkPermission() )
            LocationServices.FusedLocationApi.requestLocationUpdates(googleApiClient, locationRequest, this);
}
Step 7: GoogleMap Markers
Our Activity needs two different markers. A locationMarker uses the latitude and longitude given by the FusedLocationProviderApi to inform the device's current location. A geoFenceMarker is the target for the geofence creation as it uses the last touch given on the map to retrieve its position.
@Override
public void onMapClick(LatLng latLng) {
    Log.d(TAG, "onMapClick("+latLng +")");
    markerForGeofence(latLng);
}

private void writeActualLocation(Location location) {
    // ...
    markerLocation(new LatLng(location.getLatitude(), location.getLongitude()));
}

private Marker locationMarker;
// Create a Location Marker
private void markerLocation(LatLng latLng) {
    Log.i(TAG, "markerLocation("+latLng+")");
    String title = latLng.latitude + ", " + latLng.longitude;
    MarkerOptions markerOptions = new MarkerOptions()
            .position(latLng)
            .title(title);
    if ( map!=null ) {
        // Remove the anterior marker
        if ( locationMarker != null )
            locationMarker.remove();
        locationMarker = map.addMarker(markerOptions);
        float zoom = 14f;
        CameraUpdate cameraUpdate = CameraUpdateFactory.newLatLngZoom(latLng, zoom);
        map.animateCamera(cameraUpdate);
    }
}

private Marker geoFenceMarker;
// Create a marker for the geofence creation
private void markerForGeofence(LatLng latLng) {
    Log.i(TAG, "markerForGeofence("+latLng+")");
    String title = latLng.latitude + ", " + latLng.longitude;
    // Define marker options
    MarkerOptions markerOptions = new MarkerOptions()
            .position(latLng)
            .icon(BitmapDescriptorFactory.defaultMarker(BitmapDescriptorFactory.HUE_ORANGE))
            .title(title);
    if ( map!=null ) {
        // Remove last geoFenceMarker
        if (geoFenceMarker != null)
            geoFenceMarker.remove();

        geoFenceMarker = map.addMarker(markerOptions);
    }
}
Step 8: Creating a Geofence
At last, it is time to create a geofence. We use the geoFenceMarker as the center point for the geofence.
private static final long GEO_DURATION = 60 * 60 * 1000;
private static final String GEOFENCE_REQ_ID = "My Geofence";
private static final float GEOFENCE_RADIUS = 500.0f; // in meters

// Create a Geofence
private Geofence createGeofence( LatLng latLng, float radius ) {
    Log.d(TAG, "createGeofence");
    return new Geofence.Builder()
            .setRequestId(GEOFENCE_REQ_ID)
            .setCircularRegion( latLng.latitude, latLng.longitude, radius)
            .setExpirationDuration( GEO_DURATION )
            .setTransitionTypes( Geofence.GEOFENCE_TRANSITION_ENTER
                    | Geofence.GEOFENCE_TRANSITION_EXIT )
            .build();
}
Next, we create the GeofencingRequest object.
// Create a Geofence Request
private GeofencingRequest createGeofenceRequest( Geofence geofence ) {
    Log.d(TAG, "createGeofenceRequest");
    return new GeofencingRequest.Builder()
            .setInitialTrigger( GeofencingRequest.INITIAL_TRIGGER_ENTER )
            .addGeofence( geofence )
            .build();
}
We use a PendingIntent object to call a IntentService that will handle the GeofenceEvent. We create the GeofenceTrasitionService.class later.
private PendingIntent geoFencePendingIntent;
private final int GEOFENCE_REQ_CODE = 0;
private PendingIntent createGeofencePendingIntent() {
    Log.d(TAG, "createGeofencePendingIntent");
    if ( geoFencePendingIntent != null )
        return geoFencePendingIntent;

    Intent intent = new Intent( this, GeofenceTrasitionService.class);
    return PendingIntent.getService(
            this, GEOFENCE_REQ_CODE, intent, PendingIntent.FLAG_UPDATE_CURRENT );
}

// Add the created GeofenceRequest to the device's monitoring list
private void addGeofence(GeofencingRequest request) {
    Log.d(TAG, "addGeofence");
    if (checkPermission())
        LocationServices.GeofencingApi.addGeofences(
                googleApiClient,
                request,
                createGeofencePendingIntent()
        ).setResultCallback(this);
}
We also draw the geofence on the map as a visual reference.
@Override
public void onResult(@NonNull Status status) {
    Log.i(TAG, "onResult: " + status);
    if ( status.isSuccess() ) {
        drawGeofence();
    } else {
        // inform about fail
    }
}

// Draw Geofence circle on GoogleMap
private Circle geoFenceLimits;
private void drawGeofence() {
    Log.d(TAG, "drawGeofence()");

    if ( geoFenceLimits != null )
        geoFenceLimits.remove();

    CircleOptions circleOptions = new CircleOptions()
            .center( geoFenceMarker.getPosition())
            .strokeColor(Color.argb(50, 70,70,70))
            .fillColor( Color.argb(100, 150,150,150) )
            .radius( GEOFENCE_RADIUS );
    geoFenceLimits = map.addCircle( circleOptions );
}
The startGeofence() method is responsible for starting the geofencing process in the MainActivity class.
    @Override
    public boolean onOptionsItemSelected(MenuItem item) {
        switch ( item.getItemId() ) {
            case R.id.geofence: {
                startGeofence();
                return true;
            }
        }
        return super.onOptionsItemSelected(item);
    }

// Start Geofence creation process
    private void startGeofence() {
        Log.i(TAG, "startGeofence()");
        if( geoFenceMarker != null ) {
            Geofence geofence = createGeofence( geoFenceMarker.getPosition(), GEOFENCE_RADIUS );
            GeofencingRequest geofenceRequest = createGeofenceRequest( geofence );
            addGeofence( geofenceRequest );
        } else {
            Log.e(TAG, "Geofence marker is null");
        }
    }
Step 9: Geofence Transition Service
We can now finally create the GeofenceTrasitionService.class mentioned earlier. This class extends IntentService and is responsible for handling the GeofencingEvent. First, we get this event from the received intent.
GeofencingEvent geofencingEvent = GeofencingEvent.fromIntent(intent);
We then check if the kind of geofencing transition that took place is of interest to us. If it is, we retrieve a list of the triggered geofences and create a notification with the appropriate actions.
// Retrieve GeofenceTrasition
int geoFenceTransition = geofencingEvent.getGeofenceTransition();
// Check if the transition type
if ( geoFenceTransition == Geofence.GEOFENCE_TRANSITION_ENTER ||
        geoFenceTransition == Geofence.GEOFENCE_TRANSITION_EXIT ) {
    // Get the geofence that were triggered
    List<Geofence> triggeringGeofences = geofencingEvent.getTriggeringGeofences();
    // Create a detail message with Geofences received
    String geofenceTransitionDetails = getGeofenceTrasitionDetails(geoFenceTransition, triggeringGeofences );
    // Send notification details as a String
    sendNotification( geofenceTransitionDetails );
}
I have also implemented a few helper methods to make the implementation of the class easier to understand.
public class GeofenceTrasitionService extends IntentService {

    private static final String TAG = GeofenceTrasitionService.class.getSimpleName();
    public static final int GEOFENCE_NOTIFICATION_ID = 0;

    public GeofenceTrasitionService() {
        super(TAG);
    }

    @Override
    protected void onHandleIntent(Intent intent) {
        // Retrieve the Geofencing intent
        GeofencingEvent geofencingEvent = GeofencingEvent.fromIntent(intent);

        // Handling errors
        if ( geofencingEvent.hasError() ) {
            String errorMsg = getErrorString(geofencingEvent.getErrorCode() );
            Log.e( TAG, errorMsg );
            return;
        }

// Retrieve GeofenceTrasition
        int geoFenceTransition = geofencingEvent.getGeofenceTransition();
        // Check if the transition type
        if ( geoFenceTransition == Geofence.GEOFENCE_TRANSITION_ENTER ||
                geoFenceTransition == Geofence.GEOFENCE_TRANSITION_EXIT ) {
            // Get the geofence that were triggered
            List<Geofence> triggeringGeofences = geofencingEvent.getTriggeringGeofences();
// Create a detail message with Geofences received
            String geofenceTransitionDetails = getGeofenceTrasitionDetails(geoFenceTransition, triggeringGeofences );
            // Send notification details as a String
            sendNotification( geofenceTransitionDetails );
        }
    }

// Create a detail message with Geofences received
    private String getGeofenceTrasitionDetails(int geoFenceTransition, List<Geofence> triggeringGeofences) {
        // get the ID of each geofence triggered
        ArrayList<String> triggeringGeofencesList = new ArrayList<>();
        for ( Geofence geofence : triggeringGeofences ) {
            triggeringGeofencesList.add( geofence.getRequestId() );
        }

        String status = null;
        if ( geoFenceTransition == Geofence.GEOFENCE_TRANSITION_ENTER )
            status = "Entering ";
        else if ( geoFenceTransition == Geofence.GEOFENCE_TRANSITION_EXIT )
            status = "Exiting ";
        return status + TextUtils.join( ", ", triggeringGeofencesList);
    }

// Send a notification
    private void sendNotification( String msg ) {
        Log.i(TAG, "sendNotification: " + msg );

        // Intent to start the main Activity
        Intent notificationIntent = MainActivity.makeNotificationIntent(
                getApplicationContext(), msg
        );

        TaskStackBuilder stackBuilder = TaskStackBuilder.create(this);
        stackBuilder.addParentStack(MainActivity.class);
        stackBuilder.addNextIntent(notificationIntent);
        PendingIntent notificationPendingIntent = stackBuilder.getPendingIntent(0, PendingIntent.FLAG_UPDATE_CURRENT);

        // Creating and sending Notification
        NotificationManager notificatioMng =
                (NotificationManager) getSystemService( Context.NOTIFICATION_SERVICE );
        notificatioMng.notify(
                GEOFENCE_NOTIFICATION_ID,
                createNotification(msg, notificationPendingIntent));
    }

    // Create a notification
    private Notification createNotification(String msg, PendingIntent notificationPendingIntent) {
        NotificationCompat.Builder notificationBuilder = new NotificationCompat.Builder(this);
        notificationBuilder
                .setSmallIcon(R.drawable.ic_action_location)
                .setColor(Color.RED)
                .setContentTitle(msg)
                .setContentText("Geofence Notification!")
                .setContentIntent(notificationPendingIntent)
                .setDefaults(Notification.DEFAULT_LIGHTS | Notification.DEFAULT_VIBRATE | Notification.DEFAULT_SOUND)
                .setAutoCancel(true);
        return notificationBuilder.build();
    }

// Handle errors
    private static String getErrorString(int errorCode) {
        switch (errorCode) {
            case GeofenceStatusCodes.GEOFENCE_NOT_AVAILABLE:
                return "GeoFence not available";
            case GeofenceStatusCodes.GEOFENCE_TOO_MANY_GEOFENCES:
                return "Too many GeoFences";
            case GeofenceStatusCodes.GEOFENCE_TOO_MANY_PENDING_INTENTS:
                return "Too many pending intents";
            default:
                return "Unknown error.";
        }
    }
}
3. Testing
Testing on a Virtual Device
It is much simpler to test geofencing on a virtual device. There are several ways to do this. In Android Studio, open a virtual device and click the more options button in the bottom right.

In the Location tab on the left, enter the coordinates for the location.

I prefer to use telnet commands to control the virtual device. To use this, you need to connect to the device from the command line using the following command:
telnet localhost [DEVICE_PORT]
The device port is shown in the virtual device window. The device port is usually equal to 5554.
It is possible that you need to authorize this connection using your auth_token, but the command line shows you where it is located. Navigate to that location and copy the token and type, auth [YOUR_AUTH_TOKEN].
You can now set the location of the device by running the following command:
geo fix [LATITUDE] [LONGITUDE]
Conclusion
Geofencing may be a great addition to your app as it can considerably increase user engagement. There are lots of possibilities to explore and you could even create a sophisticated experience using indoor beacons, such as the Estimote. With indoor beacons, you know exactly where the user has passed in, for example, a shopping mall.
Adding Geofencing to a project is simple, but we need to keep power consumption in mind at all times. This means that we need to carefully choose the size of the geofence and the update rate because both directly impact power consumption of your application.
Testing is therefore very important to get a realistic idea of the power consumption of your application. Also consider giving users the option to disable geofencing altogether if they don't want or need this feature.
Original Link:
TutsPlus - Code
 Tuts+ is a site aimed at web developers and designers offering tutorials and articles on technologies, skills and techniques to improve how you design and build websites.
More About this Source Visit TutsPlus - Code