
An Interest In:
Web News this Week
- April 4, 2024
- April 3, 2024
- April 2, 2024
- April 1, 2024
- March 31, 2024
- March 30, 2024
- March 29, 2024
Some of Our Sources
- Simplebits
- TutsPlus - Code
- Pearsonified
- Vandelay Design
- Crazy Leaf Design
- My Ink Blog
- Web Design Ledger
- Specky Boy
- Design Modo
- Android Dissected
Help Webnuz
Referal links:
Make a Comic
Rebecca Cottrell sharpens her trusty HB pencil and sketches out the steps to making a comic, before inking and colouring the whole deal with a few Photoshop tips for anyone unwilling to part with a screen over the festive season. Put that eggnog down and get drawing!
For something slightly different over Christmas, why not step away from your computer and make a comic?
Why make a comic?
First of all, its truly fun and its not that difficult. If youre a designer, you can use skills you already have, so why not take some time to indulge your aesthetic whims and make something for yourself, rather than for a client or your company. And you can use a computer or not.
If youre an interaction designer, its likely youve already made a storyboard or flow, or designed some characters for personas. This is a wee jump away from that, to the realm of storytelling and navigating human emotions through characters who may or may not be human. Similar medium and skills, different content.
Its not a client deliverable but something that stands by itself, and youve nobodys criteria to meet except those that exist in your imagination!
Thanks to your brain and the alchemy of comics, you can put nearly anything in a sequence and your brain will find a way to make sense of it. Scott McCloud wrote about the non sequitur in comics:
There is a kind of alchemy at work in the space between panels which can help us find meaning or resonance in even the most jarring of combinations.
Heres an example of a non sequitur from Scott McClouds Understanding Comics the images bear no relation to one another, but since theyre in a sequence our brains do their best to understand it:
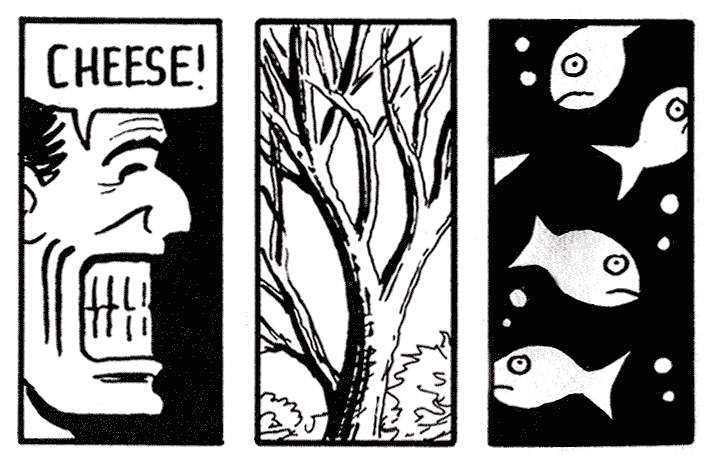
Once you know this it takes the pressure off somewhat. Its a fun thing to keep in mind and experiment with in your comics!
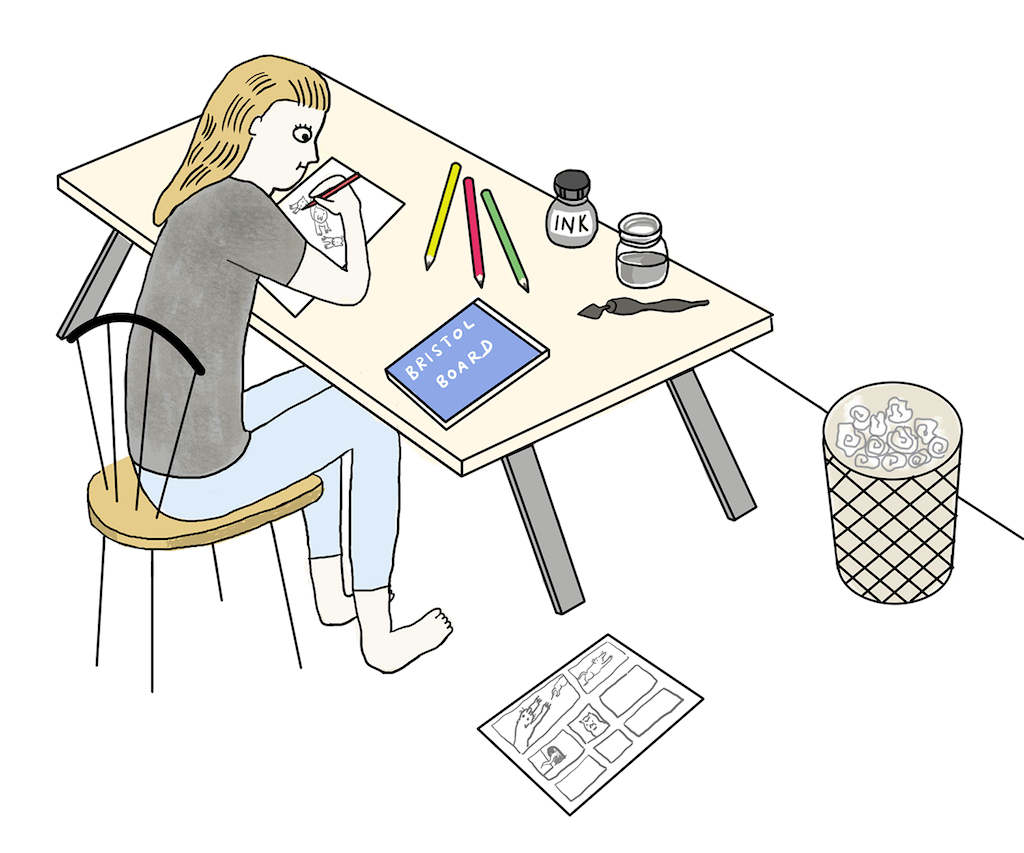
Materials needed
- A4 copy/printing paper
- HB pencil for light drawing
- Dip pen and waterproof Indian ink
- Bristol board (or any good quality card with a smooth, durable surface)
Step 1: Get ideas
Youd be surprised where you can take a small grain of an idea and develop it into an interesting comic. Think about a funny conversation you had, or any irrational fears, habits, dreams or anything else. Just start writing and drawing. Having ideas is hard, I know, but you will get some ideas when you start working.
One way to keep track of ideas is to keep a sketch diary, capturing funny conversations and other events you could use in comics later.
You might want to just sketch out the whole comic very roughly if that helps. I tend to sketch the story first, but it usually changes drastically during step 2.
Step 2: Edit your story using thumbnails
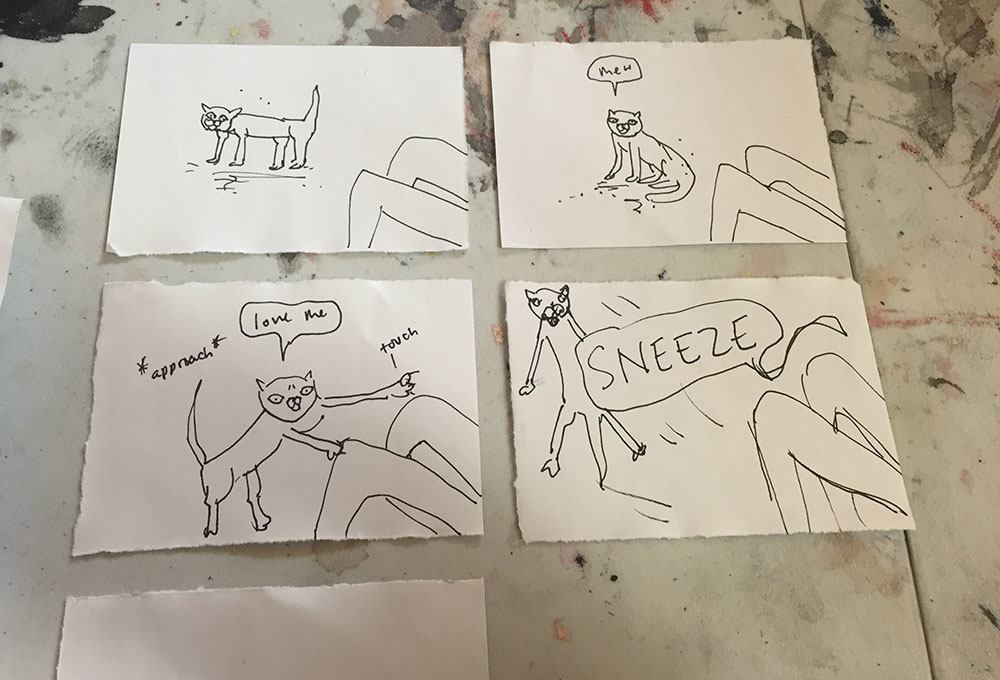
Why use thumbnails? You can move them around or get rid of them!
Drawings are harder and much slower to edit than words, so you need to draw something very quick and very rough. You dont have to care about drawing quality at this point.
You might already have a drafted comic from the previous step; now you can split each panel up into a thumbnail like the image above.
Get an A4 sheet of printing paper and tear it up into squares. A thumbnail equals a comic panel. Start drawing one panel per thumbnail. This way you can move scenes and parts of the story around as you work on the pacing. Its an extremely useful tip if you want to expand a moment in time or draw out a dialogue, or if you want to just completely cut scenes.
Step 3: Plan a layout
So youve got the story more or less down: you now need to know how theyll look on the page. Sketch a layout and arrange the thumbnails into the layout.
The simplest way to do this is to divide an A4 page into equal panels say, nine. But if you want, you can be more creative than that. The Gigantic Beard That Was Evil by Stephen Collins is an excellent example of the scope for using page layout creatively. You can really push the form: play with layout, scale, story and what you think of as a comic.
Step 4: Draw the comic
I recommend drawing on A4 Bristol board paper since it has a smooth surface, can tolerate a lot of rubbing out and holds ink well. You can get it from any art shop.
Using your thumbnails for reference, draw the comic lightly using an HB pencil. Dont make the line so heavy that it cant be erased (since youll ink over the lines later).
Step 5: Ink the comic

Youve drawn your story. Well done!
Now for the fun part. I recommend using a dip pen and some waterproof ink. Why waterproof? If you want, you can add an ink wash later, or even paint it.
If you dont have a dip pen, you could also use any quality pen. Carefully go over your pencilled lines with the pen, working from top left to right and down, to avoid smudging it. Its unfortunately easy to smudge the ink from the dip pen, so I recommend practising first.
Youve made a comic!
Step 6: Adding colour
Comics traditionally had a limited colour palette before computers (heres an in-depth explanation if youre curious). You can actually do a huge amount with a restricted colour palette. Ellice Weavers comics show how very nicely how you can paint your work using a restricted palette. So for the next step, resist the temptation to add ALL THE COLOURS and consider using a limited palette.
Once the ink is completely dry, erase the pencilled lines and youll be left with a beautiful inked black and white drawing.
You could use a computer for this part. You could also photocopy it and paint straight on the copy. If youre feeling really brave, you could paint straight on the original. But Id suggest not doing this if its your first try at painting!
What follows is an extremely basic guide for painting using Photoshop, but there are hundreds of brilliant articles out there and different techniques for digital painting.
How to paint your comic using Photoshop
- Scan the drawing and open it in Photoshop. You can adjust the levels (Image Adjustments Levels) to make the lines darker and crisper, and the paper invisible. At this stage, you can erase any smudges or mistakes. With a Wacom tablet, you could even completely redraw parts! Computers are just amazing. Keep the line art as its own layer.
- Add a new layer on top of the lines, and set the layer state from normal to multiply. This means you can paint your comic without obscuring your lines. Rename the layer something else, so you can keep track.
- Start blocking in colour. And once youre happy with that, experiment with adding tone and texture.
Christmas comic challenge!
Why not challenge yourself to make a short comic over Christmas? If you make one, share it in the comments. Or show me on Twitter Id love to see it.
Credit: Many of these techniques were learned on the Royal Drawing Schools brilliant Drawing the Graphic Novel course.
About the author
Rebecca Cottrell is an independent interaction designer, currently working with the Government Digital Service on GOV.UK. She lives in London, owns two adorable lovebirds, and likes drawing comics. Some of which you can see on her tumblr. She is on twitter.
Original Link: http://feedproxy.google.com/~r/24ways/~3/nC5DFSjDAFk/
24 Ways
More About this Source Visit 24 Ways