
An Interest In:
Web News this Week
- March 25, 2024
- March 24, 2024
- March 23, 2024
- March 22, 2024
- March 21, 2024
- March 20, 2024
- March 19, 2024
Some of Our Sources
- Slashdot
- Spoon Graphics
- Smashing Magazine
- Vandelay Design
- Fuel Your Creativity
- Web Designer Depot
- My Ink Blog
- Reencoded
- Wal You
- Specky Boy
Help Webnuz
Referal links:
Sharing Your Work in Scratch

If you've been working through this series, you've now completed your first Scratch project. The project is a simple game making use of a variety of techniques in Scratch.
Once you've created a few projects, you might want to share them with other Scratch users and with your friends if you're coding as part of a group.
In this tutorial I'll show you how to share your work, create studios for working collaboratively, and follow people.
What You'll Need
To complete this tutorial, you'll need:
- a free account with Scratch
- a web browser with access to Scratch (I recommend using a modern browser like Chrome, Firefox, Safari or Opera for the best experience)
Sharing Your Projects
Sharing your projects will make them public so anyone can see them, whether they've got a Scratch account or not. As the purpose of Scratch is to create a community of coders looking at and learning from each other's work, this is a great thing to do.
To share your project, open its main project page (not the 'See Inside' page). If you haven't shared your project yet, Scratch will show you a message telling you this:

To share it, just click the Share button. Simple!
Following Other Scratch Users
Scratch is a very sociable place: there are millions of users sharing their work every day, with nearly 10 million projects shared at the time of writing. Finding the projects you really want to view and learn from amongst all these can be tricky.
Scratch selects some featured projects on a rolling basis and displays them on the home page, but you can tailor what you see by following other Scratch users. There are two ways to do this:
- Look at some of the featured projects on the home page and in the Explore pages. If you click on the username of someone who's posted some projects you like, you'll see their user page. Click the Follow button to follow them.
- Use the search field in the admin bar to find a user you know about (maybe one of your friends). When you've found their user page, click on the Follow button to follow them.
Here's an example User page (mine):

This gives you more information about the user. Note that there isn't a Follow button in the screenshot because I can't follow myself. If you scroll down you can see my studios and who I'm following:
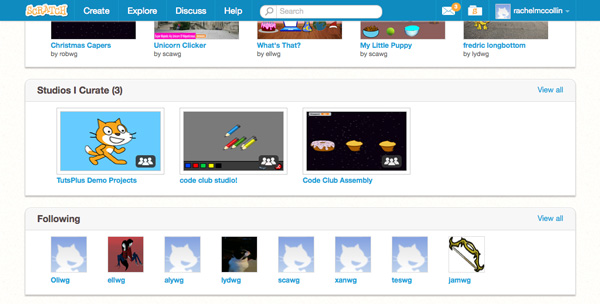
If you find a user you like, it might be worth checking out the people they follow, and then following them too.
Working With Studios
Studios are useful when you're working with a group of people or if you have a group of friends and want to easily be able to see each other's work. It's also a way to keep a group of related projects together, a bit like a playlist in YouTube.
Example studios I've created include one for all the members of my code club where we share our work each week, and one for this tutorial series which acts more like a playlist.
Creating a Studio
To create a studio, go to the My Stuff page in Scratch, either by clicking My Stuff in the dropdown menu under your username in the admin bar, or by clicking the S icon to the left of your username:
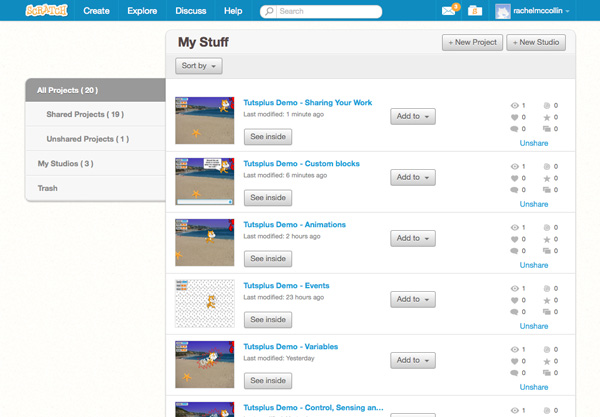
Click on the + New Studio button at the top right of the page to add a new studio:

To name the studio, click in the Untitled Studio field and type the new name. You can add an image for your studio on the left and a description of the studio beneath that. You can also define whether you want anyone to be able to add projects to your studio. If you don't check that box, only your studio's members (or Curators) will be able to add projects to it.
Here's my studio with a title, image and description added:

Adding Curators to Your Studio
The members of your studio are known as Curators. If you add Scratch users as curators for your studio, they can add projects to it, and it will appear in their studios list in the My Stuff page.
To add a curator to your studio, click on the Curators tab. You'll se that the studio already has one Manager, and that's you as you're the studio's owner. Once you've invited people to become curators and they've accepted, you can upgrade them to managers if you'd like. Managers can add and remove curators.
Click the Invite curators button to invite someone to join your studio:

A list of the Scratch users you follow will appear at the bottom of the screen, and you can either select one of them or type in the username of the person you want to add.
The user won't automatically be added to your studio: instead they'll be sent a message asking them to join, which they'll need to accept.
Adding Your Projects to a Studio
For a studio to be useful, you need to add some projects to it. There are two ways to do this:
- In the studio page, click the Add projects button, and then select from your projects.
- In the project page, click the Studios link below the project details:

Then click the tick next to the studio you want to add your project to. The tick will become green.
Summary
Sharing your work and looking at other people's work is what brings Scratch to life. It's a great way to get inspiration for new projects and solutions to problems you're trying to solve in your projects. It's also lots of fun!
Now that you know how to create a project in Scratch, use a variety of assets and blocks, and share your work, there's nothing stopping you. Good luck with your Scratch coding!
Original Link:
TutsPlus - Code
 Tuts+ is a site aimed at web developers and designers offering tutorials and articles on technologies, skills and techniques to improve how you design and build websites.
More About this Source Visit TutsPlus - Code