
An Interest In:
Web News this Week
- April 18, 2024
- April 17, 2024
- April 16, 2024
- April 15, 2024
- April 14, 2024
- April 13, 2024
- April 12, 2024
Some of Our Sources
- Technology Review
- Simplebits
- Pearsonified
- Creative Curio
- FanExtra - PSD
- Noupe
- Crazy Leaf Design
- Web Design Ledger
- Reencoded
- Web Resource Source
Help Webnuz
Referal links:
An Introduction to Android's Spelling Checker Framework
Introduction
If you are creating a custom IME (Input Method Editor) or a language processing app, you can use Android's spelling checker framework to quickly add spell check functionality to your app without having to deal with low level tasks, such as maintaining word-lists or determining Damerau-Levenshtein distances between words.
The framework can also be used to create a custom spell checker (say for a new language or for a specific domain) that other apps can use.
This tutorial first shows you how to use the framework to interact with Android's default spell checker, and then moves on to cover the basics of developing a custom spell checker.
1. Interacting With a Spell Checker
Step 1: Create an Activity
Before we dive into the framework, let us first create an Activity that can display results of spell checks.
Create a new Java class called SpellingsClient that extends Activity. This class must also implement the SpellCheckerSession.SpellCheckerSessionListener interface to interact with Android's spell checker services. In Android Studio, you can press Alt+Insert to automatically generate empty stubs for methods of the interface.
As this Activity is going to have only one TextView in its layout, you don't need to create a layout XML for it. Override the onCreate method to initialize the TextView and pass it to the setContentView method so that it takes up the entire screen.
At this point, your class should look like this:
public class SpellingsClient extends Activity implements SpellCheckerSession.SpellCheckerSessionListener {

    private TextView suggestions;

@Override
    protected void onCreate(Bundle savedInstanceState) {
        super.onCreate(savedInstanceState);

        suggestions = new TextView(this);

        setContentView(suggestions);
}

    @Override
    public void onGetSuggestions(SuggestionsInfo[] results) {
    }

    @Override
    public void onGetSentenceSuggestions(SentenceSuggestionsInfo[] results) {
}
}
Step 2: Send Data to the Default Spell Checker
Let us now pass a sentence containing multiple misspelled words to Android's default spell checker. Create a method named fetchSuggestionsFor that accepts a String as a parameter.
private void fetchSuggestionsFor(String input){

}
Because the spell checker Service is a part of the Text Services API, you have to use the getSystemService method to retrieve an instance of TextServicesManager. You can then call the newSpellCheckerSession method to create a new session, which can be used to send data to the spell checker. Add the following code to the method:
TextServicesManager tsm =
    (TextServicesManager) getSystemService(TEXT_SERVICES_MANAGER_SERVICE);

SpellCheckerSession session =
tsm.newSpellCheckerSession(null, Locale.ENGLISH, this, true);
Make sure the Locale you pass to newSpellCheckerSession matches the language of your input sentence.
Now that the session is ready, you can call getSentenceSuggestions to get spelling suggestions for one or more sentences.
The getSentenceSuggestions method takes two parameters. The first parameter is an array of TextInfo objects. You use the constructor of the TextInfo class to convert a String into a TextInfo object. The second parameter is an int that specifies the number of suggestions that should be generated. For this example, let us set it to 5.
Add the following code to the method:
session.getSentenceSuggestions(
    new TextInfo[]{ new TextInfo(input) },
    5
);
Finally, call fetchSuggestionsFor in the onCreate method of the Activity.
// Passing a sentence which has two
// misspelled words

fetchSuggestionsFor("Peter livs in Brlin");
Note that the getSentenceSuggestions method was introduced in API Level 16. Prior versions of the API used the, now deprecated, getSuggestions method.
Step 3: Display the Suggestions
The getSentenceSuggestions method interacts with the spell checker asynchronously. When the suggestions have been generated, the onGetSentenceSuggestions method is called.
The suggestions for each input sentence are available in a separate SentenceSuggestionsInfo object. Each SentenceSuggestionsInfo object contains multiple SuggestionsInfo objects, usually for each word of the sentence. Each SuggestionsInfo object contains the actual suggestions for a word in the form of String objects.
For this example, let us simply loop through all the suggestions and append them to a StringBuffer. Use getSuggestionsCount to determine the number of suggestions available and getSuggestionInfoAt to get a reference to a particular SuggestionInfo.
Add the following code to the onGetSentenceSuggestions method:
final StringBuffer sb = new StringBuffer("");
for(SentenceSuggestionsInfo result:results){
    int n = result.getSuggestionsCount();
    for(int i=0; i < n; i++){
        int m = result.getSuggestionsInfoAt(i).getSuggestionsCount();

        for(int k=0; k < m; k++) {
            sb.append(result.getSuggestionsInfoAt(i).getSuggestionAt(k))
                    .append("\n");
        }
        sb.append("\n");
    }
}
You can now use the TextView's setText method to render the contents of the StringBuffer. However, you cannot call the method directly, because onGetSentenceSuggestions runs on its own thread. Attempting to make changes in the user interface from a non-UI thread will lead to a runtime exception. Therefore, make sure you call the setText method from inside the runOnUiThread method.
runOnUiThread(new Runnable() {
    @Override
    public void run() {
        suggestions.setText(sb.toString());
    }
});
If you run your app now, the output will look like this:

As you can see, our app is currently showing suggestions for all the words in the sentence, even for the ones with correct spelling.
To only show suggestions for misspelled words, we will have to look at the flags associated with each SuggestionsInfo object. A SuggestionsInfo object for a misspelled word has the RESULT_ATTR_LOOKS_LIKE_TYPO flag set. Therefore, we must add code to ignore SuggestionsInfo objects where this flag is not set.
Add the following code to the onGetSentenceSuggestions method before the innermost loop begins:
if((result.getSuggestionsInfoAt(i).getSuggestionsAttributes() &
    SuggestionsInfo.RESULT_ATTR_LOOKS_LIKE_TYPO) != SuggestionsInfo.RESULT_ATTR_LOOKS_LIKE_TYPO )
    continue;
Run the app again to see the changed output.

2. Creating a Custom Spell Checker
Now that you know how to interact with the default spell checker, let us move on to creating a custom spell checker.
Step 1: Create a Service
Create a new Java class named SpellingService. For a class to be treated as a spell checker by the Android system, it must extend the SpellCheckerService class and override the createSession method.
Add the following code to SpellingService.java:
public class SpellingService extends SpellCheckerService {

    @Override
    public Session createSession() {

    }

}
Step 2: Create a Session
All the custom spell checking logic resides in the Session. Create a new class named MySpellingSession that extends Session. You can create it as a subclass of SpellingService.
The Session class is an abstract class. After overriding all the abstract methods, your class should look like this:
class MySpellingSession extends Session {
    @Override
    public void onCreate() {
    }

    @Override
public SuggestionsInfo onGetSuggestions(TextInfo textInfo, int suggestionsLimit) {
}

@Override
    public SentenceSuggestionsInfo[] onGetSentenceSuggestionsMultiple(TextInfo[] textInfos, int suggestionsLimit) {
}
}
For this tutorial, let us create a very simple spell checker that has the following features:
- It treats the word "Peter" as a typo.
- It returns five alternative spellings for the word "Peter".
The code to implement these features can be added to the onGetSuggestions method, because it is supposed to handle individual words (in the form of a TextInfo objects).
Extract the word using the getText method and check if it is equal to "Peter". If it is, add the appropriate suggestions to an array of String objects. If it is not, keep the array empty.
Finally, create and return a new SuggestionsInfo object that contains the array of suggestions along with the flag RESULT_ATTR_LOOKS_LIKE_TYPO. The actual code could look like this:
String word = textInfo.getText();
String suggestions[] = null;
if(word.equals("Peter")){
    suggestions = new String[]{"Pedro", "Pietro", "Petar", "Pierre", "Petrus"};
}else{
    suggestions = new String[]{};
}
SuggestionsInfo suggestionsInfo = new
    SuggestionsInfo(SuggestionsInfo.RESULT_ATTR_LOOKS_LIKE_TYPO, suggestions);
return suggestionsInfo;
We are not done yet. The SpellingsClient class we created earlier passed entire sentences to the spell checker, not individual words. That means the onGetSuggestions method will never get called directly. Therefore, we need to write code that can split the sentences into words and pass them as arguments to the onGetSuggestions method. This code has to be added to the onGetSentenceSuggestionsMultiple method.
Here's what you do in the onGetSentenceSuggestionsMultiple method:
- Loop through the array of
TextInfoobjects it receives as input and convert each sentence into an array of words using thesplitmethod. - Convert each word into a
TextInfoobject and pass it as an argument to theonGetSuggestionsmethod. - Add the suggestions returned to an
ArrayListofSuggestionsInfoobjects. - Create and return a new array of
SentenceSuggestionsInfoobjects using theArrayListofSuggestionsInfoobjects.
Add the following code to the onGetSentenceSuggestionsMultiple method:
List<SuggestionsInfo> suggestionsInfos = new ArrayList<>();

for(int i=0; i<textInfos.length; i++){
    TextInfo cur = textInfos[i];

    // Convert the sentence into an array of words
    String words[] = cur.getText().split("\\s+");
    for(String word:words){
        TextInfo tmp = new TextInfo(word);
        // Generate suggestions for each word
        suggestionsInfos.add(onGetSuggestions(tmp, suggestionsLimit));
    }
}
return new SentenceSuggestionsInfo[]{
        new SentenceSuggestionsInfo(
                suggestionsInfos.toArray(new SuggestionsInfo[suggestionsInfos.size()]),
                new int[suggestionsInfos.size()],
                new int[suggestionsInfos.size()]
        )
};
Now that the custom Session class is ready, create and return an instance of it in the service's createSession method:
return new MySpellingSession();
Step 3: Create the Metadata for the Service
Create a new XML file called spellinginfo.xml in the res/xml folder. This file is used by the Android system to determine the name of the spell checker and the languages it supports. Let's call our spell checker My Spell Checker. Add the following code to the file:
<?xml version="1.0" encoding="utf-8"?>
<spell-checker xmlns:android="https://schemas.android.com/apk/res/android"
    android:label="@string/service_label"
    >

    <subtype
        android:label="English"
        android:subtypeLocale="en"
        />

</spell-checker>
Update your values/strings.xml so that it has service_label:
<string name="service_label">My Spell Checker</string>
Step 4: Update the Manifest
Any Service that wants to behave as a spell checker must request the android.permission.BIND_TEXT_SERVICE permission and respond to the android.service.textservice.SpellCheckerService action. It should also contain a reference to the metadata XML we defined in the previous step. Define SpellingService by adding the following code to your AndroidManifest.xml:
<service android:name=".SpellingService"
    android:permission="android.permission.BIND_TEXT_SERVICE"
    >
    <intent-filter >
        <action android:name="android.service.textservice.SpellCheckerService" />
    </intent-filter>

    <meta-data
        android:name="android.view.textservice.scs"
        android:resource="@xml/spellinginfo" />
</service>
Step 5: Activate the New Spell Checker
If you compile and run your app now, you will see no difference in the output of your Activity. This is because it is still using the default Android spell checker. To activate your custom spell checker, go to the Settings app and pick your spell checker in the Language and Input section.
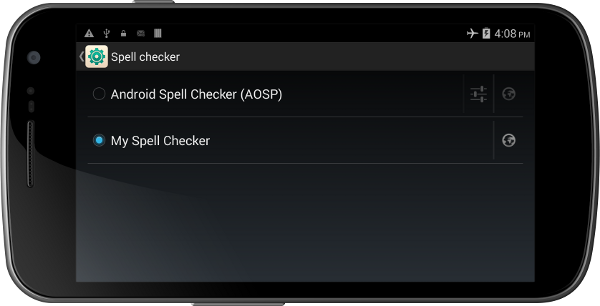
Once activated, if you restart the app, you will see suggestions only for the word "Peter".

Conclusion
In this tutorial, you learned how to communicate with Android's spell checker services to perform spell check operations in your app. You also learned how to create your own custom spell checker. You can use this knowledge to create not only better IMEs, but also fully fledged spell checkers for languages that are currently not supported by Android by default. To know more about the TextServices API and the Spelling Checker framework, refer to the Android Developers Reference.
Original Link:
TutsPlus - Code
 Tuts+ is a site aimed at web developers and designers offering tutorials and articles on technologies, skills and techniques to improve how you design and build websites.
More About this Source Visit TutsPlus - Code