Online payments are increasingly becoming more and more popular. GoCardless is yet another payment service, which currently works in the UK, allowing you to accept payments online.
What is GoCardless?
GoCardless does not accept card payments. Instead, they base their payment system on direct debits.
GoCardless enables you to accept payments in a quick and easy fashion. The service currently works in the UK only; however, their FAQ page states that they have plans expand the availability of GoCardless to more regions. GoCardless boasts a service with no set up fees, no monthly minimums, and no hidden charges. They charge 1% per transaction, up to a maximum of £2.00.
GoCardless currently offers two ways to use their service:
PayLinks generate a simple URL which you can share with whoever you like. Navigating to these links allows the visitor to make a payment to your account. No programming required!
The API gives you a lot more power than PayLinks; however, it requires more work to get set up.
In this tutorial, I will give you a quick introduction to using PayLinks and the API.
After the initial sign up screen, a few more questions ask if you are collecting money on behalf of a charity, a business, or an individual; you also have to answer a few security related questions. After logging in, you can begin to create some PayLinks. The interface for doing so is rather simple:
After creating a PayLink, you now have a link that you can distribute to others. Here is one I created (note: don’t submit any details; the link is for demonstration purposes only!): https://gocardless.com/pay/6MG3GG5H
Browsing to that URL presents the user with a page that looks like the following image:
Be sure to check out the dashboard once your link is live. It provices you with up to date information on who has been paying and how much they paid.
Examples uses of PayLinks:
Accepting donations
A freelancer wanting to offer a link to their clients for payment
Sharing a link between friends in order to split the cost of something
The FAQ is a must read if you are considering integrating GoCardless into your site.
GoCardless does not take card payments. Instead, they base their payment system on direct debits. Users make payments on a page hosted by GoCardless, as opposed to a page on your domain. This may be fine for you, but some companies may wish to keep everything hosted on their own website. Stripe, another online payment service (although US only), allows developers to flow the payment through their own website. See their useful guide Building a payment form which gives a nice introduction to Stripe. SagePay is another service that allows self-hosted payment processing.
Secure Sockets Layer (SSL) is absolutely necessary in situations like these. When using GoCardless, however, the user is redirected to an SSL enabled website where all details are handled securely. That being said, having SSL on your own website can help with the perceived security of your site. That’s not to say that enabling SSL protects your website from cross-site scripting, SQL injection, server exploits, etc, but it does encrypt the connection between your website and the client. This encrypted connection encourages users to proceed with a transaction. Naturally, this is just one of the benefits of SSL; see this article for other benefits. If SSL sounds interesting to you, then this section will give a brief overview on setting it up.
Acquiring a SSL certificate involves steps similar to the following:
The GoCardless API s very well documented and provides very useful features.
Deciding who to purchase a SSL certificate from is one of trickiest parts to setting up SSL. gandi.net offers a 1-year free SSL certificate when you purchase a domain from them. GoDaddy, VeriSign and GeoTrust, and just about any domain registrar also offer SSL certificates with a wide range of prices. StartSSL seems to offer a free SSL certificate.
Most certificate providers provide server-specific documentation on how to get started with SSL. If your chosen provider does not, check the documentation of your hosting company. On my personal server (a Ubuntu install), here’s essentially what I had to do.
Install OpenSSL
Create a Certificate Signing Request
Download the signed certificate from my provider and save it on the server.
Download the CA Root Certificate
Get Apache to serve my website based on the virtual host configuration with SSL enabled
In the command line: (many commands have been left out, specific commands may change when servers are updated so it’s best to check their documentation and use that)
#install opensslapt-get install openssl#generate csropenssl req -new -nodes -days 365 -keyout www.mydomain.com.key -out www.mydomain.com.csr -newkey rsa:2048#after having retrieved the signed certificate from my provider and copying it onto the server, configure apache virtual hosts<VirtualHost 12.34.56.78:443>SSLEngine OnSSLCertificateFile /etc/apache2/ssl/www.mydomain.com.crtSSLCertificateKeyFile /etc/apache2/ssl/www.mydomain.com.keySSLCACertificateFile /etc/apache2/ssl/verisign.cerServerAdmin [email protected] www.mydomain.comDocumentRoot /srv/www/mydomain.com/public_html/ErrorLog /srv/www/mydomain.com/logs/error.logCustomLog /srv/www/mydomain.com/logs/access.log combined</VirtualHost>
The above commands are taken from the excellent Linode documentation on SSL certificates. Other useful links are:
GoCardless enables you to accept payments in a quick and easy fashion.
Alternatively, if you want to try out HTTPS but either don’t have the money, or don’t want to spend the money, you can check out self-signed certificates (Ubuntu, CentOS & IIS 7) .
Once you have SSL set up, you get a shiny padlock in our address bar! As an aside, secure other parts of your website. As mentioned earlier, SSL simply encrypts the connection. Check out the OWASP Top Ten Project for common vulnerabilities found within web applications.
A Quick Note on Performance
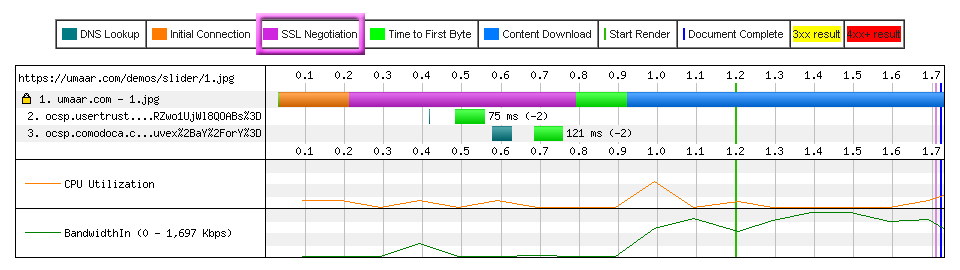
You may occasionally hear that SSL is bad for performance and impacts load time. This is true to some extent, but results greatly vary. I ran a quick test using a 140kb image on my server (a kitten, of course). To test the load times over HTTP and HTTPS I used the excellent webpagetest.org.
The results are interesting. The HTTP version of the image had a 1.168s load time with Content Download beginning just after 0.3 seconds. The HTTPS results were rather different, there’s a 1.722s load time with Content Download occurring just after 0.9 seconds. If you look at the HTTPS results, you’ll notice a pink portion on the graph; this represents SSL negotiation and does not occur on a HTTP only request. The SSL negotiation has added roughly 581ms to the request.
GoCardless API
The GoCardless API s very well documented and provides very useful features. You can find client libraries for PHP (docs), Python (docs), .NET (docs) & Ruby (docs). To test our payments in a sandbox environment, you can use the following details:
Account number: 55779911
Sort code: 20-00-00
Tip: If you are considering implementing GoCardless, it may be a good idea to register. When browsing the documentation, certain parts are actually customised, and in some cases, you can copy and paste examples that contain your access token and other bits of data. This is exceptionally handy when exploring the API.
As in the CURL example above, sometimes a portion of the response is shown in the webpage. This is useful, and you can specify your preferred format for responses by passing a certain header or by appending .json/.xml to the URL (the default response format is XML). For example:
#Get a JSON responsecurl -H "Authorization: bearer access_token" https://sandbox.gocardless.com/api/v1/merchants/247.json#Get an XML responsecurl -H "Authorization: bearer access_token" -H "application/xml" https://sandbox.gocardless.com/api/v1/merchants/247
Retrieving your merchant details demontsrates the idea of “resources,” which is contained within the sub_resource_uris block of the response. The URL structure is fairly intuitive; each resource URL is very similar to the original request. Take a look at the following example using a JSON structure:
To get a list of your users, simply append /users to the request. GoCardless also offers a few subresources:
Users: a list of a merchant’s customers; contains information such as User ID, when their account was created, first and last names.
Bills: a list of bills (bills are one off) made with the merchant; contains information such as total amount billed, GoCardless fees, a user ID, currency and more.
Pre Authorizations: similar to bills, a bill can be made using an existing pre-authorization, a user’s immediate permission would not be required (assuming it was already given). Data includes an interval, status, a maximum amount which can be charged and more.
Subscriptions: your subscriptions contains data like amount, interval length, user ID, upcoming interval date, status and more.
These code examples can be viewed in the tutorial demo; they are fairly simple and common things a developer may want to make use of when implementing GoCardless into their website.
Creating a new bill (for £10):
$payment_details = array('amount' => '10.00','name' => 'A short description');$billURL = GoCardless::new_bill_url($payment_details);/**$billURL will now contain something like: https://sandbox.gocardless.com/connect/bills/new?bill%5Bamount%5D=30.00&bill%5Bmerchant_id%5D=247&bill%5Bname%5D=Donation&client_id=....* The URL can now go into an anchor tag*/
Creating a new subscription URL (for £4.99 Every 3 Months):
$payment_details = array( 'amount' => '4.99', 'interval_length' => '3', 'interval_unit' => 'month');$subscription_url = GoCardless::new_subscription_url($payment_details);/** Just like with creating a new bill, we can insert $subscription_url into the href attribute of an anchor tag*/
Getting your merchant details:
$merchant = GoCardless_Merchant::find('247');
Retrieving the details of a specific user:
$user = GoCardless_Bill::find('438');
Retrieving the details of a specific bill:
$bill = GoCardless_Bill::find('043RVT596Q');
GoCardless Interface
The GoCardless interface is rather easy to navigate (using the sandbox as an example). Once logged in, you can access your homepage at sandbox.gocardless.com. You’ll be able to see an overview of inbound and outbound payments.
As shown below, you can view how a particular payment has progressed. Data can exported as CSV if required.
The Developer tab contains your app identifier, app secret, merchant access token and merchant ID which you’ll need when using the API. You may also provide a redirect URI: where your customers are redirected after making a payment.
Hopefully, that’s enough to give you a basic overview of what GoCardless can offer you, and help you decide whether the service will meet your requirements. Thanks for reading!
Tuts+ is a site aimed at web developers and designers offering tutorials and articles on technologies, skills and techniques to improve how you design and build websites.


 Tuts+ is a site aimed at web developers and designers offering tutorials and articles on technologies, skills and techniques to improve how you design and build websites.