
An Interest In:
Web News this Week
- March 27, 2024
- March 26, 2024
- March 25, 2024
- March 24, 2024
- March 23, 2024
- March 22, 2024
- March 21, 2024
Some of Our Sources
- Technology Review
- Smashing Apps
- You The Designer
- My Ink Blog
- Reencoded
- CSS Globe
- CSS Tricks
- Freelance Switch
- Android Dissected
- Daily Now
Help Webnuz
Referal links:
Build an Admin Panel with the Fuel PHP Framework
In the first part of this series, we took a look at the basics of the FuelPHP framework. In this second-part, we’ll be stepping it up a gear and move onto some more advanced topics! We’ll be creating an admin panel for our application, cover the common uses of the ORM and use the Authentication package to restrict access.
Join me after the break to get started!
Introduction
Since the first article Fuel has been renamed to FuelPHP. Also unlike the first article which was based on v1.0.1 this article requires v1.1.0 so a few little things are different. All the theory you have learnt from the first article is still accurate and not much has changed so this should be easy.
Step 1 - Set Up Oil
If you have not already installed the command-line utility oil and are lucky enough to be running on Linux, Mac, Solaris, etc then do so with the following command:
$ curl get.fuelphp.com/oil | sh
Step 2 - Create a New App
The oil command will help you create new projects with a few key-strokes and alias php oil when inside your FuelPHP applications:
$ oil create Sites/blog$ cd Sites/blog
This will set up a blog application for us and assuming you have Apache or some other web server running on your “Sites” folder you should be able to load the following URL and see the welcome page.

Now that FuelPHP is alive and your web server is clearly working, we can start configuring our app.
Step 3 - Configuring Your App
Open up your favourite editor and we’ll start by setting up a database connection and configure the application. This is almost identical to v1.0.x, so create a database and set up your SQL users however you normally do. When it comes to database config there are two differences:
- PDO is now the default driver
- FuelPHP v1.1 has environment-based config folders now.
These changes are pretty simple, but you can swap back to using the native MySQL driver if you like. PDO is more useful for developers as it means that your application will work with just about any database engine not just the few that had specific FuelPHP drivers built for them. That means this could just as easily be SQLite or PostgreSQL.
Just open up fuel/app/config/development/db.php and modify your config, where dbname=blog is whatever your database is called and your own username and password for the database server:
return array( 'default' => array( 'connection' => array( 'dsn' => 'mysql:host=localhost;dbname=blog', 'username' => 'root', 'password' => 'password', ), ),);
Next you will just need to open fuel/app/config/config.php and enable the auth and orm packages as suggested in the first post.
/**************************************************************************//* Always Load *//**************************************************************************/'always_load' => array('packages' => array('auth','orm',),In this config file, we need to make one small change to the whitelisted_classes array which will allow us to pass validation objects to the view:
'whitelisted_classes' => array('Fuel\\Core\\Response','Fuel\\Core\\View','Fuel\\Core\\ViewModel','Fuel\Core\Validation','Closure',),Setting up Groups
The auth package included with FuelPHP is driver based and by default we are using “SimpleAuth” which is the only driver included in the package. When you are more experienced with FuelPHP, you can start to create custom drivers to integrate with other users’ systems – such as third-party forums, content management systems, etc.
To enable groups for SimpleAuth, we simply open up fuel/packages/auth/config/simpleauth.php and set groups to the following:
return array( 'groups' => array( -1 => array('name' => 'Banned', 'roles' => array('banned')), 0=> array('name' => 'Guests', 'roles' => array()), 1=> array('name' => 'Users', 'roles' => array('user')), 50 => array('name' => 'Moderators', 'roles' => array('user', 'moderator')), 100 => array('name' => 'Administrators', 'roles' => array('user', 'moderator', 'admin')), ),);These could, of course, be anything, but are pretty standard for most apps and will work for this tutorial.
Step 4 - Creating Users
As we are building an admin panel, we need to create the users table and then populate it with a user record who will be the first administrator. We could use something like phpMyAdmin or a GUI like Navicat, but it’s better to do things via Oil so we stay within our codebase. This means password hashing is salted correctly with whatever driver is being used – and is how we’ll be doing it:
$ oil generate model users username:varchar[50] password:string group:int email:string last_login:int login_hash:string profile_fields:text Creating model: /Users/phil/Sites/blog/fuel/app/classes/model/user.php Creating migration: /Users/phil/Sites/blog/fuel/app/migrations/001_create_users.php$ oil refine migrate
This creates a user model for us and creates another migration that will build our user table when the oil refine migrate task is run. Next we have to create an Administrator user, which, again, we could do via a GUI but where’s the fun in that?
$ oil consoleFuel 1.1-rc1 - PHP 5.3.6 (cli) (Sep 8 2011 19:31:33) [Darwin]>>> Auth::create_user('admin', 'password', '[email protected]', 100);1-- Ctrl + C to exitWe’ve used the Oil Console to write code in real-time and get a response. Auth::create_user() was passed a username, password, email address and the group_id for admins, which for now we’ll just use 100 – which we set in the config. The 1 is a response from the code, which means user_id has a value of 1.
Step 5 - Code Generation
Generators are a great way to build a bunch of code from scratch and getting a running start.
As explained in the first article we can use scaffolding to build large chunks of an application quickly. This is done through the oil command and is all very optional, but it is a great way to build a bunch of code from scratch. Some people look at code generation as “tools for people who don’t know how to code” or think its some kind of black magic, but if you are new to a framework and do not want to have to learn how to put everything together then having a system make code for you is not such a bad thing.
FuelPHP v1.1 takes the code generation one small step further. Instead of just creating scaffolding (unprotected CRUD) you can now generate Admin code. This works in exactly the same way but implements a simple admin template, admin controller, etc and uses the auth package to lock down your generated code. Taking advantage of the Twitter Bootstrap, this all looks good enough to use and with only a bit of tweaking you’ll have an app that you can ship.
This is done via the command line using the oil command. We’ll generate some code then walk through it.
$ oil generate admin posts title:string slug:string summary:text body:text user_id:intCreating controller: /Users/phil/Sites/blog/fuel/app/classes/controller/base.phpCreating controller: /Users/phil/Sites/blog/fuel/app/classes/controller/admin.phpCreating views: /Users/phil/Sites/blog/fuel/app/views/admin/template.phpCreating views: /Users/phil/Sites/blog/fuel/app/views/admin/dashboard.phpCreating views: /Users/phil/Sites/blog/fuel/app/views/admin/login.phpCreating migration: /Users/phil/Sites/blog/fuel/app/migrations/002_create_posts.phpCreating model: /Users/phil/Sites/blog/fuel/app/classes/model/post.phpCreating controller: /Users/phil/Sites/blog/fuel/app/classes/controller/admin/posts.phpCreating view: /Users/phil/Sites/blog/fuel/app/views/admin/posts/index.phpCreating view: /Users/phil/Sites/blog/fuel/app/views/admin/posts/view.phpCreating view: /Users/phil/Sites/blog/fuel/app/views/admin/posts/create.phpCreating view: /Users/phil/Sites/blog/fuel/app/views/admin/posts/edit.phpCreating view: /Users/phil/Sites/blog/fuel/app/views/admin/posts/_form.phpCreating view: /Users/phil/Sites/blog/fuel/app/views/template.php
This is quite a bit of code because it is the first time it has been run. FuelPHP will set up a few basic templates and files, then build the MVC components for the posts section. Remember, this is just like writing the code yourself, but quicker. You can take a look at this output by going to /blog/public/admin/posts:

Understanding Controllers
We’ve added a Controller_Base which will contain logic for your entire app, so every controller can extend from this. The file simply contains:
abstract class Controller_Base extends Controller_Template {public function before(){parent::before();// Assign current_user to the instance so controllers can use it$this->current_user = Auth::check() ? Model_User::find(Arr::get(Auth::get_user_id(), 1)) : null;// Set a global variable so views can use itView::set_global('current_user', $this->current_user);}}By extending Controller_Template, all views will be wrapped by a template automatically. Then in the before() function we do a little bit of logic to get the current user and make it available as $this->current_user in controllers and $current_user in views.
Another controller will be built called Controller_Admin which extends Controller_Base, so as well as having the current user being built we can check to see if a user is actually an admin:
abstract class Controller_Admin extends Controller_Base {public $template = 'admin/template';public function before(){parent::before();if ( ! Auth::member(100) and Request::active()->action != 'login'){Response::redirect('admin/login');}}// ....}You’ll notice that this controller sets a custom template so instead of looking for fuel/app/views/template.php, it will look for fuel/app/views/admin/template.php. Then if a user does not match member(100) – the admin group ID set earlier – they will be sent off the the login page.
Extending Controllers
One very handy feature that FuelPHP has is to allow you to extend other controllers. Normally they are just loaded directly by the Request class after being routed to by the URL, but sometimes it is useful to extend controllers to share logic or methods. In this case, we are already checking permissions in Controller_Admin so we can extend that controller to reuse this logic.
Controller_Admin_Posts extends Controller_Admin. This means it contains the same before() check and therefore is protected in the same way as any other controller in your admin panel.
Now What?
Code generation is basically just the first step in working on an application. We still need to tweak our forms and create a frontend. For example, if you go to create or edit a post it will show the user_id field as a text box.
Step 6 - Updating the CRUD Forms
We’re going to want to modify our action_create() method in fuel/app/classes/admin/posts.php so we have a list of users available. To do this we can replace the method with this code:
public function action_create($id = null){$view = View::forge('admin/posts/create');if (Input::method() == 'POST'){$post = Model_Post::forge(array('title' => Input::post('title'),'slug' => Inflector::friendly_title(Input::post('title'), '-', true),'summary' => Input::post('summary'),'body' => Input::post('body'),'user_id' => Input::post('user_id'),));if ($post and $post->save()){Session::set_flash('success', 'Added post #'.$post->id.'.');Response::redirect('admin/posts');}else{Session::set_flash('error', 'Could not save post.');}}// Set some data$view->set_global('users', Arr::assoc_to_keyval(Model_User::find('all'), 'id', 'username'));$this->template->title = "Create Post";$this->template->content = $view;}This is the same as the code before with two changes:
$view = View::forge('admin/posts/create');This creates a new View object. We can assign properties to this view by setting them as properties, so our users data can be passed easily and would normally work a little like this:
$view->users = array(1 => "User 1", 2 => "User 2");
Now we make a similar update to action_edit():
public function action_edit($id = null){$view = View::forge('admin/posts/edit');$post = Model_Post::find($id);if (Input::method() == 'POST'){$post->title = Input::post('title');$post->slug = Inflector::friendly_title(Input::post('title'), '-', true);$post->summary = Input::post('summary');$post->body = Input::post('body');$post->user_id = Input::post('user_id');if ($post->save()){Session::set_flash('success', 'Updated post #' . $id);Response::redirect('admin/posts');}else{Session::set_flash('error', 'Could not update post #' . $id);}}else{$this->template->set_global('post', $post, false);}// Set some data$view->set_global('users', Arr::assoc_to_keyval(Model_User::find('all'), 'id', 'username'));$this->template->title = "Edit Post";$this->template->content = $view;}However, because the create.php and edit.php views share a theme partial _form.php, and properties only set variables to that one specific view we need to use the View::set_global() method:
$view->set\_global('users', Arr::assoc_to_keyval(Model\_User::find('all'), 'id', 'username'));This uses the Model_User object to get all of our users, then flattens them to an associative array for our form.
The HTML now needs to change, so delete the div wrapping “slug” – we’ll do that ourselves and change the user_id field from being a input box to a select box:
<div class="clearfix"><?php echo Form::label('User', 'user_id'); ?><div class="input"><?php echo Form::select('user_id', Input::post('user_id', isset($post) ? $post->user_id : $current_user->id), $users, array('class' => 'span6')); ?></div></div>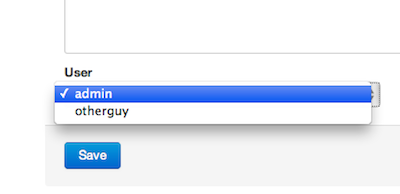
This will set the box to show all users and default to the current logged in user if none are provided. That is the only tweak we need to make at this point, so let’s make a frontend!
The Frontend
Creating a basic blog frontend is really simple so won’t worry about using code generation.
Create a new controller fuel/app/classes/controller/blog.php:
class Controller_Blog extends Controller_Base{public function action_index(){$view = View::forge('blog/index');$view->posts = Model_Post::find('all');$this->template->title = 'My Blog about Stuff';$this->template->content = $view;}}And the fuel/app/views/blog/index.php view file:
<h2>Recent Posts</h2><?php foreach ($posts as $post): ?><h3><?php echo Html::anchor('blog/view/'.$post->slug, $post->title) ?></h3><p><?php echo $post->summary ?></p><?php endforeach; ?>This is just a simple loop through the $posts array which contains all your articles.

A foreach loop, a hyperlink and a summary is all we need on this view file and we’ll make another view file to actually see the post. We’ll call this controller method action_view() and make a view file called view.php:
<h2><?php echo $post->title ?></h2><p><strong>Posted: </strong><?php echo date('nS F, Y', $post->created_at) ?> (<?php echo Date::time_ago($post->created_at)?>)</p><p><?php echo nl2br($post->body) ?></p>This is the method for the blog controller:
public function action_view($slug){$post = Model_Post::find_by_slug($slug);$this->template->title = $post->title;$this->template->content = View::forge('blog/view', array('post' => $post,));}The find_by_slug() method is a “magic method” that will build WHERE slug = "foo" in your query and return a single Model_Post instance with that data.

Now people can look at your – horribly unstyled – website and see a basic blog, and you have an admin interface to manage it!
Step 7 - Using the ORM
So far we’ve been using the ORM for our models to do basic CRUD but we’ve not yet seen anything to do with relationships. The ORM makes this incredibly easy as, well it stands for “Object Relational Mapping” for a reason. To set up relationships all we need to do is modify our models a little bit to explain how the ORM should relate the data.
A post is created by one user, so we say it “belongs to” a user. In Model_Post we can add:
protected static $_belongs_to = array('user');The user can post multiple blogs, so we add this line:
protected static $_has_many = array('posts');A quick way to test this works is by firing up the oil console:
Fuel 1.1-rc2 - PHP 5.3.6 (cli) (Sep 8 2011 19:31:33) [Darwin]>>> $post = Model_Post::find('first');>>> $post->user->usernameadmin-- Ctrl + C to exitNice, the relationships work!
Now in the view we can work with $post->user and output their name, so let’s change fuel/app/views/blog/view.php:
<h2><?php echo $post->title ?></h2><p><strong>Posted: </strong><?php echo date('nS F, Y', $post->created_at) ?> (<?php echo Date::time_ago($post->created_at)?>)by <?php echo $post->user->username ?></p><p><?php echo nl2br($post->body) ?></p>Doing things this way is called lazy loading. What basically happens is that when you ask for $post->user the ORM returns the user object based on the contents of the user_id field. This means to get the post and the first user is two queries, getting the second will be a third, etc and so it can end up being very slow with all these additional queries.
To improve performance you can switch from lazy loading to eager loading which basically tells the ORM you are going to be joining users on so it should do it as part of the first query. This can make for one larger query but the ORM will slice it up nicely for you and you wont notice the difference.
$post = Model_Post::find_by_slug($slug, array('related' => array('user')));If you look at the query the ORM produces, it will be something like this:
SELECT <code>t0</code>.<code>id</code> AS <code>t0_c0</code>, <code>t0</code>.<code>title</code> AS <code>t0_c1</code>, <code>t0</code>.<code>slug</code> AS <code>t0_c2</code>, <code>t0</code>.<code>summary</code> AS <code>t0_c3</code>, <code>t0</code>.<code>body</code> AS <code>t0_c4</code>, <code>t0</code>.<code>user_id</code> AS <code>t0_c5</code>, <code>t0</code>.<code>created_at</code> AS <code>t0_c6</code>, <code>t0</code>.<code>updated_at</code> AS <code>t0_c7</code>, <code>t1</code>.<code>id</code> AS <code>t1_c0</code>, <code>t1</code>.<code>username</code> AS <code>t1_c1</code>, <code>t1</code>.<code>password</code> AS <code>t1_c2</code>, <code>t1</code>.<code>group</code> AS <code>t1_c3</code>, <code>t1</code>.<code>email</code> AS <code>t1_c4</code>, <code>t1</code>.<code>last_login</code> AS <code>t1_c5</code>, <code>t1</code>.<code>login_hash</code> AS <code>t1_c6</code>, <code>t1</code>.<code>profile_fields</code> AS <code>t1_c7</code>, <code>t1</code>.<code>created_at</code> AS <code>t1_c8</code>, <code>t1</code>.<code>updated_at</code> AS <code>t1_c9</code> FROM (SELECT <code>t0</code>.<code>id</code>, <code>t0</code>.<code>title</code>, <code>t0</code>.<code>slug</code>, <code>t0</code>.<code>summary</code>, <code>t0</code>.<code>body</code>, <code>t0</code>.<code>user_id</code>, <code>t0</code>.<code>created_at</code>, <code>t0</code>.<code>updated_at</code> FROM <code>posts</code> AS <code>t0</code> ORDER BY <code>t0</code>.<code>id</code> ASC LIMIT 1) AS <code>t0</code> LEFT JOIN <code>users</code> AS <code>t1</code> ON (<code>t0</code>.<code>user_id</code> = <code>t1</code>.<code>id</code>) WHERE (<code>t0</code>.<code>slug</code> = 'women-love-guys-who-use-fuelphp') ORDER BY <code>t0</code>.<code>id</code> ASC
At first this might look insane, but the ORM knows exactly what is going on. Using this approach in the past I have reduced a application from running 300+ queries on a busy page (very slow) down to about 2 (very fast).
Step 8 - Adding Comments
Lots of “make a blog” tutorials stop before they get to comments which I think is a major under-sight. Every blog needs comments and we want to add them quickly so we can go and do something more fun, so we can use code generation to build the admin interface:
$ oil generate admin comments name:string email:string website:string message:text post_id:intCreating migration: /Users/phil/Sites/blog/fuel/app/migrations/003_create_comments.phpCreating model: /Users/phil/Sites/blog/fuel/app/classes/model/comment.phpCreating controller: /Users/phil/Sites/blog/fuel/app/classes/controller/admin/comments.phpCreating view: /Users/phil/Sites/blog/fuel/app/views/admin/comments/index.phpCreating view: /Users/phil/Sites/blog/fuel/app/views/admin/comments/view.phpCreating view: /Users/phil/Sites/blog/fuel/app/views/admin/comments/create.phpCreating view: /Users/phil/Sites/blog/fuel/app/views/admin/comments/edit.phpCreating view: /Users/phil/Sites/blog/fuel/app/views/admin/comments/_form.php$ oil refine migrateMigrated app:default to latest version: 3.
Comments will need some similar tweaks as Post did so make those then we set up the relationships.
Model_User
protected static $_has_many = array('posts', 'comments');protected static $_belongs_to = array('user');Model_Post
protected static $_belongs_to = array('user');protected static $_has_many = array('comments');Model_Comment
protected static $_belongs_to = array('post', 'user');Add a comment through the interface the cheating way, by going to https://localhost/blog/public/admin/comments/create and entering one

Now we can test the relationship in the console again:
Fuel 1.1-rc2 - PHP 5.3.6 (cli) (Sep 8 2011 19:31:33) [Darwin]>>> Model_Post::find(1)->commentsarray ( 1 => Model_Comment::__set_state(array( '_is_new' => false, '_frozen' => false, '_data' => array ( 'id' => '1', 'name' => 'Phil Sturgeon', 'email' => '[email protected]', 'website' => 'https://philsturgeon.co.uk/', 'message' => 'This is an epic article.', 'post_id' => '1', 'created_at' => '1322931744', 'updated_at' => '1322931744', ), '_original' => array ( 'id' => '1', 'name' => 'Phil Sturgeon', 'email' => '[email protected]', 'website' => 'https://philsturgeon.co.uk/', 'message' => 'This is an epic article.', 'post_id' => '1', 'created_at' => '1322931744', 'updated_at' => '1322931744', ), '_data_relations' => array ( ), '_original_relations' => array ( ), '_view' => NULL, '_iterable' => array ( ), )),)
Output of an array of ORM objects is a little verbose, but at least we can see the data. This means the relationship is working nicely, so let’s modify the ORM query in the blog controllers action_view() method to include comments:
$post = Model_Post::find_by_slug($slug, array('related' => array('user', 'comments')));Now update the blog view to output the comments and have a form to add more:
<h2><?php echo $post->title ?></h2><p><strong>Posted: </strong><?php echo date('nS F, Y', $post->created_at) ?> (<?php echo Date::time_ago($post->created_at)?>)by <?php echo $post->user->username ?></p><p><?php echo nl2br($post->body) ?></p><hr /><h3 id="comments">Comments</h3><?php foreach ($post->comments as $comment): ?><p><?php echo Html::anchor($comment->website, $comment->name) ?> said "<?php echo $comment->message?>"</p><?php endforeach; ?><h3>Write a comment</h3><?php echo Form::open('blog/comment/'.$post->slug) ?><div class="row"><label for="name">Name:</label><div class="input"><?php echo Form::input('name'); ?></div></div><div class="row"><label for="website">Website:</label><div class="input"><?php echo Form::input('website'); ?></div></div><div class="row"><label for="email">Email:</label><div class="input"><?php echo Form::input('email'); ?></div></div><div class="row"><label for="message">Comment:</label><div class="input"><?php echo Form::textarea('message'); ?></div></div><div class="row"><div class="input"><?php echo Form::submit('submit'); ?></div></div><?php echo Form::close() ?>This code will output all comments in a very basic style followed by a really simple form using Twitter Bootstrap markup. I’m sure you can whip up some styling for the comments section.

We can see the comment is being output and any that are added will also be put in. So the next and final stage in the process is to get comments saved.
The line with Form::open('blog/comment/'.$post->slug) will set the action to blog/comment/women-love-guys-who-use-fuelphp which means Controller_Blog needs a new method action_comment($slug) which should look something like this:
public function action_comment($slug){$post = Model_Post::find_by_slug($slug);// Lazy validationif (Input::post('name') AND Input::post('email') AND Input::post('message')){// Create a new comment$post->comments[] = new Model_Comment(array('name' => Input::post('name'),'website' => Input::post('website'),'email' => Input::post('email'),'message' => Input::post('message'),'user_id' => $this->current_user->id,));// Save the post and the comment will save tooif ($post->save()){$comment = end($post->comments);Session::set_flash('success', 'Added comment #'.$comment->id.'.');}else{Session::set_flash('error', 'Could not save comment.');}Response::redirect('blog/view/'.$slug);}// Did not have all the fieldselse{// Just show the view again until they get it right$this->action_view($slug);}}Summary
This article skipped a few things like how to set up a pretty URL instead of localhost/blog/public and how to use form validation in the model or the controller, but all of this can be found in the FuelPHP Documentation. I planned to touch on things like File Uploads and Migrations a little more but again this is all documented already.
You should have enough code now to pick apart and play with, and whatever project you choose to work on with FuelPHP already has a blog now – so throw up a splash page, design it and you are ready to make the next SquareFaceTwitBook.
Original Link: http://feedproxy.google.com/~r/nettuts/~3/NpMMwdIZ2D8/
TutsPlus - Code
 Tuts+ is a site aimed at web developers and designers offering tutorials and articles on technologies, skills and techniques to improve how you design and build websites.
More About this Source Visit TutsPlus - Code